by Osprey Photo Workshops & Tours | Apr 21, 2019 | Assateague, Chicoteague, Nature Photography, Photo classes, Photo instruction, Virginia, Wildlife Photography
Photo Opportunities
Chincoteague National Wildlife Refuge & Assateague Island National Seashore

Ospreys can dive to catch fish. Their feathers shed water easily and their talons specifically designed to be able to grab and fly with their catch.
Chincoteague National Wildlife Refuge and Assateague Island National Seashore
Location & Management:
Managed by the US Fish and Wildlife Service, Chincoteague National Wildlife Refuge covers 14,000 acres of beach, dune, marsh, shrub and forest habitats. The majority of the refuge is located on the Virginia end of the narrow, 37-mile-long barrier island of Assateague (Assateague Island National Seashore) just south of Ocean City Maryland. The refuge is managed to benefit wildlife and to protect critical habitat for both resident and migrating species. Birds found on the refuge include ducks, geese, heron, raptors, warblers, and shorebirds plus deer, raccoons, Delmarva Peninsula Fox Squirrels, muskrats, foxes, and otters.

In recent years, there has been a significant drop in the number of migrating snow geese visiting the refuge in the fall. Once reaching nearly 40,000, but today the numbers are much lower. Grabbed this shot several years ago as they landed on the beach. This fall, they were there again this year.
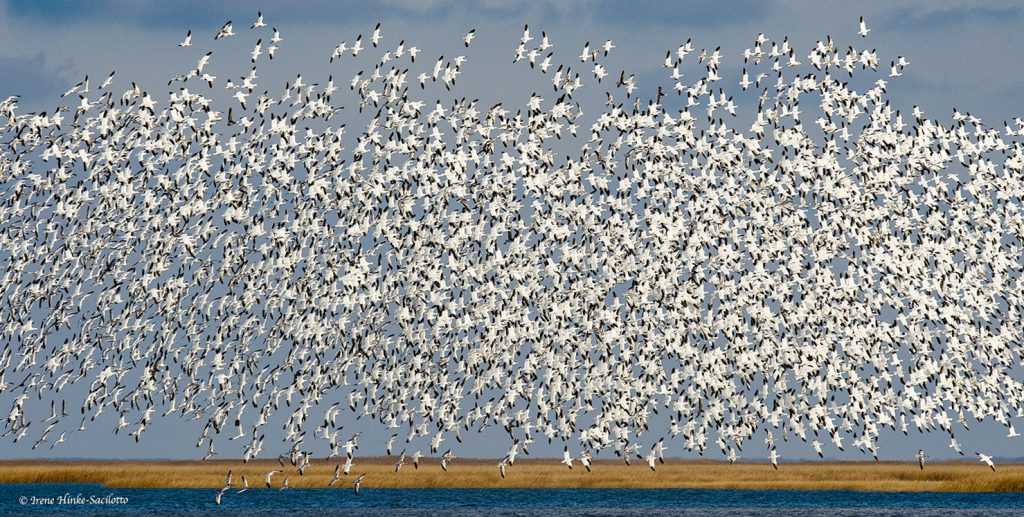
Large numbers of snow geese sometimes stop at Bombay Hook National Wildlife refuge, DE instead of proceeding south to Chincoteague in the fall. This flock circled several times before landing.
A number of impoundments have been created by refuge staff where water levels are managed to provide resting and feeding areas for waterfowl and other species. Some dikes bordering the enclosures are topped with roads adjacent to water-filled borrow ditches where birds congregate. This arrangement offers excellent opportunities to photograph wildlife from your car, steadying your camera on a bean bag or using another means of support. Because the animals are protected on the refuge and are used to seeing people and vehicles, they are less timid than elsewhere and more easily photographed.

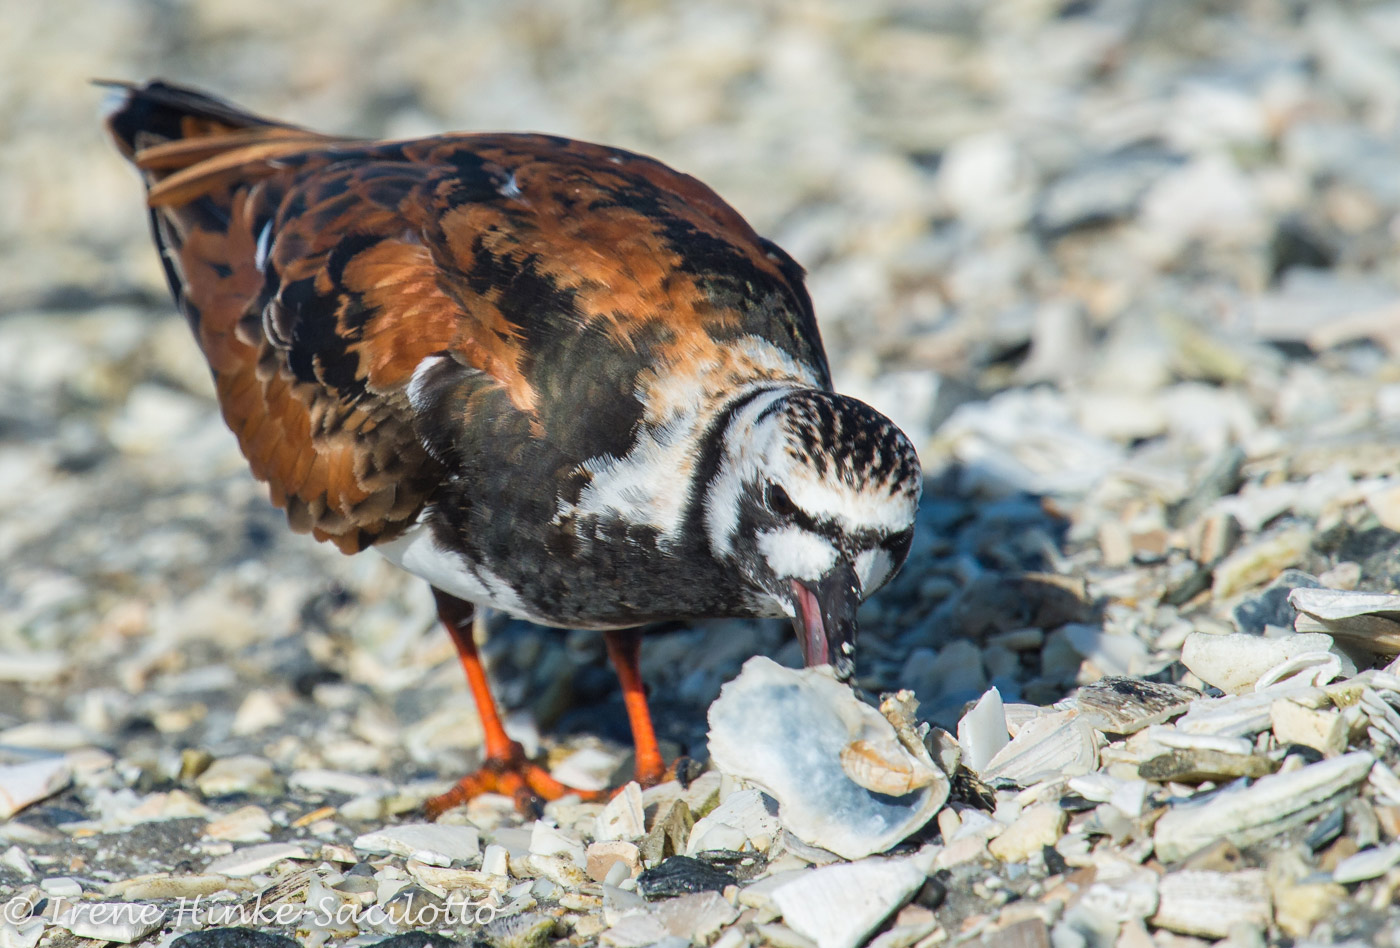
Clapper Rails are secretive birds found in the marshes. They feed at low tide on the exposed mud flats. Rails are often heard before seen.
Wild ponies are a favorite photo subject among visitors. Smaller than standard horses with heavy coats to protect them in this harsh environment. They appear perpetually pregnant with bloated bellies from their diet high in bulk and salt.

New born. Wild pony family.
Constant Change:
As with all barrier islands, the sand shifts with the season and strong storms. The ocean cuts through the dunes sometimes forming temporary inlets. Water-laden sand rolls over the land creating new marsh. With the landscape constantly changing, there are always new and exciting opportunities for photography. No matter when you visit, you will always find something to photograph. Even in the summer when the public beach is packed with people, you can still find photo subjects by venturing out in the early morning and late afternoon when there are fewer people to interfere with your activities.

Once endangered, Delmarva Peninsula Fox Squirrels were transplanted on Chincoteague and now they are often seen at the edge of the maritime forest.
Locating and approaching wildlife:
Spotting animals requires careful scanning of the environment for shapes, tones or colors out of place, and movement. By studying animals, whether photographing or not, you gain insight into their behavior and are better able to capture action shots. Creatures of habit, animals often visit the same locations repeatedly so check these spots on a regular basis. Know your equipment well and be prepared to photograph at any time. Have a suitable camera/lens combination ready with exposure settings pre-set for conditions you are likely to encounter. Once a potential subject is spotted, plan your approach. Consider the lighting, background, subject temperament, and the animals direction of movement. If it is following a predictable path, move slowly and indirectly to position yourself where it is heading. Be careful not to cause it to alter its behavior. Rapidly moving directly towards the animal will normally causes it to flee.

I watched the direction the fox was moving and carefully position my vehicle on the shoulder of the road at a distance in front of where I thought it was going. I made sure the warm afternoon light was illuminating its beautiful red coat

After hearing its distinctive call, I spotted this Belted Kingfisher on one of its favorite branches. As I positioned my camera, it plunged into the water and emerged with a small crab in its bill before returning to its perch. To capture various poses of the bird as the bird struggled to consume the crustacean, I held down the shutter release button and repeatedly fired a series of shots using a high number of frames/second.
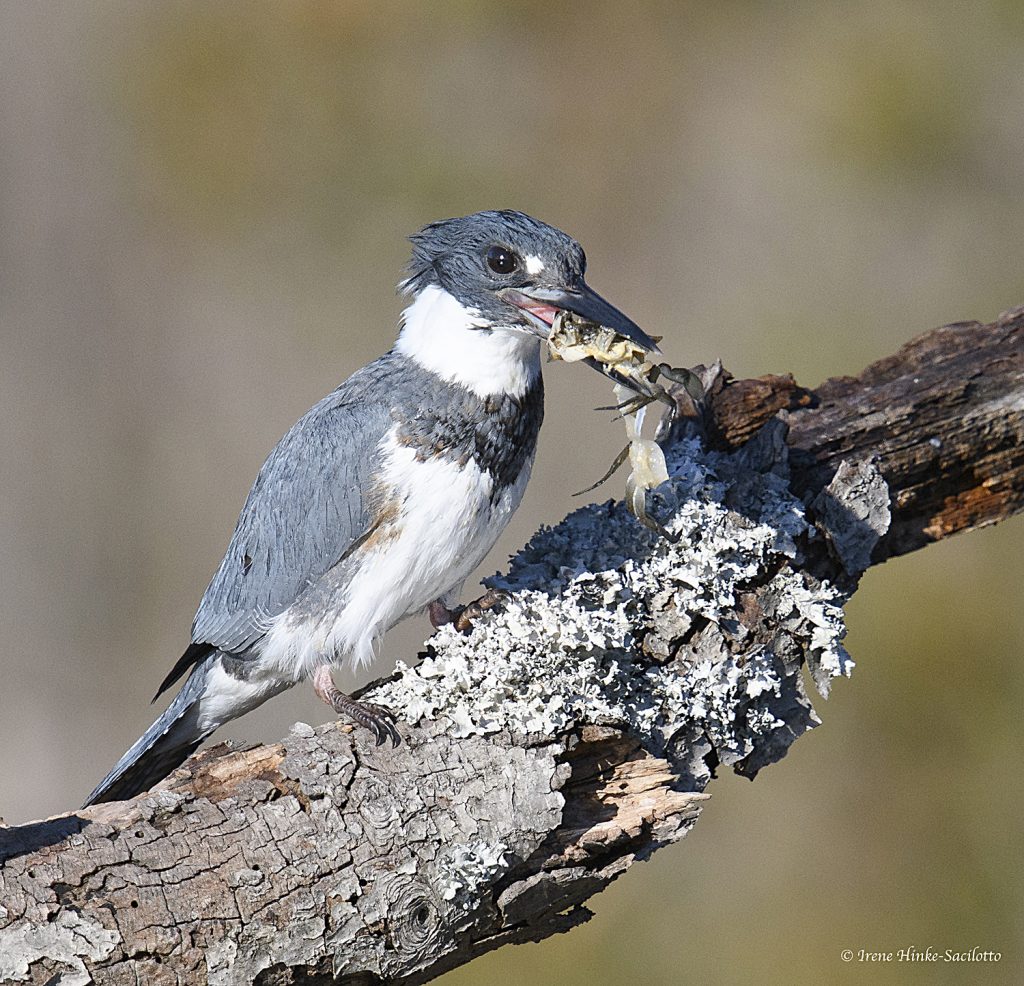
Shot from my car with my Nikon D850 camera and 600 mm lens resting on a bean bag. Settings: ISO 800, F10, and shutter speeds approximately 1/2000 second.
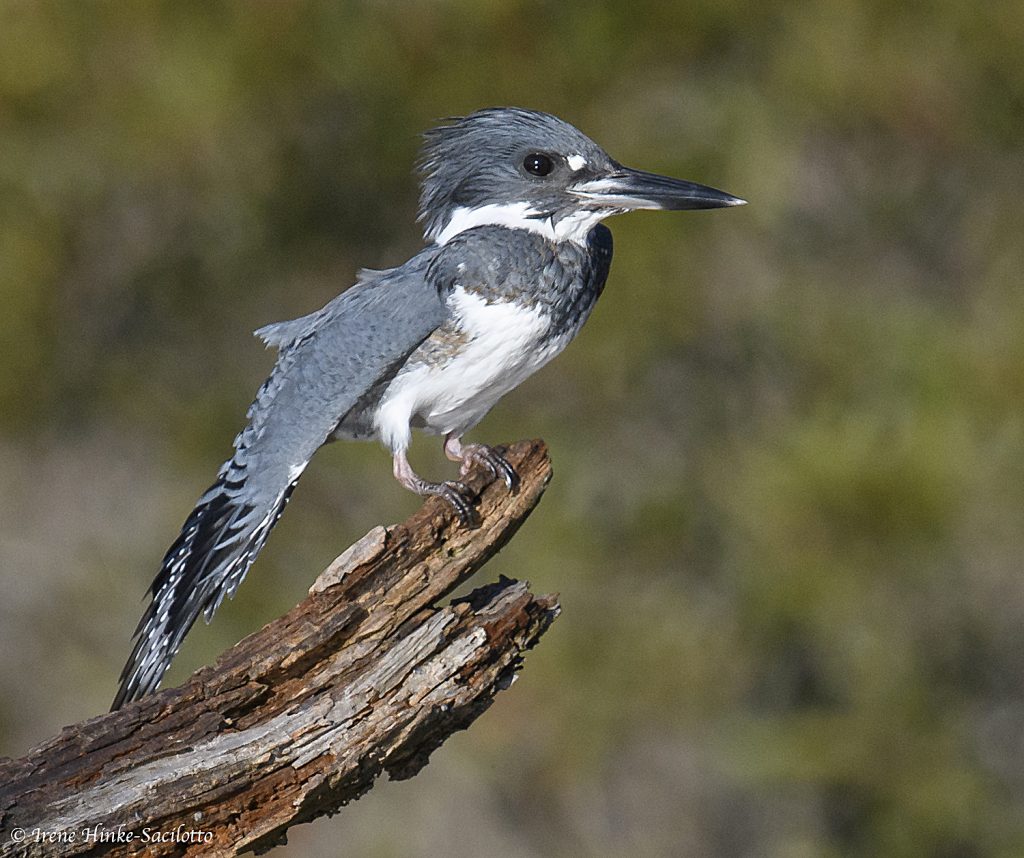
Belted Kingfisher stretched wing just before it dove after fish.
Suggested lenses and other gear:
- A wide-angle for beach scenes, flocks of birds, and sunrise/sunsets and perhaps a 80 to 200 mm zoom lens to isolate portions of the scene.
- A 300, 400 or 600 mm telephoto for small or timid subjects such as shorebirds. It is preferable to buy long lenses that have collars for mounting on a tripod. This makes it easier to handle the camera/lens combination and it allows for quick adjustment of orientation from horizontal to vertical or in-between.

To spot animals, I look for movement. This Cedar Waxwing was part of a flock attracted to the berries. Shot with my 600-mm lens.
- A 1.4 tele-converter to extend the effective focal length of your primary lens for photographing small subjects. Note: The tele-converter reduces the amount of light reaching the sensor, cutting shutter speeds in half. For best image quality, buy one matched to your prime lens.
- A 200-mm macro lens for close focusing and high magnification when photographing a shell, insect, or flower. Compared to shorter macro lenses, with the 200-mm lens, you can obtain the same magnification at a greater working distance from your subject–a benefit if photographing something timid such as a ghost crab.
- Other gear: An electronic shutter release to prevent camera shake when using long exposures or high magnification. A polarizing filter to remove unwanted reflections and shine on surfaces of vegetation intensifying colors. Depending on the angle of the sun, it can also make the sky appear bluer. You might want to include a neutral density filter that reduces the amount of light entering the lens in order to create special effects by using slow shutter speeds to suggest motion of moving objects – the surf, the wings of birds, etc.

The lighting and pose made this photo of a Great Blue Heron special. Shot in the early AM.
- A sturdy tripod, preferably without a center post for maximum stability when using long telephoto lenses. The tripod should be topped with a professional ball head that can easily support the weight of your camera/lens combination or with a Wimberley Head (gimbal) which is preferred by many photographers for manipulating large lenses and tracking animals and birds.
- If shooting on the beach, the wind off the ocean can be fierce and unpredictable, so never walk away from the tripod. Also, watch where you place your camera gear since an incoming wave can swamp your equipment or worse, wash it away. When around blowing sand or dust, shield your camera when changing lenses to avoid particles entering the throat of the camera and making their way to the sensor resulting in dark spots on your images.

Willet picking up mole crab. Shorebird behavior is often predictable. They follow the edge of the surf, probing for organisms as waves retreat.
Useful tips:
- By having with you two cameras mounted with different lenses when in the field, you can avoid changing lenses in the open and can more quickly switch from one focal length to another.
- When on the beach, wipe or brush the sand off your tripod legs with a damp cloth to prevent particles and salt from entering the joints between tripod segments and making it difficult to adjust the tripod’s height. You can buy or create water-proof tube covers for the lower legs to minimize sand-related problems and to allow you to submerge the legs in the surf.
- If visiting in the spring, summer or early fall, bring insect repellant to guard against mosquitoes, biting flies, and ticks potentially carrying Lyme disease. Reads more on CDC’s website. https://www.cdc.gov/lyme/prev/on_people.html
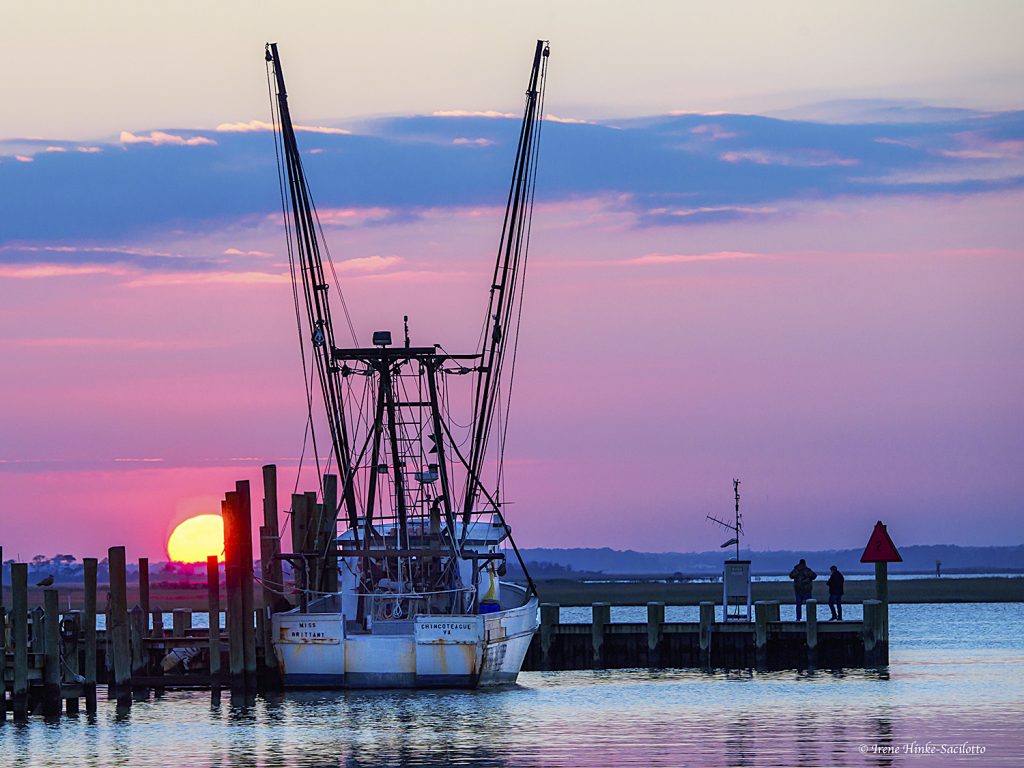
Adjacent to the refuge is the town of Chincoteague with a small boat harbor. Sometimes loons are found here. It is also a good place to photograph sunset.

by Osprey Photo Workshops & Tours | Apr 8, 2017 | Flower Photography, Garden Photography, Longwood Gardens, Nature, Nature Photography, Photo classes, Photo instruction, Photo Technique, Photo Workshops
Photography at Longwood Gardens
in the conservatory
and for similar conditions elsewhere as in a greenhouse
Close-up Photo Tips
Next photo workshop featuring flower photography – 14-15 April at Norfolk Botanical Garden. For info, see my website www.ospreyphoto.com or http://norfolkbotanicalgarden.org To register call (757) 441-5830
Introduction to Photography at Longwood Gardens
A legacy left by Pierre du Pont, Longwood Gardens consists of over 1,077 acres of indoor and outdoor gardens with fountains, reflecting pools, flower beds, woodland trails, and meadows. Located near Kennett Square, Pennsylvania, in the Brandywine Creek Valley.
The 4-acre indoor Conservatory of Longwood Gardens houses plant displays that are varied throughout the year. It is divided into climate-controlled rooms representing various climates and plant species from around the world. My favorite is the orchid room, filled with species from all over the world, varying in color from red to black, with some shaped like lady slippers and others resembling insects. At any time during the year the display showcases 200–300 of the 6,200 orchids housed at Longwood Gardens.

Orchid Arch
Depth of Field (DOF) Issues
The more you magnify your image, the shallower the depth of field in the photo, i.e. the amount of scene that is sharp in front and behind the point of focus (1/3 in front and 2/3 behind). With high magnifications, you can increase the depth of field slightly by selecting a higher f-number (smaller lens openings) but with extreme magnification this may have only have a marginal effect. You may opt to use less magnification to gain depth and then crop the image during editing to exclude the unwanted surroundings.
A shallow depth of field is not necessarily a bad thing and can be helpful to isolate the subject and keep the background from becoming a problem by being well defined. Isolation of the subject in this fashion is particularly effective if the background is at a distance and you are shooting eye-level with the subject. But shallow DOF can be a problem if the subject you wish to photograph has depth and you wish to capture detail front to back.

Orchid – photo focused on internal parts
Flat Surfaces
When photographing patterns on a leaf or a group of multicolored leaves or flowers, you need to have the face of the lens parallel to the surface to have all portions of the scene within the DOF. To photograph from above a pattern created by a group of leaves or flowers, select a section of the scene where the vegetation is of nearly equal height and distance from the lens. A cell phone with built in camera can have an advantage here because it can be more easily positioned at the desired angle over the subject without the constraints of a tripod or the weight of a heavy camera/lens system.

Leaves shot with i-phone

Purple pattern
Manual Focus
Manually focusing your lens allows you to precisely select the part of the scene you wish to be sharp. With some lenses, manual focusing allows you to focus closer to the subject than when using autofocus. This slightly increases the magnification possible with that lens.
Stacking
George Lepp and others have used the technique of stacking to sharply capture each layer of a subject, controlling what is, and is not in focus. This requires taking multiple images of a stationary subject at different but overlapping points of focus and using software such as Helicon Focus. The technique can be used with macro and landscape subjects. For details, see George Lepp’s article in Outdoor Photographer Magazine. http://www.outdoorphotographer.com/tips-techniques/photo-editing-tips/unlimited-depth-of-field/

Orchid Pair
Distracting Backgrounds
It is easy to be caught up with the beauty of a flower or other subject that you ignore obvious distractions in the background. For a photograph to be successful, it is important that the viewer can immediately identify the subject. Anything that directs the eye away from it should be avoided. Such distractions can be particularly troublesome in the conservatory on sunny days. Carefully examine the image in your viewfinder looking for bright or colorful vegetation behind the subject, shiny objects, lights, hot spots from sunlight striking the background, shadows from overhead struts supporting the greenhouse glass, and object appearing to grow out of your subject. If close to your subject, make sure your own shadow is not falling on a portion of it.
Because of the shallow depth of field common with high magnification, you may have a difficult time recognizing distractions behind the subject. One trick to avoid this issue is to temporarily shift the focus of the lens from your subject to the background in search of potential problems – bright areas, shiny objects, strong forms, bright colors, etc. Note possible distractions and then refocus on the subject, keeping these observations in mind. If necessary, move or recompose your image to avoid the offending items.

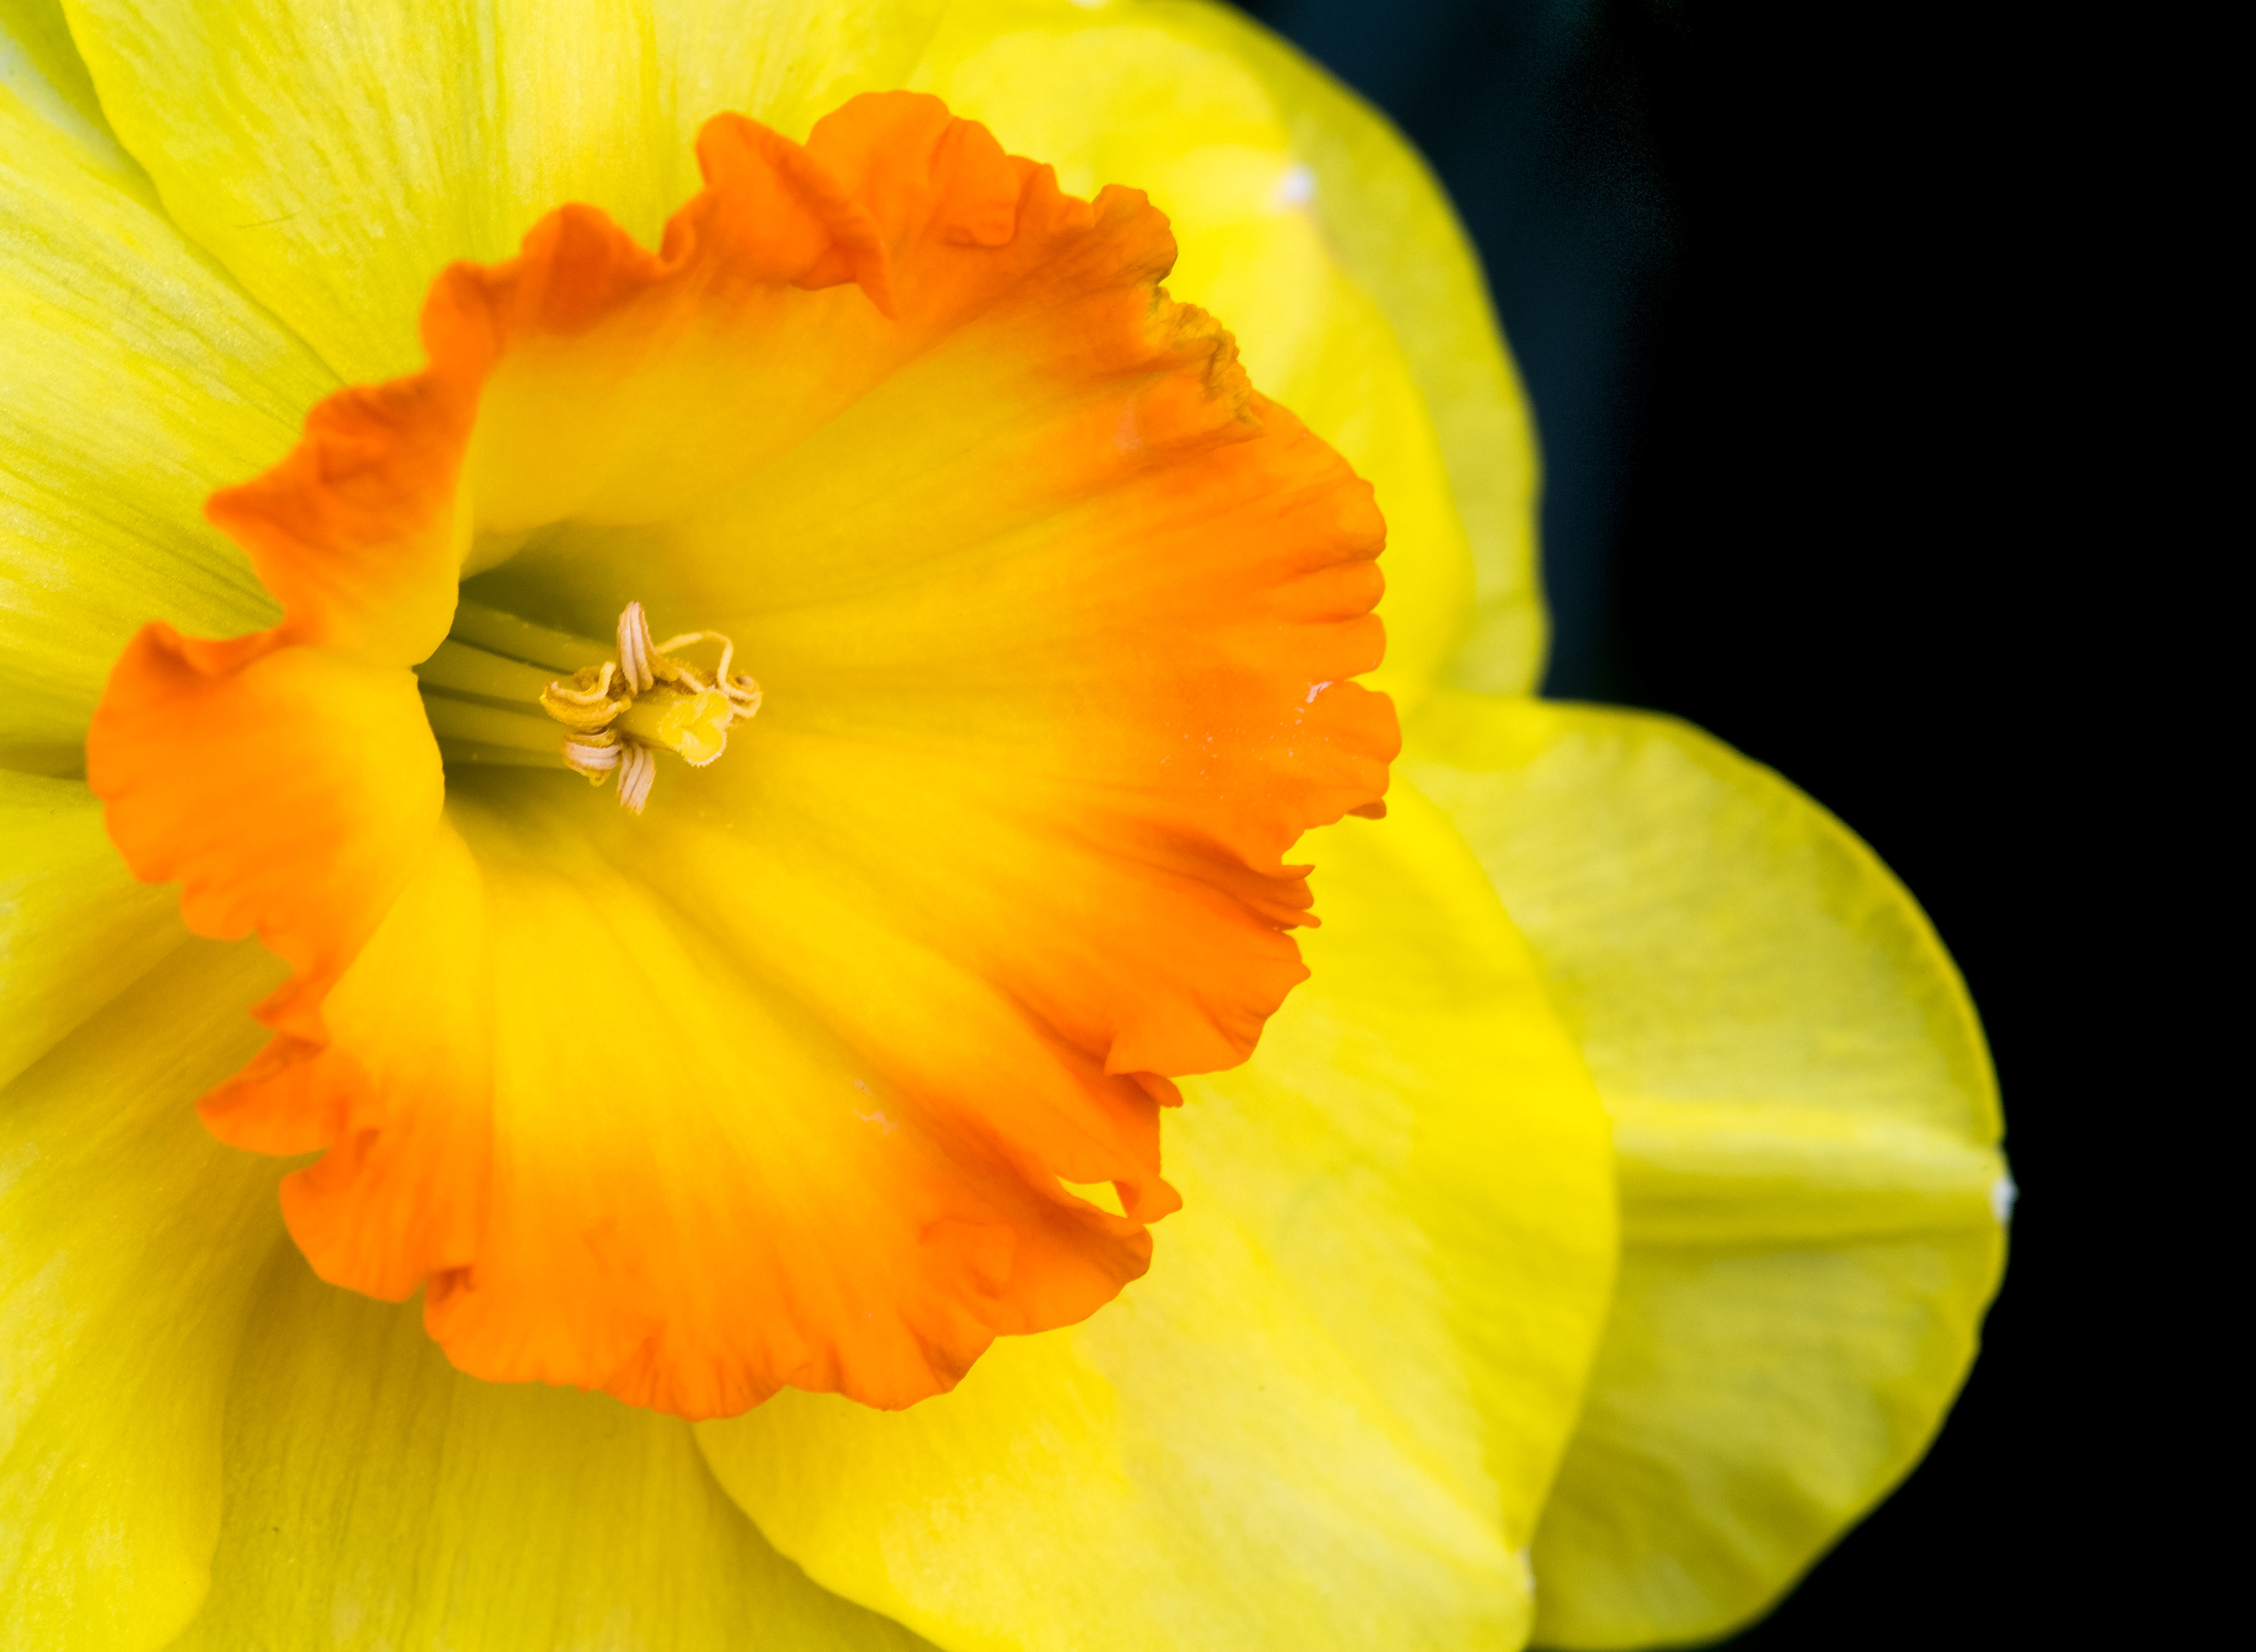
Jonquil
Visualization
Take the time to visualize your final results. When approaching a subject, always identify what drew you to it initially. Was it its color, abstract patterns, shape, texture, etc. Consider the best lighting and depth of field to emphasize these features. Adjust the f-stop and position the camera accordingly.
Light
Low light can be an issue in the conservatory in areas heavily shaded or on overcast days. High ISO settings on your camera may be required so select your camera that has the best response under these conditions. With many cameras, ISOs higher than 400 are accompanied by noise that reduces image quality and appears as random specs of color and/or something similar to film grain. In your shooting menu, you may have special settings to improve performance at high ISOs or when using slow shutter speeds. Turn them on but don’t forget to turn them off when conditions change. Avoid under exposure since noise becomes more evident as you lighten the exposure. Noise is the most noticeable in dark areas of the image and if the image is underexposed. Editing programs such as Adobe’s Lightroom and software plug-ins provided by Nik and Topaz can help reduce the appearance of noise without compromising image sharpness.
Playback Display Options
In your playback menu on your camera select display options that help you recognize exposure problems. Turn on the histogram and highlight indicator that shows where the image is overexposed and detail lost.
Wires and Sticks
Plants on display are often supported by wires or sticks, so try to avoid capturing them in the photo. This may require changing your shooting angle or magnifying the subject to better isolate the most interesting aspects of the plant. Consider using an editing program such as Adobe’s Lightroom, Photoshop Elements or Photoshop CC to remove the offending object using clone or healing brush tools. In the Lightroom program, you can also use the adjustment brush to lighten or darken areas, open up shadows, and control contrast, sharpness, saturation, etc. The spot removal tool can be used to cover problem areas.
Have fun. The orchid image below was oversaturated intensionally during editing for a bazar artistic effect. I struggled to keep a window sill out of the photo so I avoided it by filling the frame with the subject.

Orchid – High Saturation
Spot-lighting
If the subject is in the sun or is back-lit and background is busy, search for an shadowed area that can be positioned in the frame behind the subject. If no natural shadow is present, have a friend cast a shadow over the offending area or create one of your own.
Polarizer Filter
Mounting a polarizer on your lens can remove reflections from the surface of leaves, water, windows, and make the sky appear bluer. To use one, rotate the outer ring until you remove the offending glare. However, they remove a component of light resulting in slower shutter speeds for the same f-stop, There are warming polarizers that some people prefer to reduce the blue in the image.

Orchids part of Orchid Arch
Lenses
There are applications for any lens from wide angle to telephoto in the garden; however, for flowers close-ups, macro lenses are the most versatile. They are designed for high magnification and are extremely sharp edge to edge with low image distortion. Compared to a standard lens, they able to focus on subjects at a closer distance and thereby magnify the image. Many can reach a magnification of 1:1without accessories. They come in different focal lengths with the 105 or 200 mm lenses being my favorite. The shorter lens has vibration reduction and is easier to handhold but I prefer to use a tripod for stability when possible. The longer focal length lens has a narrower angle of view making it easier to alter the background with slight shift in position. They also offer a greater working distance from the subject. This helps prevent your shadow falling across the subject. Also with live subjects, the greater working distance increases the chance that the subject will not be alarmed and not flee. With a dangerous subject, the extra room provides a safety zone. My 200 mm Nikon Micro-Nikkor lens comes with an adjustable collar around the lens so you can mount the lens on a tripod directly, providing better balance and stability. The collar (see image below) also allows you to easily rotate the camera orientation from horizontal to vertical or in between without having to adjust the tripod or detach the camera from the tripod. The down side to macro lenses is that they are more expensive than standard lenses.
Macro-Zoom lenses have the ability to focus closer to the subject than a standard lens but often they do not have the magnification power of a “true” macro lens and the image quality is often not as good. But they do offer a lot of versatility from one lens.

Colar for 200 mm macro lens
Extension Tubes & Close-up Filters
As an alternative for close-up photography, consider purchasing a less expensive set of hollow extension tubes (see image below) that fit between the lens and camera body and allow you to focus closer to your subject than with the lens alone and thereby increase magnification. With no glass involved, the images obtained are quite sharp. Another low-cost alternative is using close-up filters that mount on the front of your primary lens. The resulting images are not as sharp as with the other options but are suitable for aesthetically pleasing images. A tele-converter can also be useful when you cannot get very close to your subject. They increase the magnification of your primary lens without changing your position.

Extension Tubes
Movement Issues:
When using high magnification, movement of the subject or camera is exaggerated and can be detrimental to image quality particularly when using slow shutter speeds. Tripods and monopods help you steady the camera. They are allowed in the garden most of the year but their use is limited in the conservatory. You must obtain a permit to carry it at the info desk near the main entrance to the gardens (Some conditions apply for use, so see Longwood’s web site for guidance). Tripods are not permitted during times of high visitation, particularly during the Christmas season. They can only be used in the conservatory until noon and cannot be used in the Children’s garden. Be considerate of other visitors since the narrow paths can become quite crowed as the day progresses and for popular exhibits.

Hybrid Lilly
More on Tripods
Tripods are useful for more than serving as a stable platform for the camera. With the camera supported on a tripod, it is easier to carefully examine the image in the viewfinder and on the LCD screen for issues related to composition, image sharpness, or background distractions. In the playback mode, consider using your camera’s magnifier for more critical view of image sharpness and depth of field. I frequently use a Hoodman or similar loupe over the LCD when reviewing images in the field. It excludes external light so you can more accurately judge what was captured.
It is wise to invest in a good tripod suited to your needs. Those with legs made with strong carbon fiber are lighter and easier to transport. If you have the opportunity, take your heaviest camera and lens to a pro camera shop such as Service Photo in Baltimore and test various tripods with your set-up. Using an unsteady, cumbersome tripod can be worse than using none at all. I recommend using a ball head mounted directly on the tripod for most applications.
At times, using a tripod can stifle creativity. Often you mount the camera on the tripod, walk around the subject a little, plant the tripod in one spot, and never move it again. Try exploring camera angles without the camera mounted on a tripod. Once you have decided on the best approach, they add the tripod for support.

Orange Stamens
Unwelcomed air movement
Be sensitive to subject movement caused by environmental conditions. The conservatory’s fans, that help regulate climate conditions in each room, circulate air and create drafts that can cause leaves and flowers to move during exposure. Similarly the movement of people passing nearby or opening a door can also generate an unwanted breeze. Be aware of the potential problem and wait for a lull in the motion before taking your photo. To maintain a still camera when taking a photo, use an electronic cable release.

Mark & Adam
More Than Just Flowers
Flowers are photographically intriguing but don’t ignore the garden’s water features, the conservatory’s architecture, and aspects of the plants other than the blooms (the leaves, buds, seeds pods, vines, fruit, etc.). Since the conservatory is quite large, I suggest deciding on specific goals for your visit, perhaps specific rooms, flowers, or techniques. Have fun and experiment with unusual camera angles, abstracts designs, or special effects created by intentional camera movement. Visit local gardens, your own backyard, a nearby meadow, or even a florist shop to improve your skills and creativity.

Tile in Children’s Garden

Umbrellas Suspended from Ceiling

Art Deco Decor in Ballroom of Conservatory

by Osprey Photo Workshops & Tours | Mar 4, 2017 | Digital Photography, Nature Photography, Photo classes, Photo instruction, Photo Tour, Photo Tours, Photo Workshops, South Dakota, Travel, Wildlife Photography
Badlands National Park Spring Escape
June 4 – 9, 2017
With trip leaders – Sandy Zelasko & Irene Hinke-Sacilotto
SOUTH DAKOTA – Photography Tour
sponsored by

in conjunction with

“Eat more flowers”
INTRODUCTION
During this South Dakota photo tour, we will explore Badlands National Park and locations in the vicinity. On most days, we will be in the field at dawn to take advantage of the early morning light. Likewise, we will end each day’s activities at sunset. When the sun is low in the sky, the light accentuates the relief and texture of the land. Colors are warm and the contrast soft, so details are not hidden by the dark shadows present at noon-time. At dusk and dawn, animals are more active and easily located. We will reserve mid-days for rest, reflection, image transfer, and travel between locations. There will be a variety of photo opportunities, including both scenery and wildlife.

Badlands Formations
BADLANDS NATIONAL PARK, SOUTH DAKOTA
Once the site of an ancient sea, the South Dakota Badlands have been transformed over thousands of years into the land you see today. Layers of sediment and ash were eroded away leaving behind multi-colored rocks and boulders balanced on pedestals of stone. Eroded canyons and isolated buttes stand as testament to the power of the wind and rain. At first glance, the land seems sterile, yet close examination reveals a variety of creatures. Agile bighorn scale steep canyon walls. Pronghorn and buffalo graze on the succulent prairie grasses while hawks circle overhead. A loop road travels through the northern portion of the park providing easy access to unusual geologic formations and favorite wildlife haunts.
An active prairie dog town lies along Sage Creek Rim Road. The colony’s occupants are enjoyable to watch and photograph as they groom, nibble on grasses, and romp playfully with their siblings. Now and then a shrill alarm call ripples across the colony warning of a potential intruder — perhaps a badger or coyote in search of a meal.
South of the Sage Creek area in the second unit of the park is Sheep Mountain Table. At the base of the plateau are formations with rocks balanced on limestone pedestals. A rough dirt road climbs to this high, flat plateau which is isolated from the surrounding terrain by deeply cut canyons. On top, the views are spectacular. Dirt roads extend like fingers to a variety of vantage points on the rim of the table. (access is dependent on road conditions at the time)

Wild Turkey

Bighorn Ram

by Osprey Photo Workshops & Tours | Apr 27, 2015 | FlowerPhotography, Nature Photography, Photo classes, Photo Technique, Photo Workshops, Wildlife Photography

NEW ….. Garden Photography Class
Lilypons Water Gardens (Field Trip)
23, 27, 30 Jun, 7 Jul 2015
with Irene Hinke-Sacilotto
Classroom @ Y in Abingdon, MD: 23 & 30 Jun, 7 Jul 2015 (630 – 8:30 PM)
Field practice @ Lilypons: 27 Jun 2015 (Saturday 8:00 – 11:30 AM)
Date for the field trip was selected because it is the best time to see lilies and lotus blooming at the same time. Garden is located near Frederick, MD. (Max number of participants – 6)

With exotic flowers in attractive surroundings, Lilypons Water Gardens offers you a wide range of subjects to photograph. Although designed to showcase lilies, lotus, and other aquatic plants, the gardens include terrestrial favorites — iris, cone flowers, ornamental grasses, flowering shrubs, black-eyed susans, and other colorful blooms. Some gardens are accented with ornamental waterfalls, fountains, and statues. These and other decorative touches add interest, perspective, and a sense of motion to the images. The gazebo reflecting in a lily pond is my favorite. In addition to their aesthetic appeal, the gardens provide opportunities to photograph wildlife drawn to the water, shelter, and food. Common visitors include an assortment of insects, birds, frogs, turtles, snakes, deer, fox, muskrats, raccoons, and squirrels.

Topics of discussion include: equipment selection, composition, lighting, exposure, creative design, and perspective. Field practice @ Lilypons Water Gardens. Classroom sessions are at the Ward Center, Y of Central Maryland, Abingdon, MD. (Based on Digital SLR cameras)

Directions to Lilypons – near Frederick, MD. Take Route I-70 and follow Route 85 south through Buckeystown until you see Lilypons Road. Turn left; cross the bridge; and turn into the entrance to Lilypons Water Gardens on the left. Proceed to the parking area. (Approximately 2 hours from Baltimore).
Register with the Y of Central MD, Abingdon, MD
http://ymaryland.org/locations/familycenterys/wardharfordcounty
410-679-9622