
by Osprey Photo Workshops & Tours | Aug 22, 2016 | Brazil, International photo tours, Nature Photography, Pantanal, Photo Tours, Wildlife, Wildlife Photography
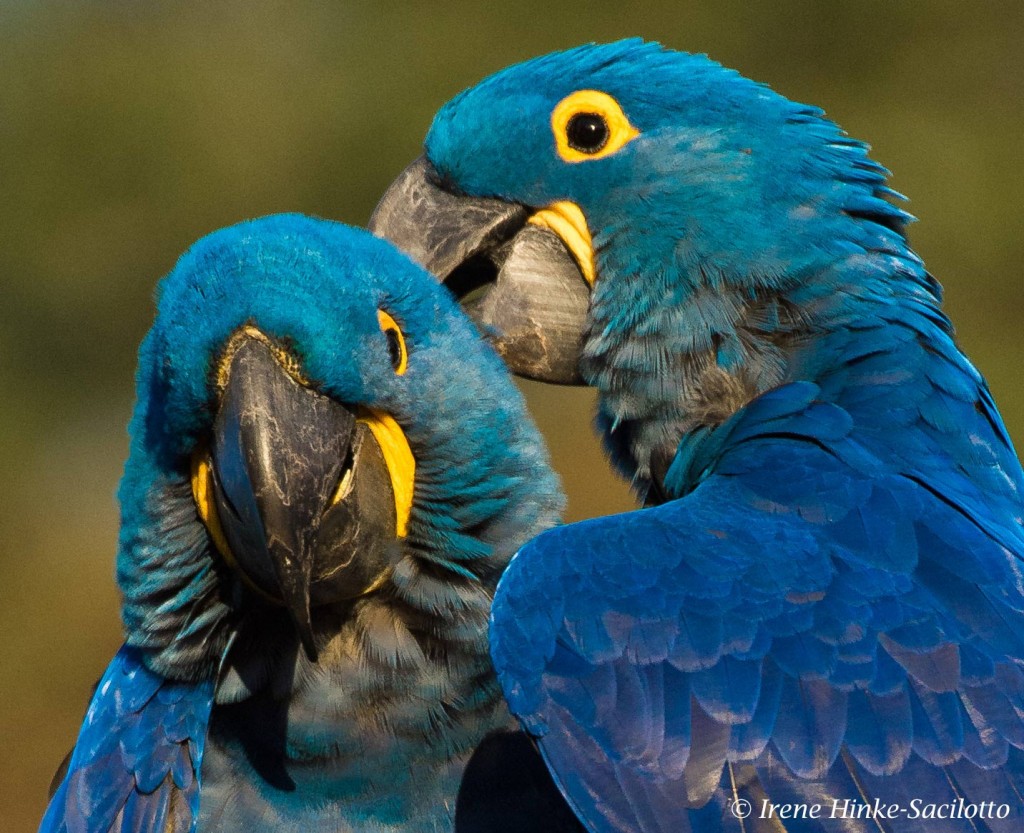
Hyacinth Macaw
The Pantanal of Brazil is a UNESCO World Heritage Site. Why is it unique?
The majority of the Pantanal is located in Brazil with smaller portions in Bolivia and Paraguay. It covers 81,000 square miles, with the Bazilian portion in the states of Mato Grosso and Mato Grosso do Sul
The Pantanal is huge gently sloping basin and the largest seasonally flooded tropical wetland. It is10 times the size of the Everglades and is a mosaic of habitats created by water with distinctive wet and dry seasons. 80% is submerged during the rainy season, the months November through March. The nutrient rich floodwaters deposit sediments that enrich the soil and create a fertile environment capable of supporting highly diverse collection of plant and animal species. It’s home to some of the rarest animals on earth–the jaguar, marsh deer, giant river otter, hyacinth macaw, crowned solitary eagle, maned wolf, giant anteater, South American tapir, yellow anaconda, and yacare caiman. They share the habitat with howler monkeys, capybara, toucans, parrots, iguanas, armadillo, tegu lizards and other wildlife. It is estimated that there are more than 3500 species of plants, thousands of invertebrates, and hundreds of bird, mammal and reptile species.
In addition to benefiting wildlife, the Pantanal is important for flood abatement, water purification, recharging ground water, climate stabilization, and serving as a nursery for aquatic life.
Wet Season: The rainfall is approximately 1,000–1,400 mm (39–55 in) per year. But the majority of the water comes from runoff from the surrounding upland areas including the Paraguay River and its tributaries flowing from the surrounding plateau. As water levels rise, these rivers inundate the Pantanal’s grasslands and gallery forest, creating a vast temporary wetland bounded by dry and humid forests, grasslands, & savannas. During the rainy season water level rises 2 to 5 meters.
Dry Season: May to late November is considered the dry season in Pantanal, and the water level drops dramatically. In November, very little of water persists except in some ponds and permanent rivers and streams. Tourists visit primarily June through Oct. The average temperature in the Pantanal is 25 °C (77 °F), but temperatures can fluctuate from 0 to 40 °C (32 to 104 °F).

Black Hawk
Access:
The main gateways into the Pantanal are the cities of Cuiabá (capital of the state of Mato Grosso) and Campo Grande (Capital of the state of Mato Grosso do Sul).
The Transpantaneira Highway is an elevated 160 km long dirt road. With dozens of bridges, many of them wooden, it crosses the Pantanal over savannahs, lakes, seasonal streams, rivers, lagoons, marshes and shrub wetlands until finally reaching the Cuiabá River where it ends at Porto Jofre. Along the way, there are many opportunities for roadside photography of wildlife.
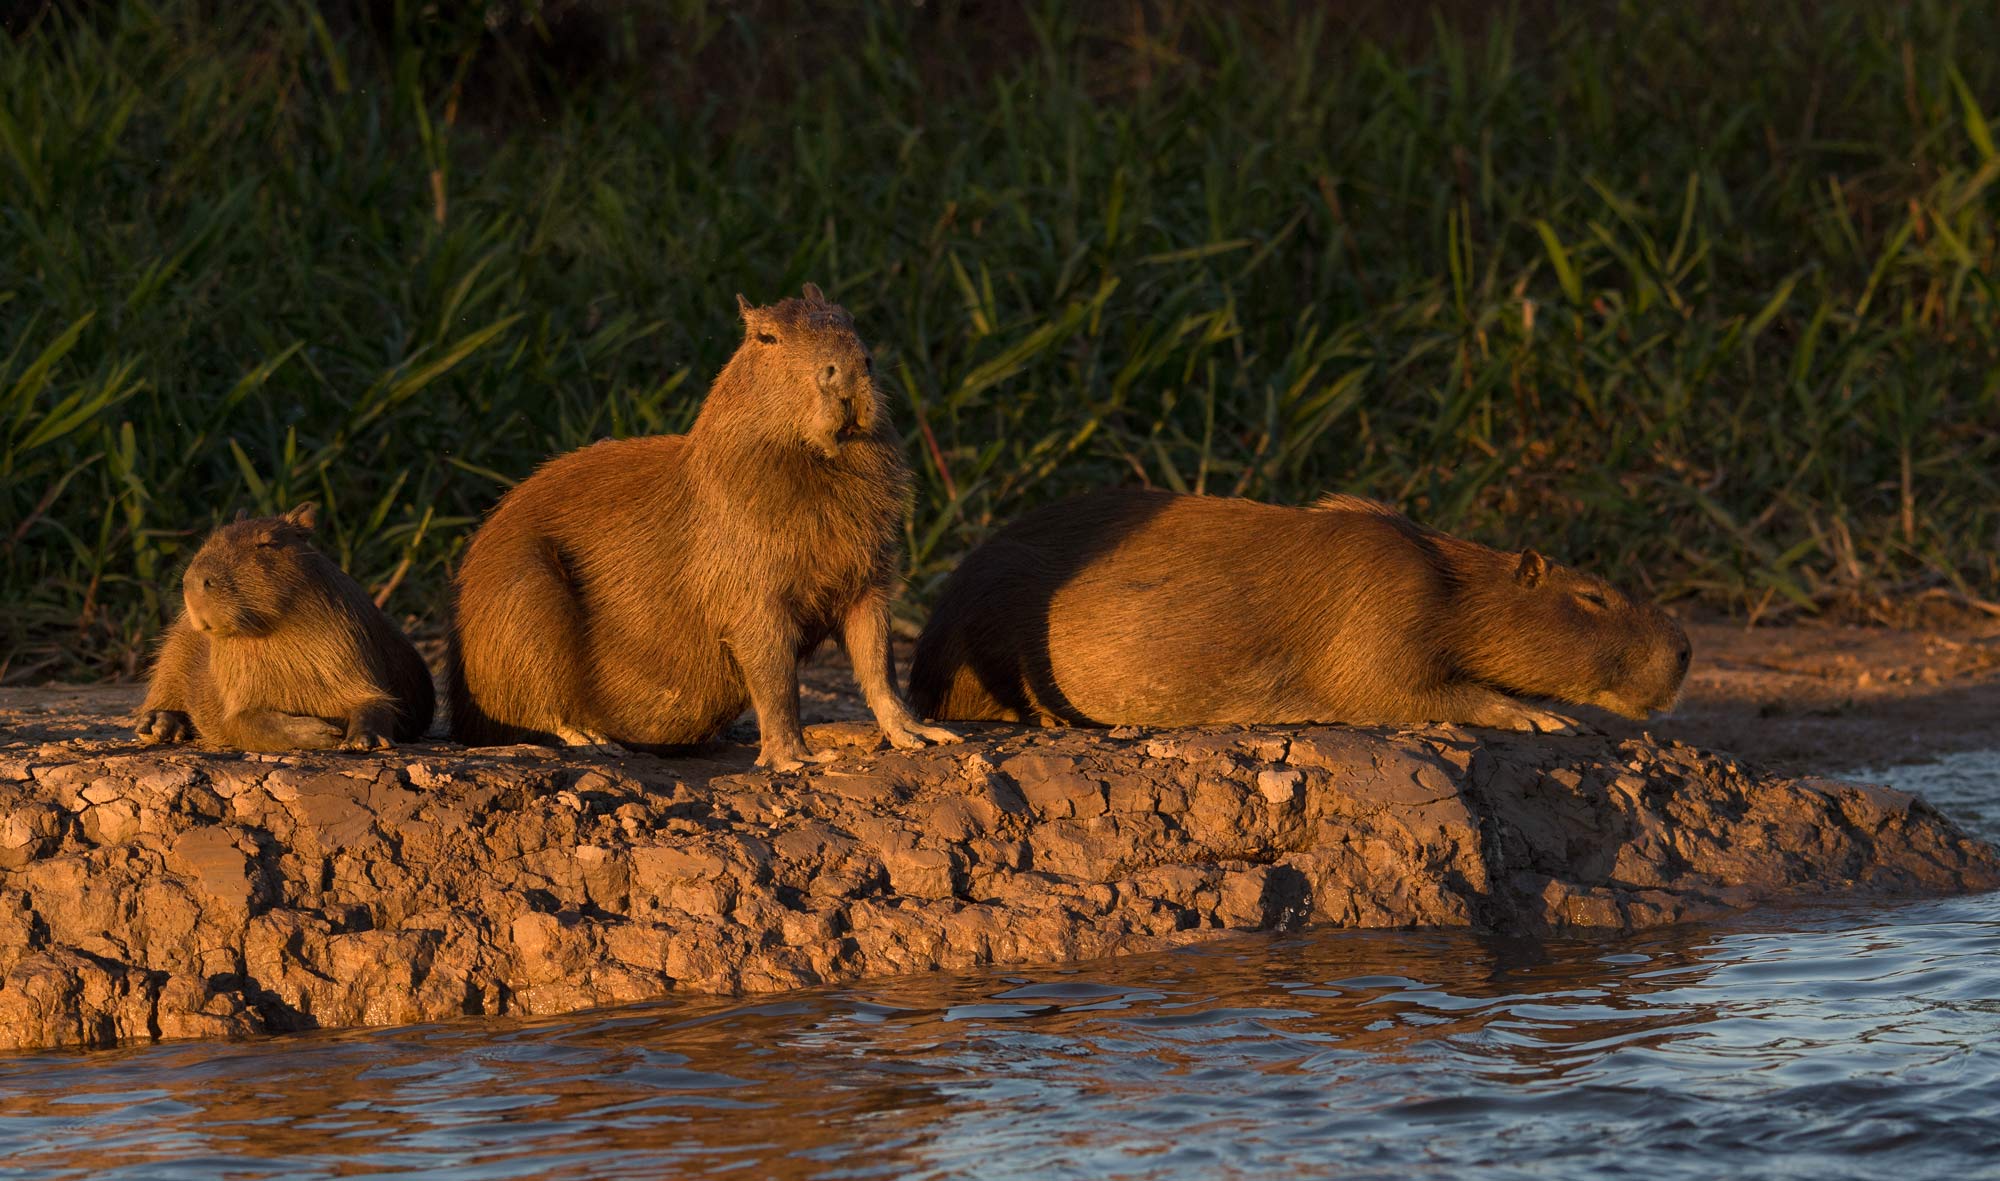
Capybara
Economy: The economy of the area is based on cattle ranching, agriculture (rice, soy beans, corn, sugar cane, etc.), agroindustries, mining (gold, diamonds, iron, manganese), professional fishing, sportfishing and eco-tourism.
Concerns: Approximately 99 % of the Pantanal is privately owned with thousands of ranches (fazendas) and 8 million cattle. Current threats to the ecosystem include hunting, poaching (exotic species trade), pesticides from agricultural runoff, pollution from sewage and mining, and infrastructure development effecting hydrology. But compared to the Everglades, it is relatively untouched despite the lack government protection.

Giant River Otter eating fish.
by Osprey Photo Workshops & Tours | Jun 22, 2016 | Bird photography, Brazil, Canadian Rockies, International photo tours, Nature Photography, Photo Workshops, Travel
Tips for International photo tours. Preparation.

Arctic Tern
Documents
If you don’t have a passport you will need to apply for one to visit countries outside the U.S.. If you have one already, check the renewal date several months before departure to be sure it covers the dates of travel. For passport info visit https://travel.state.gov/content/passports/en/passports.html
For visa requirements for the country to be visited, go to the country’s consulate website for requirements and fees. In the past I have successfully used a visa service called Travisa, www.travisa.com in the past and recently recommended them to a friend who also employed their service. In all cases, they were quite helpful answering questions about the visa process and application and review your application before delivering them to the respective embassy. Since you are sending your passport to them to hand-carry to the country’s embassy in Washington, D.C. and returning the documents to you, it is critical that the service is reliable.
Travel Alerts
Check the following websites, US State Department website (www.state.gov), the CDC http://wwwnc.cdc.gov/travel and the World Health Organization (http://www.who.int) for travel advisories for the regions to be visited. The state department site has passport forms and other travel info as well as a convenient travelers check-list https://travel.state.gov/content/passports/en/go/checklist.html. Be sure to photo copy travel documents and store separately from your originals in case the originals are lost or stolen.
Consider signing up for the Smart Traveler Enrollment Program (STEP). They send travel and security updates about your destination and being register can help them contact you in the case of an emergency. https://step.state.gov/step/
Credit Cards:
Notify your credit card company either on-line or via phone of your upcoming travels so your charges from your new location will not be rejected as suspicious. I recommend carrying a travel wallet with protection from theft and with RFID blocking in the lining so scanners can’t read the radio-frequency tags embedded in your credit cards and passport. Distribute you cash in several locations in the event that you loose or have your wallet stolen.

Whale off shore of Iceland
TSA Pre-check
If you travel frequently, you may want to consider enrolling in TSA pre-check. Go to the TSA’s website www.tsa.gov to begin the enrollment process on-line. Afterwards you will have to go to a TSA center to participate in a 10-minute interview and fingerprinting. TSA pre-check status allows U.S. citizens and lawful permanent residents to go through an expedited TSA screening process if available. Those travelers will be allowed to leave on their shoes, light outerwear, and belt. You can keep your laptop in its case and compliant liquids or gels in your carry-ons. When registered, you receive a TSA number that you report when you purchase your airline tickets. In most cases, TSA pre-check will be printed on your boarding pass allowing you to use the TSA pre-check line at the security check- point at the airport. At the airport, a TSA pre-check line may or may not be available depending on availability of staff and security level of alert. If available, the TSA security check is expedited — lines are shorter and passage through TSA security screening is faster.
Currency exchange
Check common policies for acceptance of credit cards in the areas to be visited and the tipping policy. It is best to carry some local currency for tips, small purchases, taxis, sometimes airport taxes, etc. You can exchange dollars at the local airport when you arrive at your destination or at local banks, or money exchange centers but there is usually a higher service charge and less favorable exchange rates than if you can obtain the currency in the U.S. If you belong to AAA, they have a service whereby you can obtain foreign currency before your trip for a reasonable fee or no fee if $200 or more is exchanged. In Italy when we were running out of local currency and had problems finding a bank willing to exchange US dollars for Euros.
Health check-up
Several months before traveling overseas, it is a good idea to investigate what is required in terms of inoculations, etc. I visit Johns Hopkins Travel Clinic in Baltimore for needed shots, medication, and health adversaries. Locally you can obtain similar services through organizations such as Passport Health, https://www.passporthealthusa.com/travel-medicine. In some cases, you may have to be given multiple injections over a period of time. Some malaria medicines require taking pills several weeks prior to travel. With Johns Hopkins, they maintain a record of my visits and prepare a shot record to take with me. Also they provide a summary of the health concerns for the area. Note: Some countries require documentation indicating that you have received certain vaccinations, for example Yellow Fever.

Atlantic puffin.
Prescription medicines
Make sure have enough of your prescription medicines to cover trip and any delays. Keep them in your hand-carry baggage. Have had meds stolen from check luggage. If you need an item refilled in a foreign country, you may have difficulties and may be required to visit a local doctor for a prescription.
Emergency evacuation related to health
MedjetAssist is a global and domestic medical transport company with several membership programs. https://medjetassist.com/ It’s not a health insurance program for travelers but if you are hospitalized 150 miles or more from home, Medjet will arrange air medical transport back to your hospital of choice in your home country — all you pay is your basic plan membership fee.
You might wish to consider purchasing basic travel insurance offered by companies such as Travel Guard http://travelguard.com. Depending on the program, they cover costs related to in-hospital medical care, lost luggage, travel delays, trip cancellation, etc. Prices and plans vary according to benefits and the cost of the trip. It is best to check with your personal health insurance company for their policy regarding paying for overseas treatment and hospitalization.

oystercatcher
On the plane
Stay hydrated and avoid alcohol. Walk or exercise your legs when possible to maintain good circulation and avoid possible blood clots. There are compression socks that are supposed to help.
Relief for long delays between flights
On occasion, I have had excessive delays between flights If you belong to an airline club such as United’s, at some airports they have a lounge with personalized travel assistance, Wi-Fi, beverages, snacks, and most important, it is a much more pleasant environment in which to wait than sitting in the public areas of the airport terminal.
For my upcoming trip to Brazil, I have approximately a 10-hour delay between my domestic and international flight heading back to the U.S. I discovered that within the airport there is a “hotel” with small sleeping quarters where you can rest in privacy while waiting for your flight. At Sao Paulo airport, it’s called “FastSleep” and you pay by the hour.
Equipment check
I typically have my camera cleaned and serviced at least twice a year if used heavily particularly before a major trip. Since I am a Nikon user and Nikon Professional Services member, I send my cameras to Nikon’s New York Service and Repair Center. Using my NPS number, I receive expedited service. It may cost a bit for a “once over” on your camera periodically but it is worth it when you have invested several thousand dollars in a trip. Note: I always carry at least one spare camera. (If camera sent for cleaning, check your setting when the camera is returned. Often set to defaults.
Carry-on luggage
I travel on the airlines with my camera gear loaded in a Gura Gear light-weight backpack and place my computer in a rolling computer bag. Chargers, power strips, filters, tripod ball head, etc., I place in my checked luggage with the more delicate items placed in a small padded backpack that can double a field pack. TSA locks may help against in experienced thieves but do not guarantee absolute protection from others and less reputable TSA inspectors. I have had items removed from my luggage more than once.

Hummingbird
Saving digital files while traveling.
I carry my Apple laptop computer, card reader, and two potable Seagate 2 T drives. When possible, I transfer image files from my compact flash cards each evening after shooting to my portable drives. I don’t save the files on the computer itself since they consume too much room. When possible, I quickly review the images on Adobe Lightroom. Once assured that the camera is working properly and my technique is solid, I then put the cards aside for reformatting in the camera. I usually carry a number of compact flash cards and cardholders to store cards in case transfer of images is not possible. I have card-holders color coded for cards needing to be transferred and others of a different color for cards where the images have been transferred and are ready to be re-formatted in the camera where they will be used. Any scheme that works for you is fine.
International calling plans
I add an international calling/data plan to my cell phone for the month I will be traveling. This provides an economical way to communicate the event of an emergency, delays in travel, urgent business, etc. If you have the Whatsapp application on your phone, you can make long distance calls or send text messages via Internet for free. Recently I used it for the first time and was impressed that the transmission was so clear.

Common Gallinule

by Osprey Photo Workshops & Tours | Mar 27, 2016 | Bird behavior, Digital Photography, Nature Photography, South Texas, Tangier Island, Wildlife, Wildlife Photography

Black-Bellied Tree (whistling) Duck feeding along the edge of pond.
Photo Blinds for Wildlife Photography
Blind Construction
Blinds or hides are used by both hunters and photographers. By the word blind, I mean a tent or structure made of camouflage material to hide you and your camera from the animal you intend to photograph. Typically they are placed in locations where animals visit frequently. They allow you to photograph wildlife in its natural state, without its behavior being altered by human presence – feeding, courting, caring for young, interacting with other, etc. Typical places to locate a blind are near a watering hole, food source, den, lodge, nesting site, baited area, backyard bird feeder, etc. Blinds need not be fancy or perfectly match the surrounding as long as their shape is somewhat disguised by the pattern of the fabric or materials used in construction. It is important that the fabric does not flap noisily in the wind. Success is most likely when the blind is in place for enough time for the animal to become acclimated to it.

Blinds along side lake. Wooden frame.
I have used blinds suitable for photography from the following web sites: http://www.sportsmansguide.com, http://www.basspro.com, http://www.cabelas.com, http://www.dickssportinggoods.com, and http://www.rue.com. The best are lightweight, easy to set up alone, and relatively inexpensive. Even cheap tents can be modified to suit your purpose by camouflaging them using spray paint. I typically modify the blind I purchased to better suit my needs for photography, adding openings for my lenses on 3 or 4 sides. I fit the holes with sleeves made from camo mesh (2 or 3 layers) to cover the lens and I add an elastic closure to adjust the sleeves to the diameter of the lens. The mesh disguises the lens while allowing me to look for the approaching animals. I also add small observation windows of the same multi-layered mesh for the same purpose. More permanent blinds that I have constructed, I have a wooden frame made from cheap 1 x 4 and 2 x 4 pieces of lumber, approximately 42 inches long. I cover the frame with cotton camo material purchased from a fabric store, which I staple in place. Burlap is a cheaper cover used by many photographers but I am allergic to it. Side pockets inside the blind are useful for storing small accessories. You can further disguise your blind adding branches or grasses local to the area.

Blind opening with flash using dropped mesh fabric rather than sleeve.
Hot Climates
When working in hot climates, I add ventilation holes made of camo netting near the top of the blind to allow the hot air to escape. Photographers have been known to suffer from heat stroke when exposed to high temperatures for a long period of time. Always take water into the blind. If extremely hot, carry a spray bottle filled with water and spray it on your skin. The cool water drops your body temperature. Even wetting down the interior wall of the blind can lower internal temperatures. When working in hot humid conditions, avoid bring the camera and lenses indoors unprotected where the moisture from outdoors will condense on the glass. Place camera and lenses in a plastic bag where any moisture will form on the surface of the bag and not the equipment. Similar problems can develop when lenses are taken from a warm room into cold. In humid conditions, consider storing camera gear in a bag with silica gel, a drying agent.

Blue wing teal attracted to corn in the bottom of the pond in South Texas where temperatures can soar into the high 90s & low 100s in the summer.
Entering a Blind
I enter the blind at times of low activity or in the dark. For a nervous subject I place the blind at some distance away from the final position and move the blind in place over a period of time. A tactic to fool your subject into thinking the blind is empty is to have two people go into the blind and then one person leave. By watching the animal’s reactions, you can determine if they have accepted you and the blind. In its presence, they should resume their normal behavior.

Osprey landing on nest. Placed blind a distance away to observe the osprey’s behavior.
Placement
For placement of the blind, I consider the background behind the subject and the surroundings where the subject will be photographed. Bright rocks, shiny objects, bright colors, and dark strong forms if distracting should be avoided. The direction of the sun at the time of day you plan to photograph should be considered. Usually I prefer to have the sun to my back or to the side. On ponds, I often have two blinds, one for morning and one for evening shooting. Some photographers working on long-term projects place their blinds over a dug out trench. Chairs are placed inside so the photographers can shoot at eye level with their subjects. I find with a long lens such as a 600 mm and a little extra distance from the subject, the angle of view is relatively horizontal giving the illusion that you are shoot eye to eye with the subject. For best results, while in the blind stay alert. Animals approach very quietly. Listen carefully and watch for movement. It is not the time to read a book.

Deer attracted to water near one of my blinds during a dry period.
Cover Scents, Game Calls
If the animal has a good sense of smell such as a coyote, then fox urine, skunk and other cover scents distributed around the blind will help disguise your presence. Like hunters, you could use game calls to attract animals closer to the blind. Duck and turkey calls, courting sounds, and predator calls can be bought in most hunting stores. Decoys placed in front of the blind can also increase your chances of success. Decoys are available for ducks, geese, turkey, etc. From their stands or camouflaged boats, duck hunters use both calls and decoys placed in the water in front of their blinds to attract waterfowl flying overhead.

Turkey are attracted to game calls during breeding season.
Baiting
On privately owned ranches and farms, baiting is a great tool to attract wildlife. Obviously you must have the owner’s permission to be on their land. You typically want to bait areas where you want your subjects. For deer, javelina and waterfowl, I have used whole corn (in water it sinks under surface). For songbirds bird, sunflower and other birdseed is perfect and for woodpeckers depending where you are located, suet or fruit may be effective. Cat food works well for raccoons and some other mammals. On federal land, private blinds and baiting are typically prohibited. However on some refuges, blinds are provided for visitors. Without bait and decoys, these are often not as effective as a blind where you can add enticements. I spent a lot of time in South Texas on a ranch where I could deploy blinds where I desired, at watering holes etc. In many cases, I enhanced the environment with logs, bushes or perches. I have also placed a blind in a ditch or pond using a float designed for fishing or a Styrofoam platform of my own making.

Turtle on a prop provide in pond near my blind.
No mater what approach you use, working from blinds can be very exciting and rewarding. There is nothing like being just a few feet from wildlife and walking away with great photos.

Hawk drinking shot with 600 mm lens which gave the illusion that I was shooting on eye eyelevel.
Skimmers courting. Blinds help capture behavior otherwise seldom seen at close range.

by Osprey Photo Workshops & Tours | Jan 6, 2016 | Chicoteague, Fall photography, Nature Photography, Photo Tour, Photo Workshops, Uncategorized, Wildlife Photography
Chincoteague National Wildlife Refuge/Assateague Island
Trip Report (Dec 2015)

Snow Geese Flock
Arrived at Chincoteague, VA on Thanksgiving 2015 to spend several days with friends for the holiday. On Friday, at the Chincoteague National Wildlife Refuge Visitors Center, I delivered a presentation on wildlife photography as I do for the refuge at least once a year. My friends departed at the beginning of the week leaving me to begin scouting locations for my upcoming workshop, sites most likely to provide participants with good photo opportunities. The weather was rainy and cloudy much of the week making my job challenging. To make matters worse, the number of birds, particularly snow geese, this year was fewer than in the past, perhaps due to the warm weather in November and early December. It did not help matters that the phragmites along the banks of the borrow ditches was high in many places making photography difficult and the birds hard to spot.
Luckily there were some small breaks in the weather. Sleeping-in is not wise since you never know what Mother Nature has in store for you. One morning at dawn, light fog floated over the water that reflected the golden color of the sky. Geese floated into the scene and provided some needed foreground. Later that day I spotted a fox squirrel in soft light gathering leaves for her nest. On another day, I spotted her again on the side of the road dining on pinecones. The low light meant I had to use ISOs higher than normal to freeze the action (800 and 1600). On another morning, I grabbed a striking pre-dawn shot of the lighthouse as I enter the refuge.

Sunrise

Sunrise Beach Road

Dawn at Chincotegue Lighthouse

RudyTurnstone
Outside the refuge, I explored the town of Chincoteague and the small boat harbor. I talked to a few watermen and photographed them off-loading their catch. This year was the first time I witnessed workboats returning to the harbor at sunset. This presented me with nice opportunities for sunset photography.

Fishing boat returning
With the low number of birds present of the refuge, I was concerned that my workshop participants arriving on the upcoming weekend would be disappointed with photo opportunities. Besides the small boat harbor, I looked for new subjects to photograph around town. On a foggy morning, I stopped at the intersection where there was a steam driven tractor on display. I had passed it many times but never took the time to examine it. With camera in hand, I discovered interesting details worthy of snapping some shots. Elsewhere in town I took a few shots of outdoor displays and a peculiar mallard with feathers stuck on its bill.

Mallard Duck Quacking
On Friday, finally the weather improved. At dawn, the sky had a bit of color near the horizon so I combined silhouettes of pines against the colored background – layers of color for a slightly abstract feel. Weather conditions continued to improve and so did the number of birds on the refuge. The small group of snow geese that had been hanging out on the beach at Toms Cove near the Life Saving Station, moved north resting on the sand near the beach parking lot. Honking as each new wave of geese arrived, their numbers grew. Against the blue sky, one V of geese after another filled the sky and descended to join the original flock. It was a beautiful sight. I spent the better part of morning photographing the spectacle, much of the time photographing from in my car to avoid disturbing the birds. (Lens primarily used: Nikon 80-400 mm chosen for its flexibility).

Snow Geese landing
In the afternoon Friday, 4 Dec, the impoundment along Beach Road was full of birds – ruddy ducks, buffleheads, cormorants, and flocks of yellowlegs and herons. Weirdly as quickly as the birds appeared, the number dropped significantly the following day when my workshop began.

Trawler at sunset
I had a full workshop this time with 8 participants of varying skill levels. The critique sessions revealed that all walked away from the workshop with very nice images and fresh ideas to improve their photography. Saturday ended with a great sunset at the small boat harbor. We arrived just in time to catch a huge sun dropping behind a trawler tied up at end of the dock. Sunday began with sunrise photography at the beach to be followed by photography of horses and a few herons along the service road. (I rented the Chincoteague Natural History Association tram for part of Sunday morning.)

Fox squirrel
My lesson learned. Don’t give up despite the weather or other disappointments. If you keep a positive attitude, you are bound to find something interesting to photograph.

by Osprey Photo Workshops & Tours | Dec 17, 2015 | Autumn photography, Canadian Rockies, Digital Photography, Fall photography, Nature Photography, Photo Tour, Photo Tours, West Virginia, Wildlife Photography
Two of my favorite locations for autumn photography are the mountains of West Virginia and the Canadian Rockies.

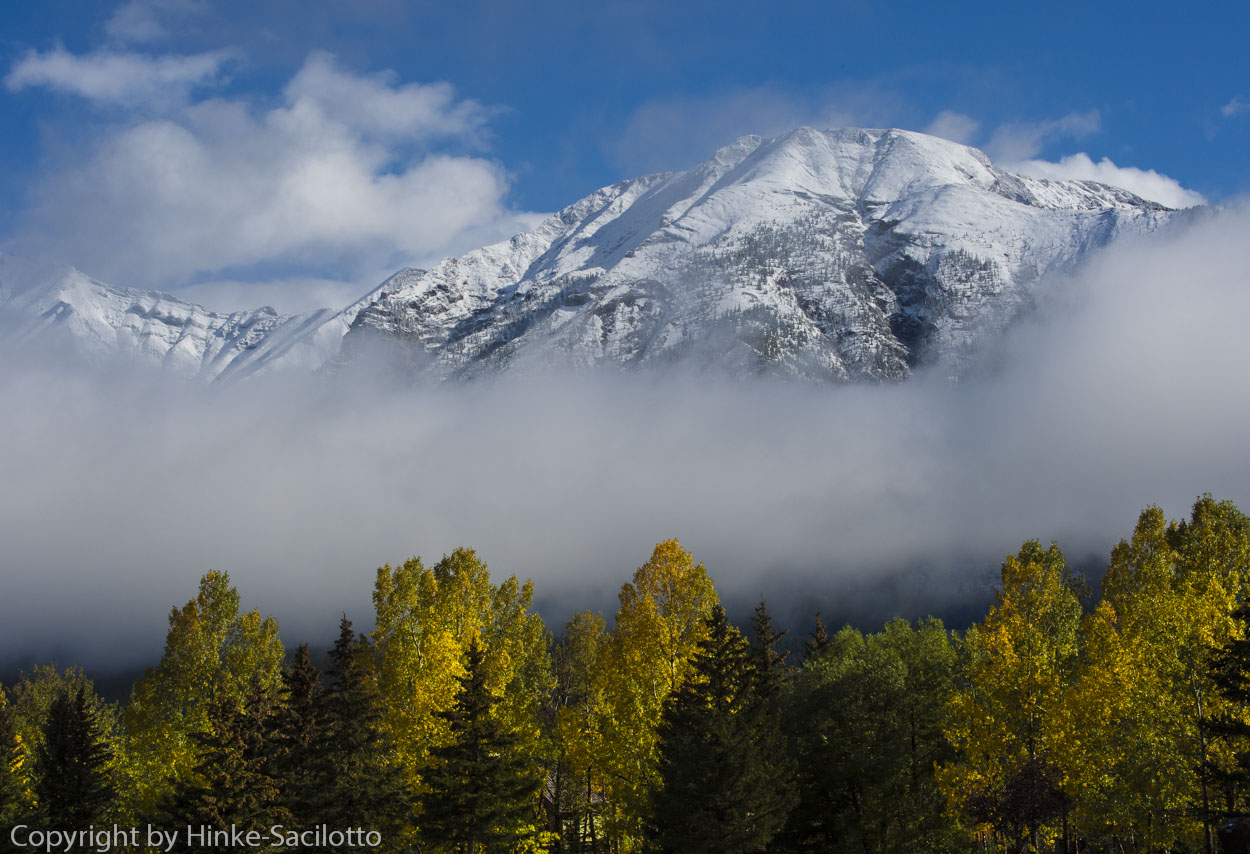
Aspen on hillside, Canadian Rockies
With the arrival of fall, to the delight of photographers, leaf color changes, birds migrate, and animals move from the high country to lower elevations. But also rain and overcast skies often accompany the seasonal change as temperatures fluctuate and the weather becomes less stable. Such conditions can render images dull and flat, but can also be an asset.
Rain – the Sliver Lining
In the Canadian Rockies this September, we had 2 days of continuous hard rain, so much that rock slides blocked the main highway. We just took the time to relax, read, and work on images. Although being driven inside by the rain was disappointing, the following morning was spectacular with beautiful fresh snow on the mountain tops.

Snow Peaks, Canadian Rockies
Rain can be a both a blessing and a curse. With rain, the grass becomes greener, rainbows appear, water droplets adorn leaves and spider webs, pools of rainwater reflect the colors around them, and waterfalls and cascades flow more swiftly. The color of vegetation becomes more saturated. By using a polarizing filter to remove shine on surfaces, you can make colors even more intense.
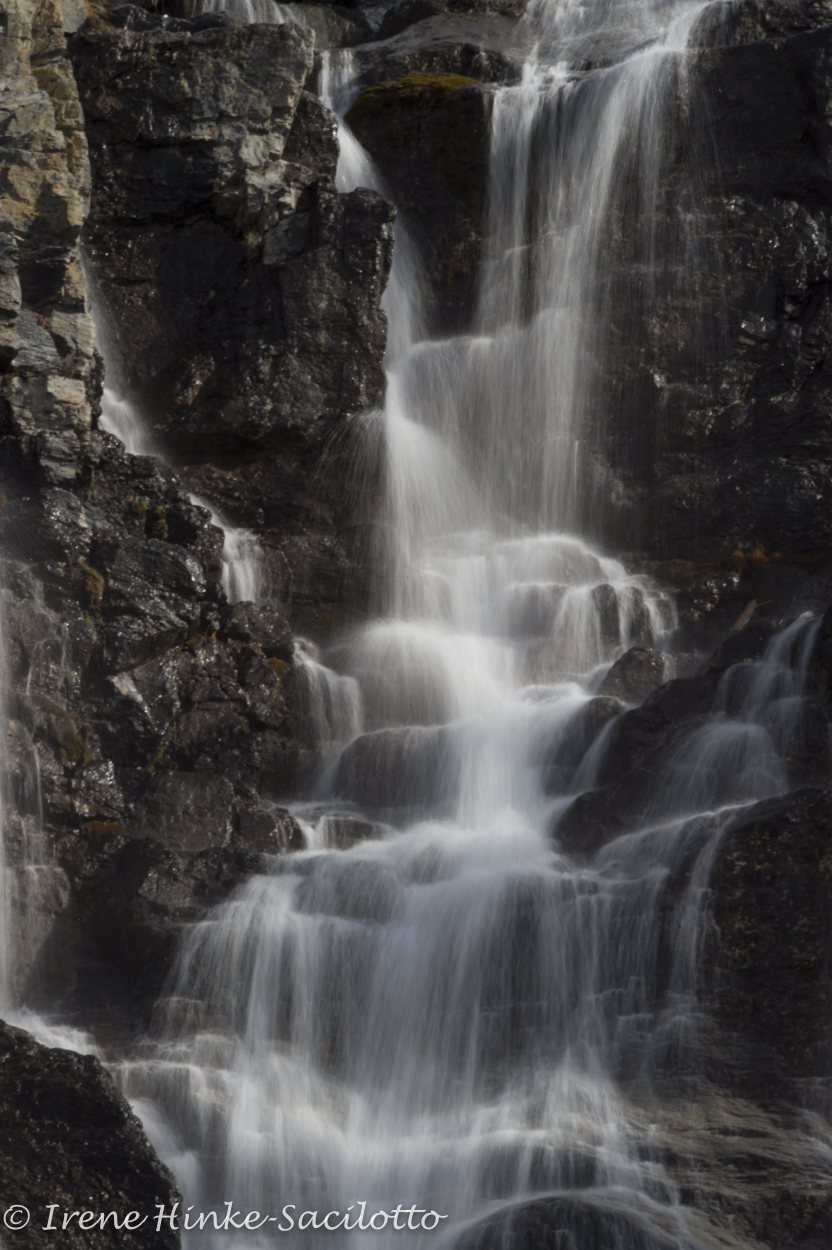
Tangle Falls after rainfall.
Ok, so the next image is not related to fall photography but it makes the point that rain can be a good thing. My photos that I shot in Costa Rica of hummingbirds in the rain, were some of my favorite from that trip. (A cheap kids poncho or large plastic bag will keep your gear dry in case of an unexpected downpour.)

Fiery-throated Hummingbird in the rain, Costa Rica
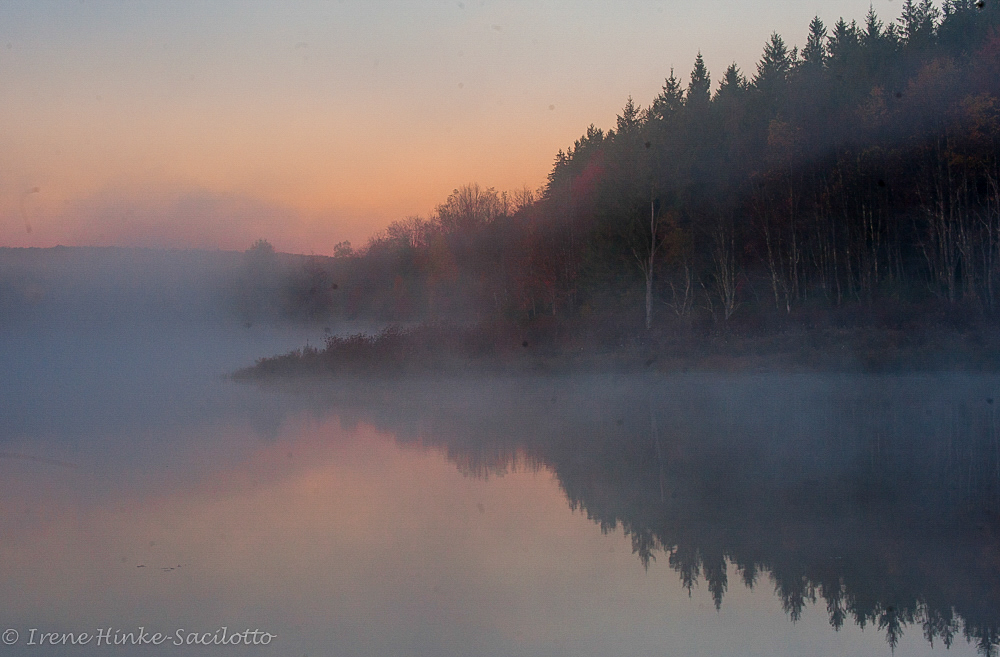
Fog & Overcast Skies
Overcast skies, low cloud banks, and fog generated by temperature changes in the fall can present photographers with unique photo opportunities. When I rise in the morning, I let the light direct my activities. On a foggy morning, I will head to a nearby lake, pond, or low area where the fog creeps along the ground and slowly rises with the heat of day to reveal interesting ghost-like silhouettes of trees, bushes, and mountains ranges. If in Shenandoah National Park, I am likely to go to a high point to photograph the fog hanging in the valleys between the mountains. (Note: Be careful when exposing foggy scenes. Depending on your camera, if your light meter is reading off of the fog layer, then it will adjust the exposure to render the fog mid-tone gray. This will often result in an underexposed photo. Add more exposure to compensate).

Snow covered peaks near Canmore, Canadian Rockies

Morning fog over river, Jasper, Canadian Rockies
Blackwater Falls State Park, Fog over Pendleton Lake.at dawn.
If instead of fog, I wake to a sky that is lightly overcast, I will head to a location where the soft light complements the scene, e.g. to a waterfalls, cascade, stand of trees, woodland trails, flowing streams, delicately colored wildflower, etc. On a bright sunny day, photographs of these subjects will often be disappointing with distracting backgrounds, hot spots, and deep shadows that hide important details. (If the sunlight becomes to bright for your subject, you can sometimes get acceptable results by waiting until the light is diffused by a passing cloud.)

Linde Point, Blackwater Falls State Park, view down Blackwater Canyon. Soft light reveals details.
The Wonders of Backlighting
Backlighting and side lighting bring out the vibrant color of autumn leaves. By using a polarizing filter you can intensify the effect by removing glare from the surface of vegetation. Even towards mid-day, polarizers can sometimes help you achieve satisfactory results. Take note that flare can be a problem when pointing the camera towards the sun. Flare appears as unwanted bright spots across the image or a bright wash over the photo. Flare spots are created by the sunlight reflecting off of glass surfaces within the camera lens or filter. How can you reduce flare? Your lens shade can help but you may need more assistance. You can shadow the lens with a jacket, hat, card, umbrella, or person’s shadow. You can also stand in the shade of a tree or building. Sometimes you can reduce flare by aiming your lens such that the sun is blocked by an object such as behind a cloud or tree limb.

Pond at Canaan Valley State Park. Fall color reflecting in a pond. (For reflections in ponds and lakes, you may capture better color in the water from the surroundings trees by moving to a higher vantage point where more of the water’s surface is visible.)

Backlit fern

Backlit Tree, Canaan Valley

Dolly Sods. Leaves from blue berry bushes turn red in the fall and glow when struck by the late afternoon sun.
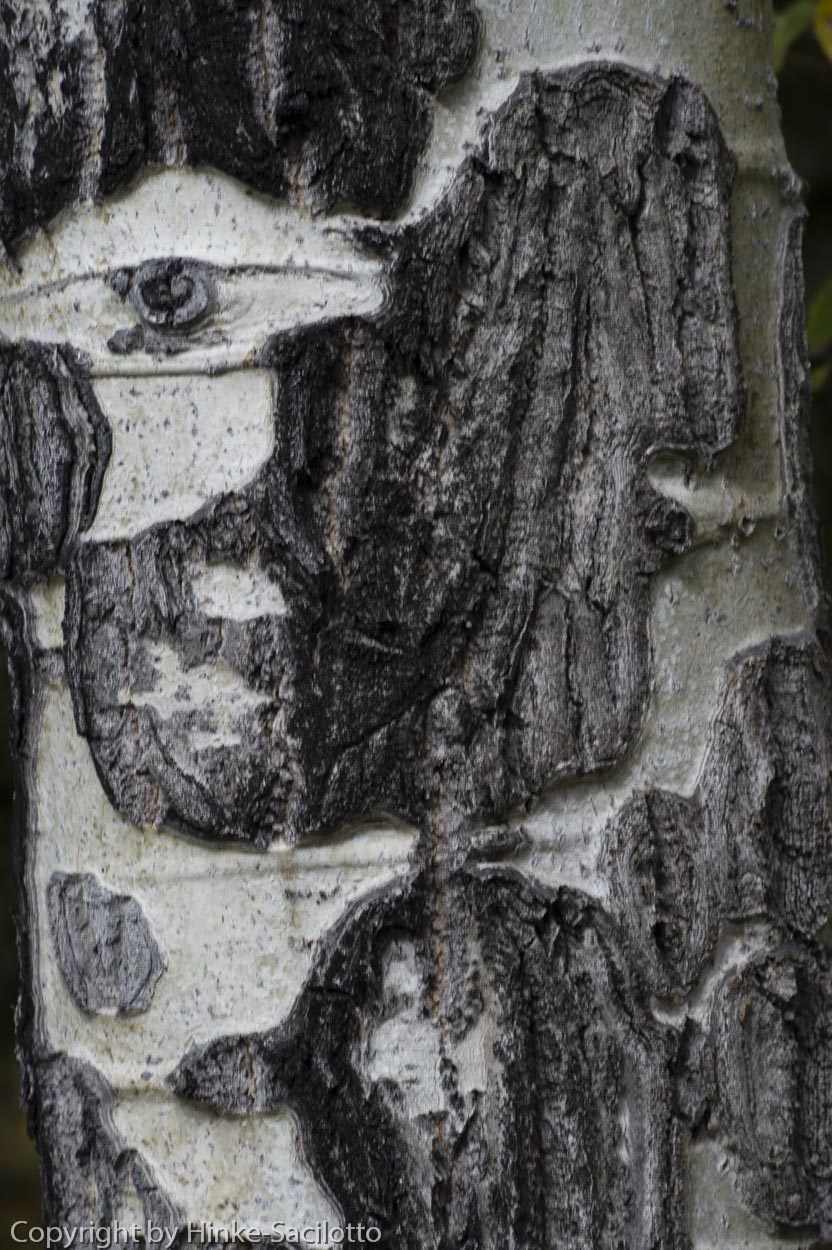
Isolation and macro landscapes
Instead of using your wide-angle lens for all landscape photos, consider isolating portion of the scene using a telephoto or macro lens. (Be careful when using wide-angle lenses for landscapes. They alter perspective and shrink the size of items in the background; thereby, lessening the impact of a photo. The mountains you emotionally reacted to are reduced to bumps on the horizon.)
For any photo, identify what attracted you to the scene. Then chose your lens , angle of view, lighting, etc. to emphasize what initially impressed you. Concentrate on the key elements and simplify the image, eliminating the non-essential components. Instead of capturing a broad landscapes all the time, look for patterns and portions of the scene that have high visual impact. These are what I call macro landscape. Little things such as bubbles in a stream, water droplets on a fallen leaf, lichen covered rocks, distinctive patterns on tree bark, colorful reflections in a pond, the flow of water across a rock, etc. can be perfect photo subjects.

Bubbles in stream

Fallen leaves floating in pond, fall color, Canaan Valley

Iceland cascade.

Bark Patterns
Slow Shutter Speeds
For streams and waterfalls, its fun to experiment using low ISOs, small apertures, and neutral density filters, achieving slow shutter speeds to blur the motion of the water for an artistic effect. With flowing streams, slow shutter speeds can add sense of motion which can be sometimes enhanced by swirling patterns of colorful leaves, bubbles, or foam. There is no way to perfectly predict what the final results are going to be, so take a number of shots with different settings. Use your camera’s playback mode to judge results.

Slow shutter speed. Photo of cascade. Canadian Rockies.

Swirling water in a stream.

Roadside cascade, Canadian Rockies. Slow shutter speed to show action. Soft light to avoid hot spots.
Location, Location, Location
If the leaf color is not good in one area, don’t give up. It might be spectacular a short distance down the road. Autumn colors vary with temperature, rainfall, and altitude. The arrival of peak color in any one location varies from year to year.

Fall color reflected in a stream, West Virginia, Near Elkins, WV. Spotted the possibilities as I was crossing the bridge where I took this photo.

by Osprey Photo Workshops & Tours | Oct 21, 2015 | Autumn photography, Fall photography, Nature Photography, Photo Tour, Photo Tours, West Virginia

Dolly Sods
West Virginia Fall PhotoTour (Trip Report)
Blackwater Falls State Park is situated in the West Virginia mountains near the town of Davis and is approximately a 5 hour drive from my home on the East side of Baltimore. Canaan Valley National Wildlife Refuge and Canaan Valley State Park are only a short distance from Blackwater. They all lie within Canaan Valley, a 13 mile long high valley, nestled among the higher ranges of the Allegheny Mountains. The average valley floor elevation is 3,200 feet (980 m) above sea level which accounts for its cooler temperatures and early arrival of fall. Within the valley are extensive wetlands and the headwaters of the Blackwater River which spills out of the valley as Blackwater Falls. Highly photogenic, its amber-colored water plunges down 62 feet before cascading through an eight-mile long gorge (Blackwater Canyon).

Blackwater Falls
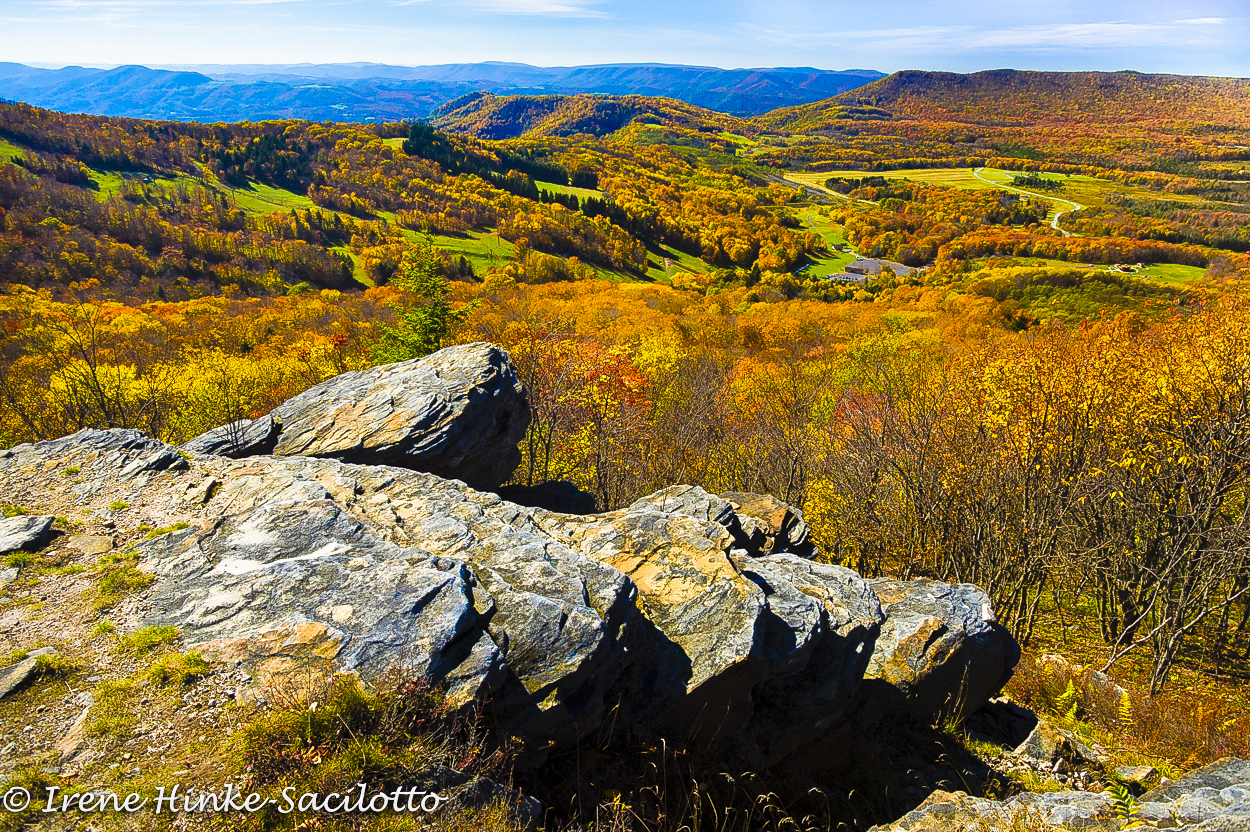
This part of West Virginia is a favorite destination of mine during the first two weeks of October when the hillsides are ablaze with the colors of autumn. This year the colors were less then prime due to wet weather and warmer temperatures but still beautiful. Views from the overlooks at Blackwater Falls State Park such as Pendleton, Linde, and lodge provided ample photo opportunities. Canaan Valley State Park offered more opportunities to capture fall color as the sun back-lit the leaves of aspen, maple, oak, and fern. In ponds and along the Blackwater River, the colors from the surrounding vegetation reflected in their surface. For the first time in a long while, I took the Canaan Valley ski lift to a ridge opposite the park. (The lift does not operate all year so check the schedule if you are interested). Once I step off the lift, it was a bit of a hike to reach an open area with a clear view of the valley, but the trek is worth it. As I climbed towards rocks of Bald Knob, along side the trail I encountered a large group of vibrantly colored red-leaved blue berry bushes which begged to be photographed. From here, I continued to follow the trail upward until I finally reached the rocky overlook with a panoramic view of Canaan Valley. After sitting down for a few minutes and enjoying the view, I began to photograph the valley below using the large bolders as foreground. (You can either return to the parking area the way you came using the lift or follow a steep, leaf covered trail to the bottom. The later can be a bit challenging but I made it down despite being a little sore the next day).

View or Canaan Valley.

Way to Elkins, WV
While in the area, it is worth visiting Dolly Sods, a high rocky plateau. Its 10,215 acres, are part of the Monongahela National Forest and Allegheny mountain range. As a result of logging, fires, and harsh winters, the plant life is unique and more similar to that found much farther north with one-sided trees, sphagnum bogs, and low growing bushes. There are 3 main access roads to the road that runs the length of the ridge of Dolly Sods. All are gravel and can be a bit challenging for cars with low clearance. There are a number of overlooks of the Allegheny mountain range once you reach the top. My favorite area is the end near the end of the road in a section known as Bear Rocks. Here there are few trees, large lichen covered boulders, and fields of blueberry and cranberry bushes with leaves that turn red in the fall. Late in the afternoon, these leaves glow when backlit by the setting sun. (See under tips, notes for avoiding flare in your photo). This year the leaves were more brown than previously but there were still some areas where the color was nearly prime. It had rained the day before I arrived and puddles had formed on the trails. The water reflected the blue of the sky and the colors from the surrounding vegetation offering some unique opportunities for photography.

Dolly Sods

Dolly Sods
No mater when you visit, these West Virginia treasures offer the photographer plenty to photograph. There are more possibilities in Southern West Virginia, where I have done workshops in the past–the New River Gorge, Sandstone Falls, Grand View, Babcock Mill, Pipestem State Park, Hawks Nest, and other locations offer photographers great photo opportunities in the fall. Fall comes a bit later in these locations – late October. No matter where you go, think of photographing more that the grand vistas and consider simple things like bubbles in a stream, water droplets on the grass, a caterpillar, a backlit fern, or a deer drinking from a pool of water. The possibilities are endless for an autumn photo tour.


Elakala Falls near blackwater lodge
Robert Hitchman in his “Photograph America Newsletter” describes autumn photo opportunities in locations across the U.S. including Vermont, Connecticut, Michigan, New Hampshire, and more. wwww.photographamerica.com


