by Osprey Photo Workshops & Tours | Aug 8, 2021 | Autumn photography, Chincoteague NWR, Nature, Nature Photography, Photo Tours, Photo Workshops, Wildlife, Wildlife Photography
Trip Report, Chincoteague NWR, November 2020
Nature Photography
Chincoteague NWR is located on the southern Virginia end of the barrier island of Assateague. In the fall, the refuge attracts large numbers of snow geese along with ducks, swans, herons, ospreys, shorebirds and other migrants. It is also the home to wild horses, deer, raccoon, fox squirrels, and other animals. Used to being protected, the wildlife is unusually tolerant of humans and presents visitors with great photo opportunities. It is one of my favorite places to photograph wildlife in both the fall and spring. I have been conducting photo workshops there for many years. Numbers of species and the variety has shifted over the years. The refuge is located along the Atlantic Flyway. Once over 40,000 snow geese stopped at the refuge doing fall migration Now they stop farther north but still several thousands visit the refuge today along with shorebirds, swans, and other waterfowl.


Chincoteague NWR website:
https://www.fws.gov/refuge/chincoteague/
Trip report – Fall 2020
First Stop – Sunrise
For sunrise I typically stop along Beach Road at the first large pool on the right after passing the visitors center– Black Duck Pool. There are convenient pull offs for cars on both sides of the road. At sunrise, I often see deer crossing the water.
I had a treat one morning at sunrise when a large flock of White Ibis circled overhead with many landing in front of me. They were joined by herons and a few ducks. When photographing the birds against colored sky and water, I had to be careful that their silhouettes did not merge with the silhouettes of other birds or the surrounding grasses.
Several mornings were foggy and allowed me to create images different from many I have taken here before at this location. The two photos below were taken on one of those mornings. I like the layers revealed by the lifting fog and sense of calm these images invoke. In terms of exposure if using aperture priority, I had to increase my exposure compensation by at least +2. Remember that the light meter assumes it is pointed at something mid-tone and will darken the exposure to make it so, thereby underexposing the image.


First Stop – Sunrise
For sunrise I typically stop along Beach Road at the first large pool on the right after passing the visitors center– Black Duck Pool. There are convenient pull offs for cars on both sides of the road. At sunrise, I often see deer crossing the water.
I had a treat one morning at sunrise when a large flock of White Ibis circled overhead with many landing in front of me. They were joined by herons and a few ducks. When photographing the birds against colored sky and water, I had to be careful that their silhouettes did not merge with the silhouettes of other birds or the surrounding grasses.
Several mornings were foggy and allowed me to create images different from many I have taken here before at this location. The two photos below were taken on one of those mornings. I like the layers revealed by the lifting fog and sense of calm these images invoke.

In terms of exposure if using aperture priority, I had to increase my exposure compensation by at least +2. Remember that the light meter assumes it is pointed at something mid-tone and will darken the exposure to make it so, thereby underexposing the image.

Black Duck Pool
After shooting sunrise, I will check out the scene across the road for horses and herons in the early morning light. If there is nothing of interest, I typically drive towards the beach checking out the borrow ditches on the side of the road for herons, ducks and other visitor that are in good light and in a suitable non-distractive background.
Note: In the summer it is difficult to photograph wildlife other than in the early morning and late in the pm since there is a lot of traffic on Beach Road as folks head to the public beach for the day.
On the morning that I saw the flock of ibis at sunrise, I found a large number of individuals engaging in a feeding frenzy at the junction between the borrow ditch on the left and Swan Cove. They were joined by a few herons. This is the first time that I have witnessed such a high number of ibis together. When they finished feeding in one area, they moved up the borrow ditch congregating at various points along the way. My car worked beautifully as a mobile blind. I could move the car and follow the birds as they traveled upstream. I shot from the car as to not disturb the birds and used a bean bag on the window sill to securely support my lens and camera.

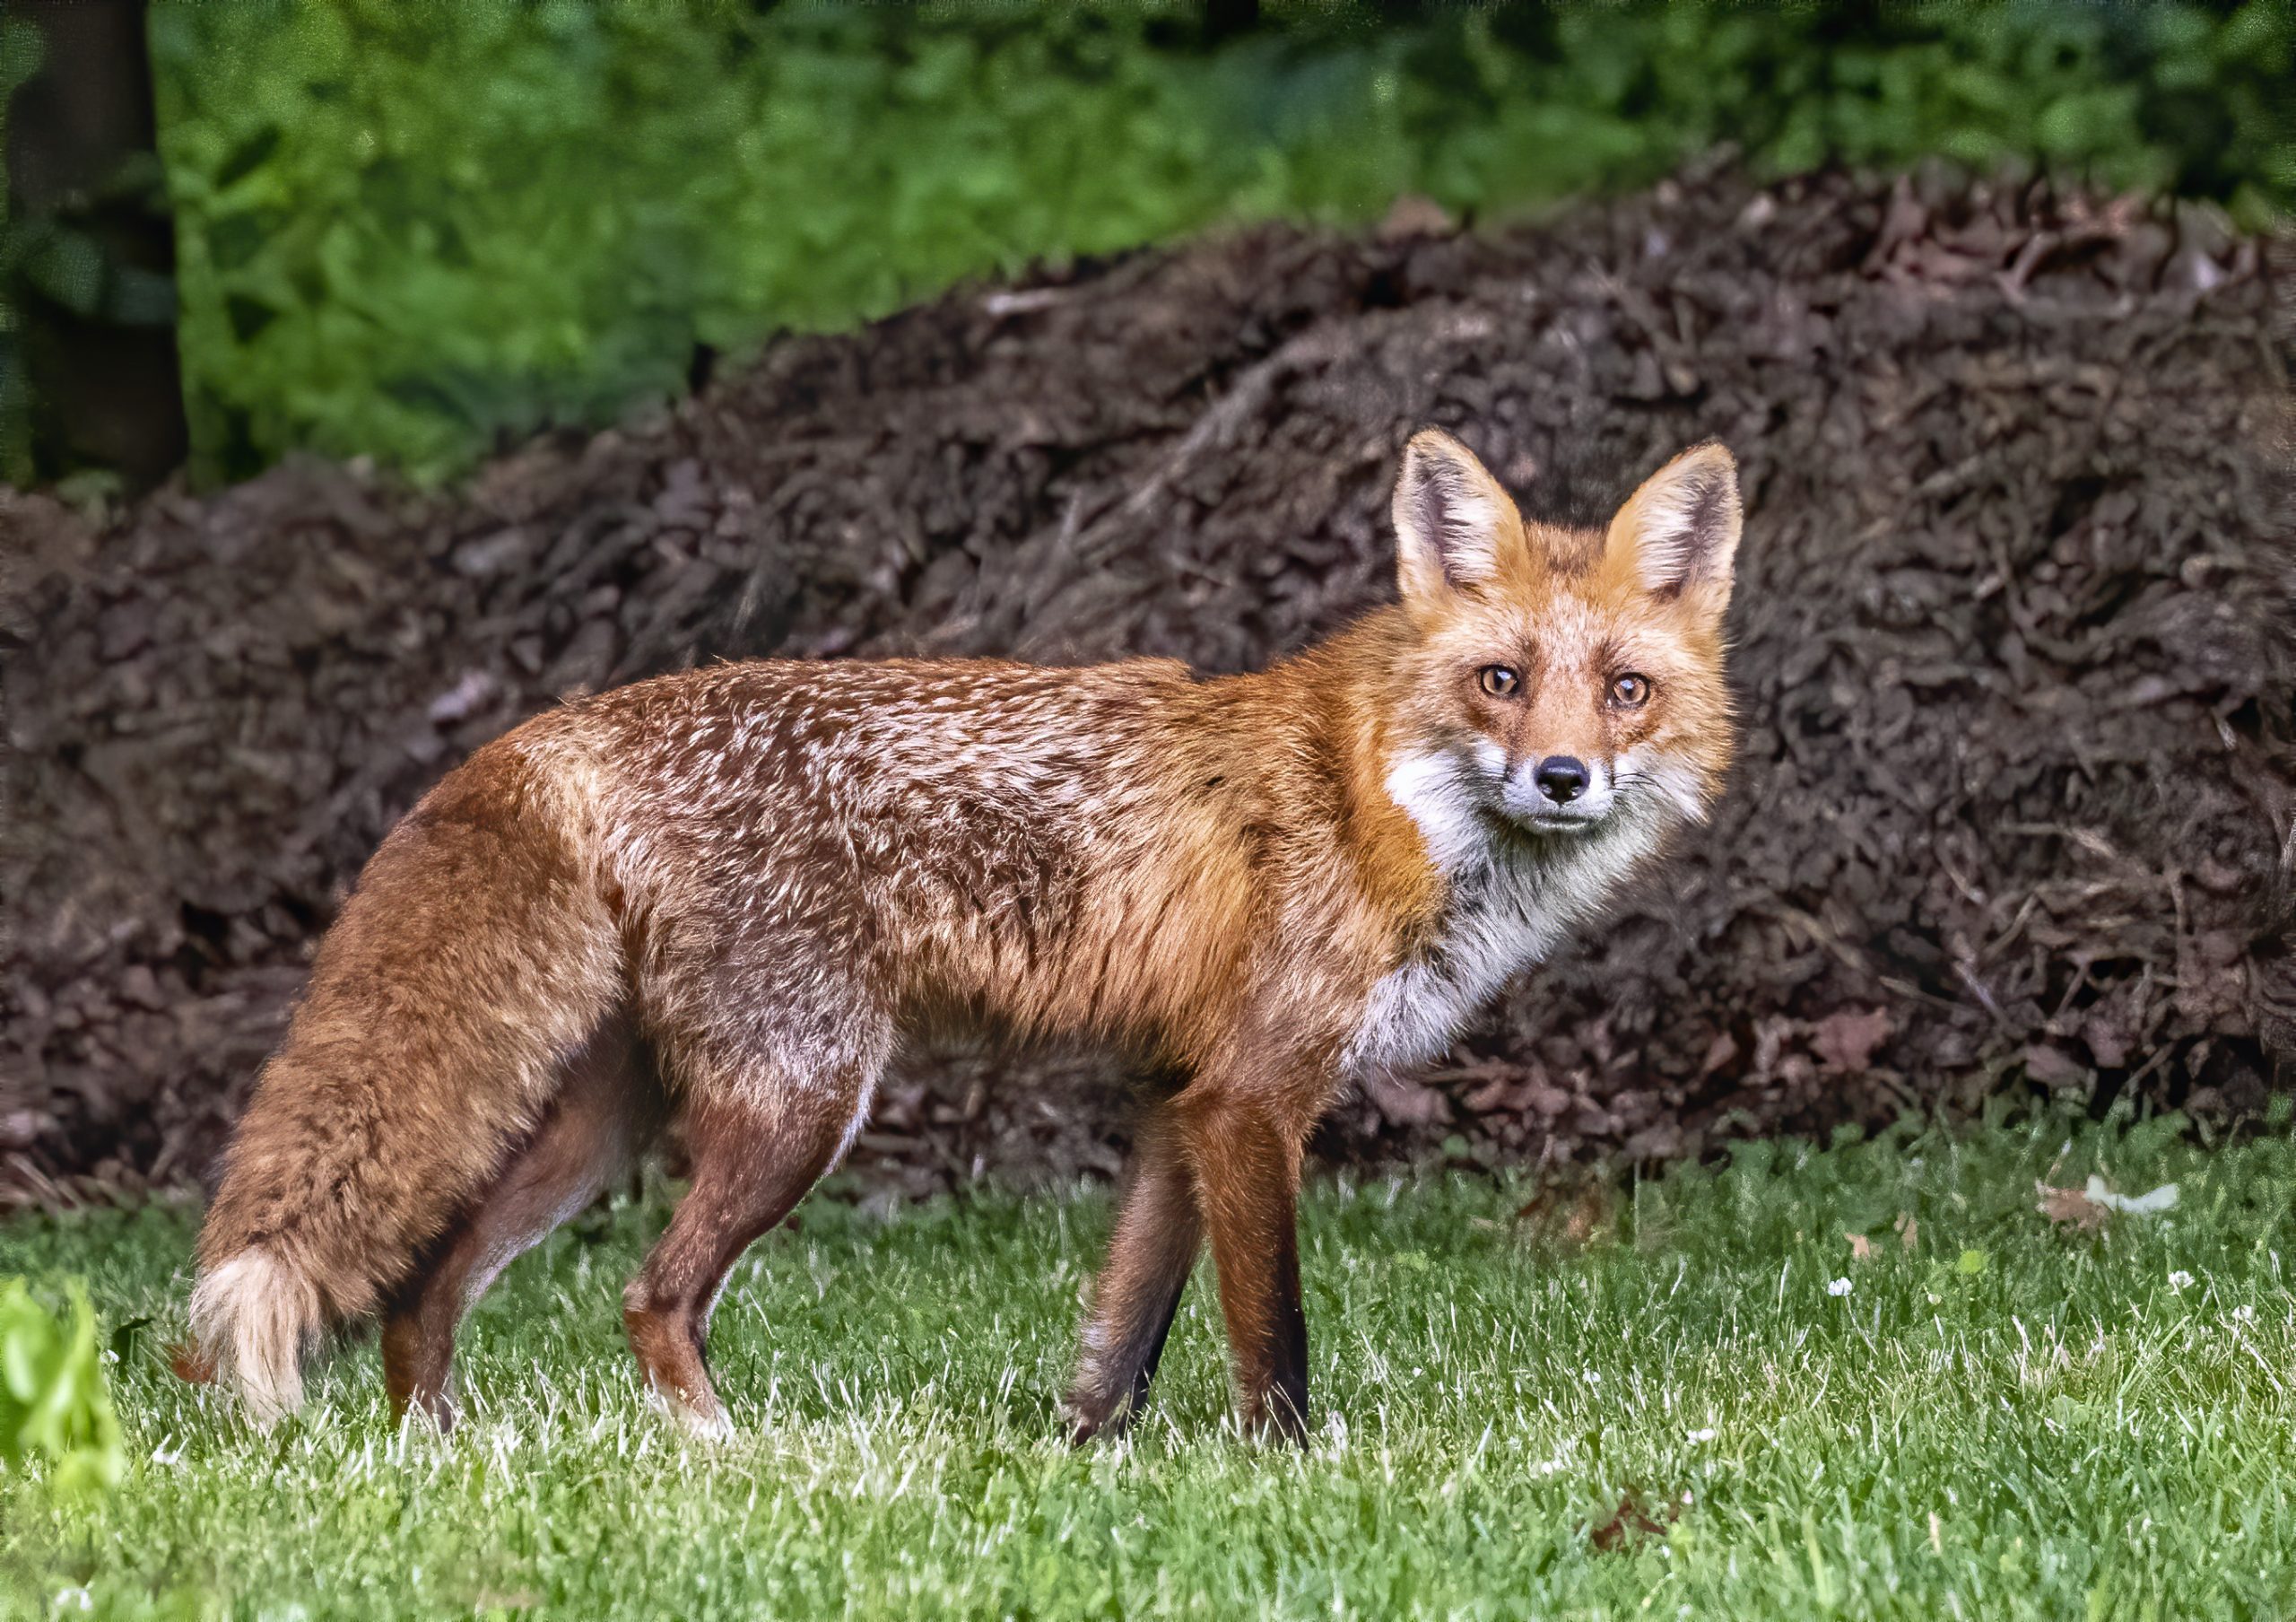
Occasionally in the same area I have encountered a fox or raccoon, so I am always checking the edges of the road for cooperative subjects.

Swan Cove
One of my favorite spots to photograph is Swan Cove. It typically attracts are large number of birds including shorebirds that often feed in the shallows near the road at low tide. On this trip I encountered a group of Yellowlegs and Dowitchers feeding close to the shore. Again I used my car as a mobile blind, shooting from the window with my 600 mm lens mounted on my home-made beanbag. On a day there was little wind and I was able to capture images of the birds with their reflection in the water. I always look for small ducks and grebes in this pool. On this trip I was able to photograph several tolerant Pied-Billed Grebes, Buffleheads and Ruddy Ducks close to shore, sleeping, preening and diving for food.


Black Duck Pond
Often later in the morning I check out the marsh and fields across from Black Duck Pond. I typically look for horses in the marsh and around small stands of trees. Around 9 a.m. on more than one morning, I got a number of photos as the horses crossed the marsh and fed on the grasses. Sometimes blackbirds would land on their backs, I am guessing, eating insects.

In this same area I found a cooperative female Belted Kingfisher sitting on a post. I spent a delightful hour with her as she flewdown to catch fish, landed on the post again, shook off water, preened. and stretched its wings. I got a number of great images shooting from my car with my 600 mm F4 lens combined with a 1.4 teleconverter


Also in the same marsh where there were pools of water and a channel, I was able to photograph herons feeding, groups of Buffleheads swimming the channel as well as Double-crested Cormorants swimming, diving or sitting on dead snags drying their wings. This past year the water level in the marsh was perfect for shooting across marsh at sunset.

Little Toms Cove
I frequently check out this area near the water control devices that allow water to pass under the road to Swan Cove. Often when you have an obstruction in waterway, macroinvertebrates and other organisms accumulate around the opening often attracting fish and birds. This year I encountered a bird that I had not photographed before, a Surf Scoter, a sea duck typically seen flying over the ocean. This past November there was a Horned Grebe hanging out in the same location. When the tide is out, I often see rails or oystercatchers feeding on the exposed mud flats.


Sea Ducks
In the winter some photographers go to Barnegat Light and State Park in New Jersey, The photographers brave the cold to photograph sea ducks from the jetty at the inlet — a favorite is the Harlequin Duck. I have not visited the site in the winter but have seen great results. However, conditions can be dangerous with icy rocks and a rough surf with waves that might swamp you and your equipment.
 Atlantic Shore
I always check out the beach for a colorful sunrise or shorebirds feeding along the water’s edge. The best time to photography is when the tide is low and when more of the beach is exposed. When photographing shorebirds, in the morning at Chincoteague it is difficult to avoid shadows covering much of the bird without moving out into the surf. However with post processing in Lightroom and Camera Raw, you can lighten the shadows with a selection brush. I always concentrate on birds that are moving towards me, not retreating. In the afternoon, it is easier to capture these images since the bird often is lit by the soft warm light at the end of the day.


 x
x
Bayside
On the bayside of Little Toms Cove opposite the beach, I often find an assortment of shorebirds, herons and an occasional fox. On this visit, there were Great Egrets flying back and forth feeding near posts marking private clam beds. I also photographed aa Black-bellied Plover and a Dunlin in winter plumage feeding amongst the oddly colored organism called Sea Pork. It is a colony of tunicate organisms which are plankton feeders. Though an oral siphon, they draw seawater through their bodies and pass it through a sieve-like structure that traps food particles and oxygen, eventually to exit through the atrial siphon. One sunset when the tide was out, I captured the remarkable colors and patterns as the setting sun lite the mud flats.


Wildlife Loop
On fall afternoons, I often checked out the wildlife drive around Snow Goose Pool (only open to cars after 3 pm). This time not long after I entered the drive, I saw a flock of ducks explode in flight from the marsh. It took me a minute to realize that a bald eagle had swooped over the group. It missed catching a duck and flew back to the pine tree where it often perched near its nest. Unfortunately, I was distracted by the ducks, I missed the shot of the eagle. On other trips I have seen a pair of eagles siting on the edge of the marsh in the same area. Northern Harrier (Marsh Hawks) also hunt in the area.


Shoveler Pool
Farther around the Wildlife Loop is Shoveler Pool which typically attracts ducks, geese, and swans. I was not disappointed this year for small groups of Pintail Duck, Green-wing Teal and Black Ducks took off and landed in the pool. Each day there were a number of Tundra Swans resting and feeding in the same area. Some individuals were quite aggressive, chasing geese and other swans. Before attacking, they often became very vocal, extending their necks low to the water and picking up speed. This fall the water level was low with weeds poking through the water’s surface, often leaving me with a somewhat distracting background behind the birds.
In the background of this pool was a stand of dead pines. These are Loblolly Pines which were killed by an infestation of Southern Bark Beetles that attack old or diseased trees. In several places in the refuge you will see similar stands of dead trunks. Refuge personnel replaces these dead pine trees with hardwoods such as red maple, water oak, and sassafras, creating a more varied habitat for wildlife. During your visit you may see young trees wrapped in plastic for protection.
If all goes well in May, I will return to Chincoteague NWR to photograph, hopefully to capture new and different images.


by Osprey Photo Workshops & Tours | Oct 7, 2020 | Bird behavior, Bird photography, MD, Nature, Nature Photography, Photo instruction, Photo Technique, Photo Workshops, Uncategorized, Wildlife, Wildlife Photography
Urban Wildlife Photo Project
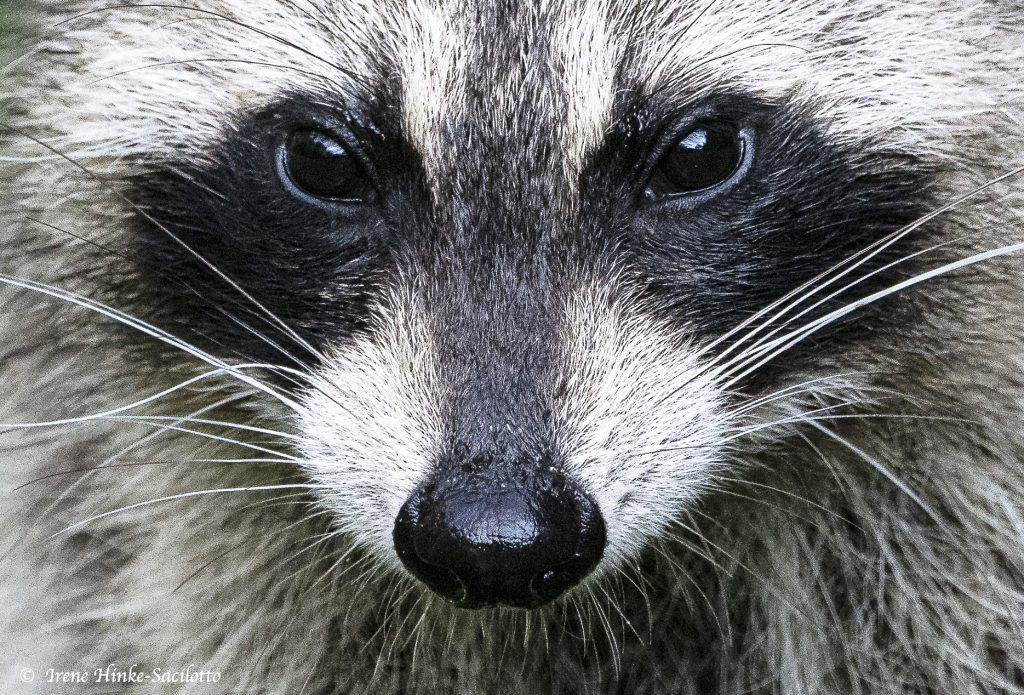
Raccoon Eyes
Overview
As mentioned in my last newsletter, in recent months I have reconnected with an old friend who has been allowing me to photograph on her property. She lives nearby and owns several acres of land with an open area, vegetable garden, flower beds, woods, and a pond by the house with aquatic plants, dragon flies and frogs. She has two permanent bird feeder locations that are near bushes and tall trees. One is located at the far end of the yard with the other near her house. Bushes and tall trees were nearby both. They provide cover from which the animals could safely approach the feeders as well as escape if threatened by hawks, foxes, or other predators. When the weather allowed from late April until today, I would spend several hours early in the morning or late in the afternoon photographing in her yard. In July when, temperatures soared into the mid to high 90s and humidity rose feeder activity slowed and was limited to the cooler times of the day and after sunset. The drop in activity seemed to continue into September.

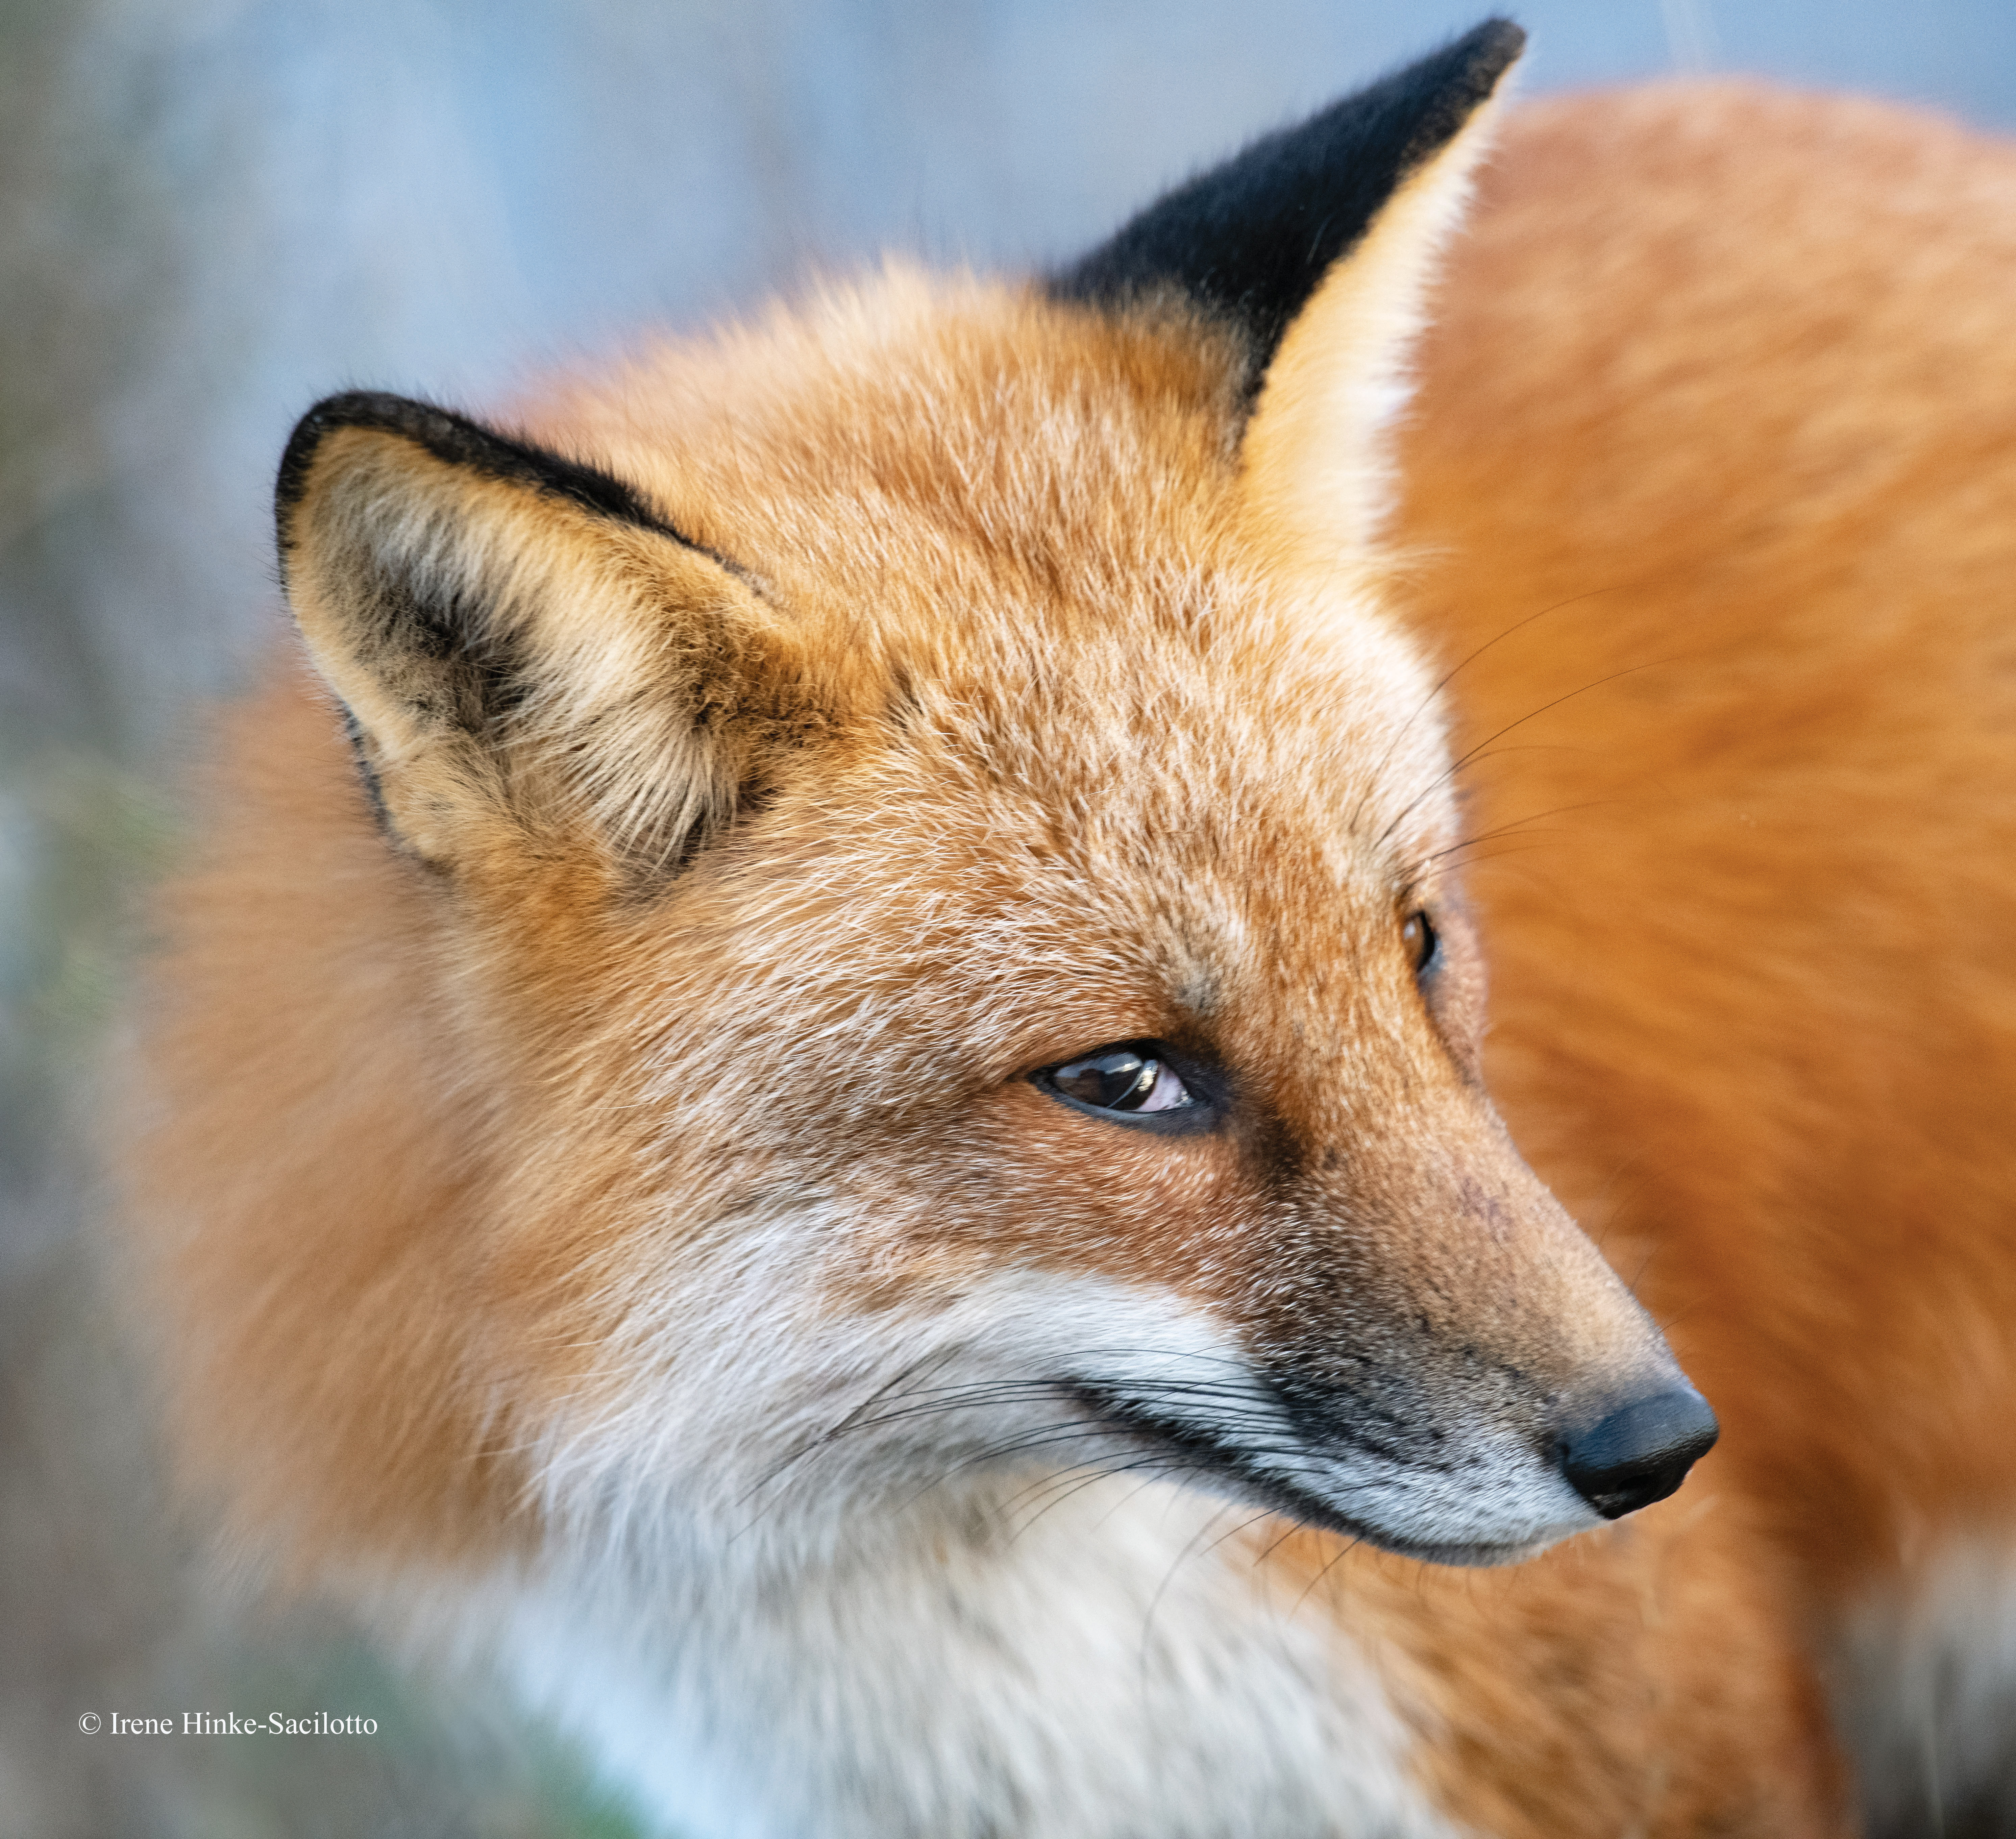
Red Fox emerging from woods.
Initial setup
In late April, I began photographing at the bird feeder nearest the house. It was close enough that I could photograph from my friend’s dining room window. In addition to standard bird seed and suet feeders, we hung a thistle sock on a branch to attract gold and purple finches. The non-melt suet, that could withstand the summer heat, attracted the small woodpeckers, chickadees, and nuthatches. At times we added meal worms to the mix, which seemed to be a favorite of the Carolina Wrens. The bird feeder at this location was elaborate with arms and multiple hooks from which to hang a variety of feeders. I added a few natural perches for the birds to land on, but to my disappointment, they seemed to prefer sitting on the iron appendages of the feeder stand. After several days shooting, I concluded that the way the sunlight hit the area was not ideal for it cast unwanted shadows on the birds. In addition, the bushes behind the feeders were very close making it difficult to blur the background even with the lens wide open and a shallow depth of field. It became even more distracting when hit by bright sunlight.

Raccoon eating apple put out to attract deer.
Second location
Adaptability, perseverance, and patience are all keys to successfully photographing animal behavior. When I failed to get satisfactory results at my first location, I shifted my attention to activity around the permanent feeder at the far end of the yard. Nearby, there was a bird bath and kiddy pool filled with water to attract wildlife on hot dry days. Since I did not want to photograph the birds at the feeder, I created what I have affectionately call my animal jungle jim. With logs, tree roots, branches, other items that I collected roadside and from nearby woods, I created a setup where I hung additional feeders and provided a safe place for the birds to perch. At key locations on the logs, I smeared peanut butter and suet. For the squirrels, raccoons, and jays, I added unsalted, raw peanuts to the wildlife buffet. After watching squirrels for an extended period of time, I am convinced that they are smart and agile and that very few bird feeders are squirrel-proof.

Black-capped Chickadee with the sun breaking through trees behind it.

Post to attract woodpeckers and the birds with suet block nearby.
Urban Wildlife Photo Project (cont.)
Periodically, I changed the arrangement to vary the background in my photos. For variety, I added a vertical 4-foot-long tree trunk cemented in a bucket that I could move to different locations. I baited it with a peanut butter/suet mix and placed a cage filled with suet nearby hoping woodpeckers and other birds would first perch on the trunk before jumping to the feeder. I added a small tree to the mix for birds to perch in, hoping to vary the appearance of my images.
Carolina wren on post.

Downey woodpecker on side of tree trunk.

Frog escaping from backyard pond.
Dragonfly at pond
A couple days when activity at the feeders was low, I switched my attention to smaller subjects, dragonflies and frogs. But I only had my Nikon 200 to 500 mm lens with me instead of my 200 mm macro lens designed for close focusing. When I moved forward towards the subject to increase magnification to what I desired, the autofocus could not lock on it. Remembering a similar situation in the past, I switched to manual focus and discovered I could get closer to the subject and still keep it in focus. For the dragonfly, I had to avoid my shadow falling on it. I took advantage of the fact that if it flew away, it typically returned to the same spot. For the frog photos, I had to be careful to stay low and move slowly. The biggest problem was finding a camera angle where the background was satisfactory.

Gray squirrel peaking around tree trunk.

by Osprey Photo Workshops & Tours | Oct 27, 2019 | Mc Neil River State Game Sanctuary, Nature, Nature Photography, Uncategorized, Wetlands, Wildlife, Wildlife Photography
Passion for Wildlife Photography

Inspiration
Why is wildlife my favorite subject to photograph? To begin, I inherited love of animals from my father. He lived in the Baltimore’s inner city in a row home with 12 siblings, but escaped whenever possible, walking great distances beyond city limit into the woods with his dog by his side. I am grateful for the knowledge he shared and reserving free time to take me for walks in the woods turning over logs looking for salamanders and in treetops for squirrels. He instilled in me an appreciation for nature and love of animals, no matter how common or unusual.
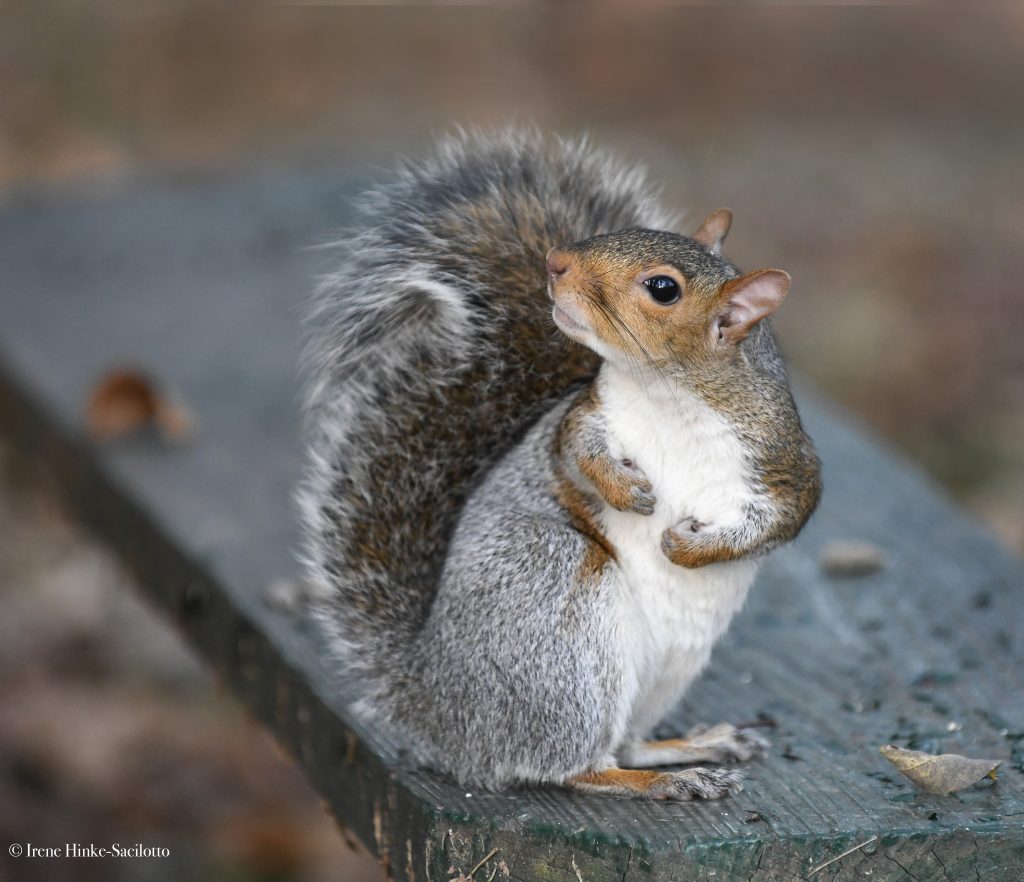
The Eastern Gray Squirrel is commonly found on the east coast of the U.S. They are known for their acrobatic skills. With specialized feet that you can see here, they can hang upside-down on trees trunks, run along the top of a fence, and gain access to the most sophisticate bird feeders.
Engagement & Mindset
I am curious by nature and love the challenges that wildlife photography presents to include locating animals and anticipating behavior. For me, the pursuit of wildlife photography has a calming influence in my life. I call it “Photo Yoga”. When observing animals, my attention is totally focused on the subject. Negative thoughts, worries, and concerns disappear. Immersed in moment, I often instinctively sense what is going to happen next as my subconscious recalls past encounters and visual cues. Even if I never take a shot, each encounter provides me with a mental database that helps me take better images in the future and with stories to share. The observations are often interjected in my presentations for camera clubs and entertain friends. For some photographers, post processing is the favorite part of rendering an image. For me, my greatest joy is capturing images in the field.
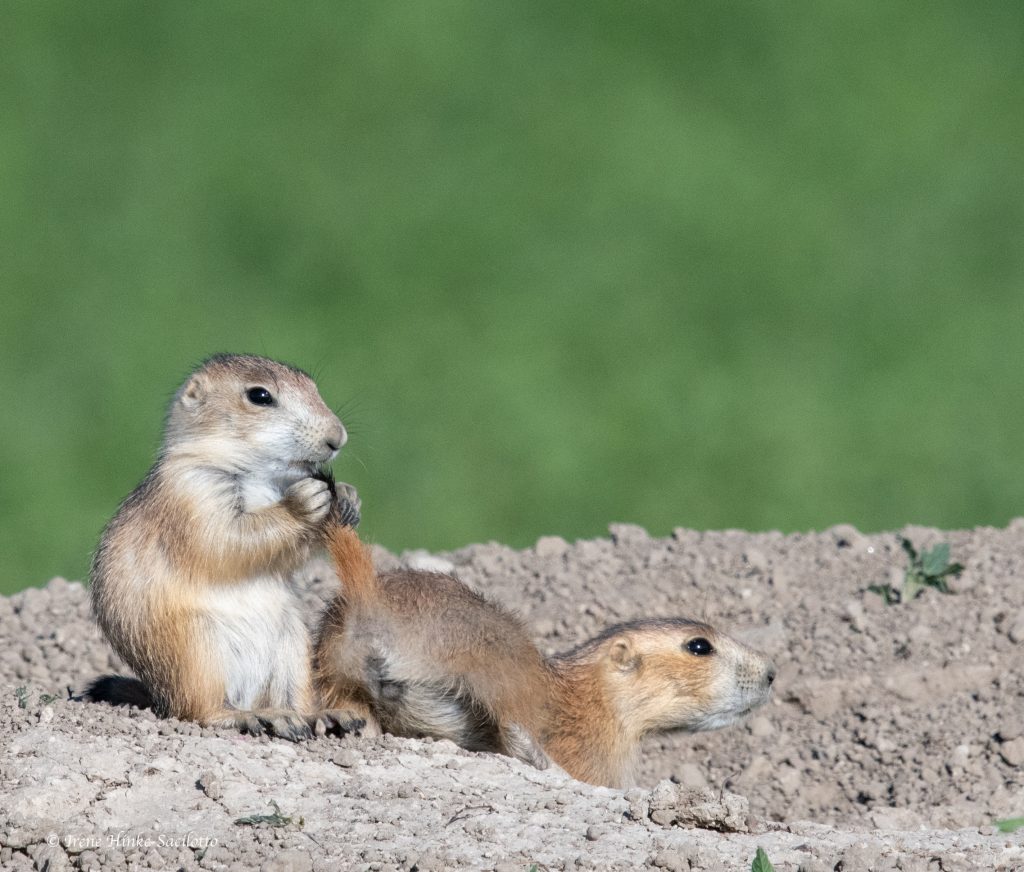
Humor is infectious. I had to laugh when watching this young Black-tailed Prairie Dog playing with the tail of its sibling.
Patience & Perseverance
Patience and perseverance are critical for capturing great images of wildlife behavior. Maybe nothing is happening at the moment. But if you wait, conditions may change. Stay focused but be open to other possible images, different than those you originally had in mind.

This wallaby mom and her joey hung out near my room at O’Reily’s Guest House in Australia. I looked for the pair each day when I walked passed the area. One day, both were in the open and allowed me to capture this and other images.

I spent a long time with this pair of wallabies and took a number of photos of them. This one shows the size of the joey. I suspect junior may shortly be too large to be fit in mom’s pouch.
Knowledge, the Key to Success
The more you know about your subject, the better your photography. Careful observation of animal behavior and research are crucial. Now web searches make gathering information much easier than years ago. Talking to researchers, hunters, fellow photographers, and birders can be quite helpful understanding what you are observing and making it easier to anticipate action.
I saw this Great Egret beginning to stretch after sitting on this branch for a long time. It extended its wing and then stretched its leg. I was lucky to capture this image at the exact moment that the bird’s leg was extended with the wing behind.
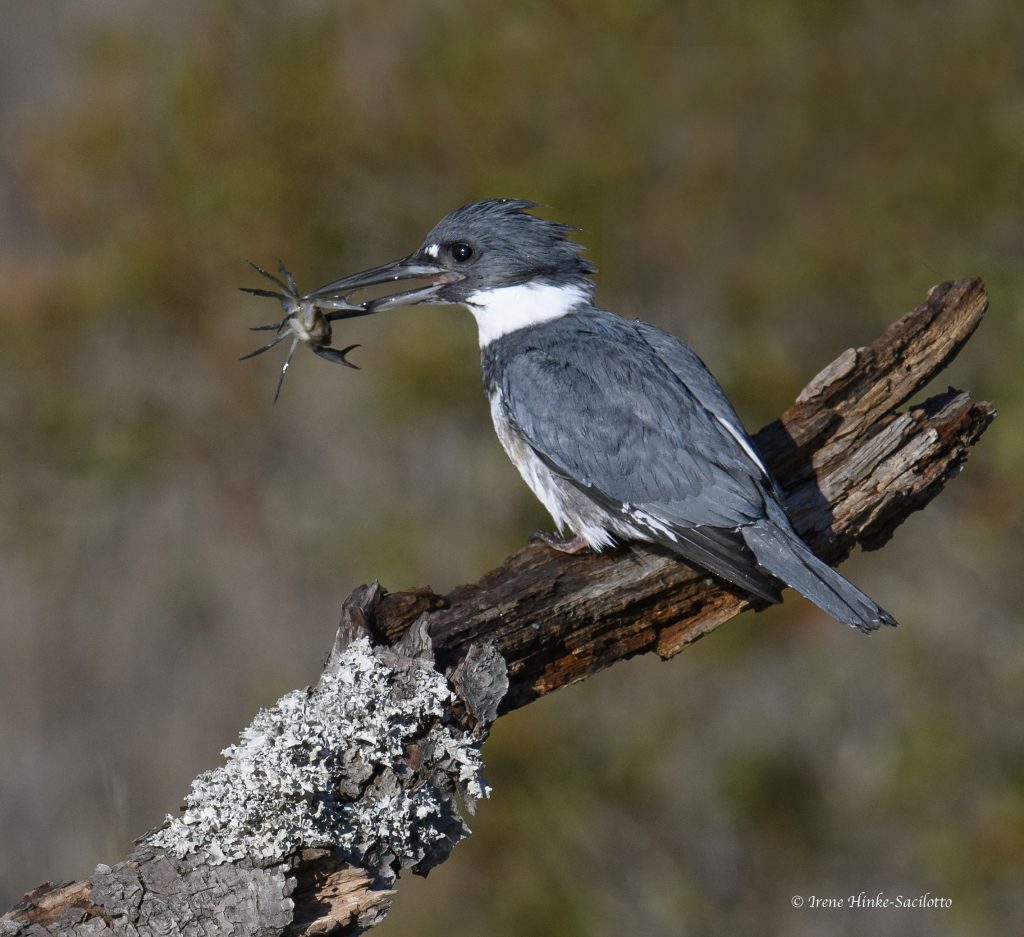
After this Belted Kingfisher caught a crab, it shifted the position of the crab in its bill a number of times trying to eat it. By taking a series of photos in rapid succession, captured this shot at the exact moment that the crab’s claw showed against the background.
Relax and Let your Imagination Soar
Give up preconceptions or labels. Keep an open mind with child-like curiosity and enthusiasm. Be flexible and experiment. Move and change your camera angle. I might lie on my back for an interesting point of view or shoot while lying on my belly. Zoom out for wider views of the surrounding or increase magnification to capture detail. Sometimes I give myself assignments designed to stretch my imagination. I go into the field with a single lens or shoot only with slow shutter speeds.

Ribbon Snake photographed while lying on my belly for a unique point of view.
Identify the Attraction
When photographing, it is important to identify what initially attracted you to the subject. Is it rim-light, texture, patterns, repeating elements, reflections, detail, surprising behavior, unique appearance, etc.? Once you realize what attracted you, then select the lens, approach, and lighting that best captures that feature. Look for shots that tell a story and unique behavior.
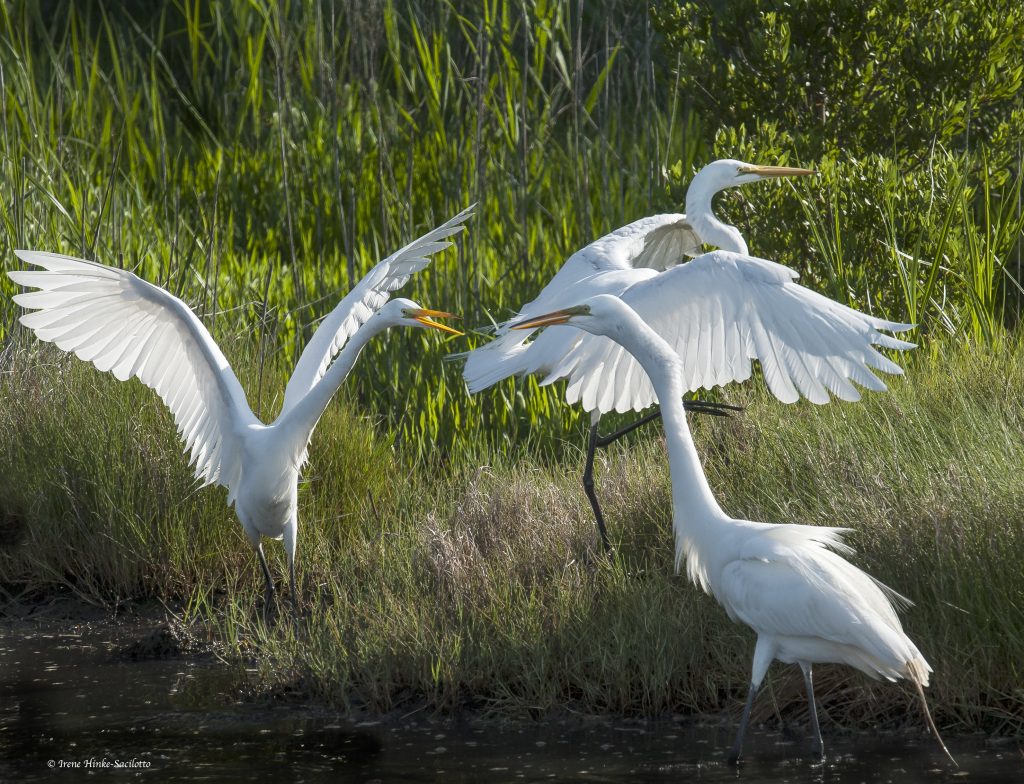
This image shows Great Egret fighting over something. In this case, the squabble was over a pool of water filled with small fish. Apparently, the third bird wanted no part of the disagreement.

Sanderlings are small shorebirds that feed along the shoreline. When waves retreat, the birds follow and feed on mole crabs and other organisms as wet sand is exposed. With incoming surf, they run ahead of it to avoid being swamped.
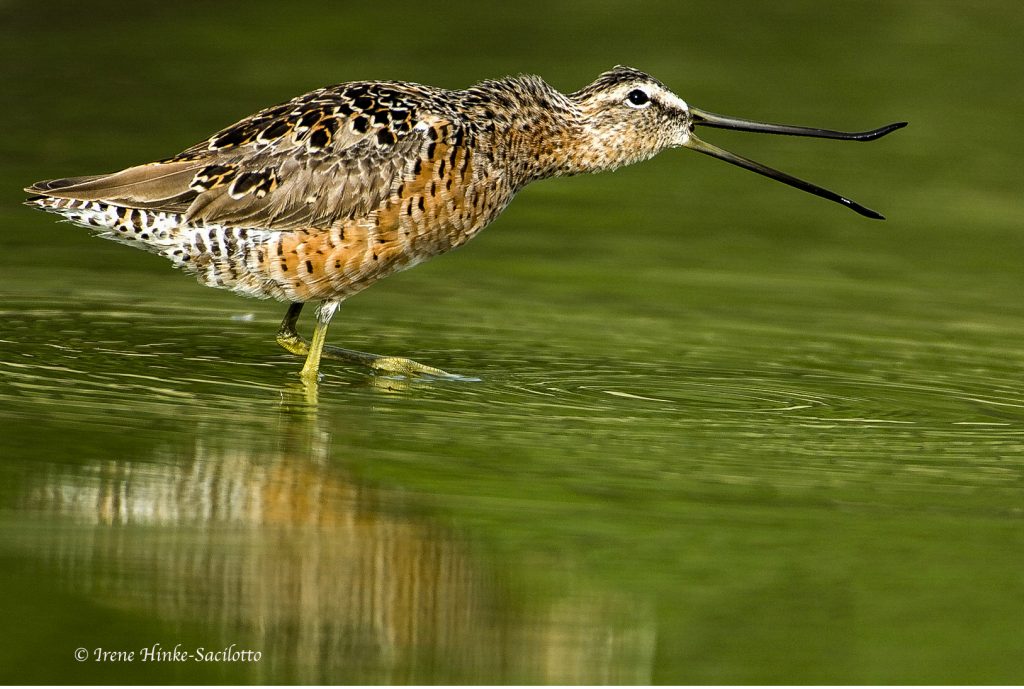
This photo of this Long-billed Dowitcher yawning, shows that the bill is not rigid. The tip with tactile receptors can be manipulated as it feeds making it possible for it to locate prey by touch.
Refining your Images
In the field, I continuously refine my images. Typically if there is time, I take a series of photographs attempting to make each one better than the last. I examine the composition, carefully scan the edges of the frame, and look for potential flaws and distractions. I also consider alternative points of view so I can take full advantage of each situation. I look for lines, contrast, color, etc. that can lead to the subject and keep the viewer’s eye engaged and within the frame. I may spend hours with one subject or return day after day.

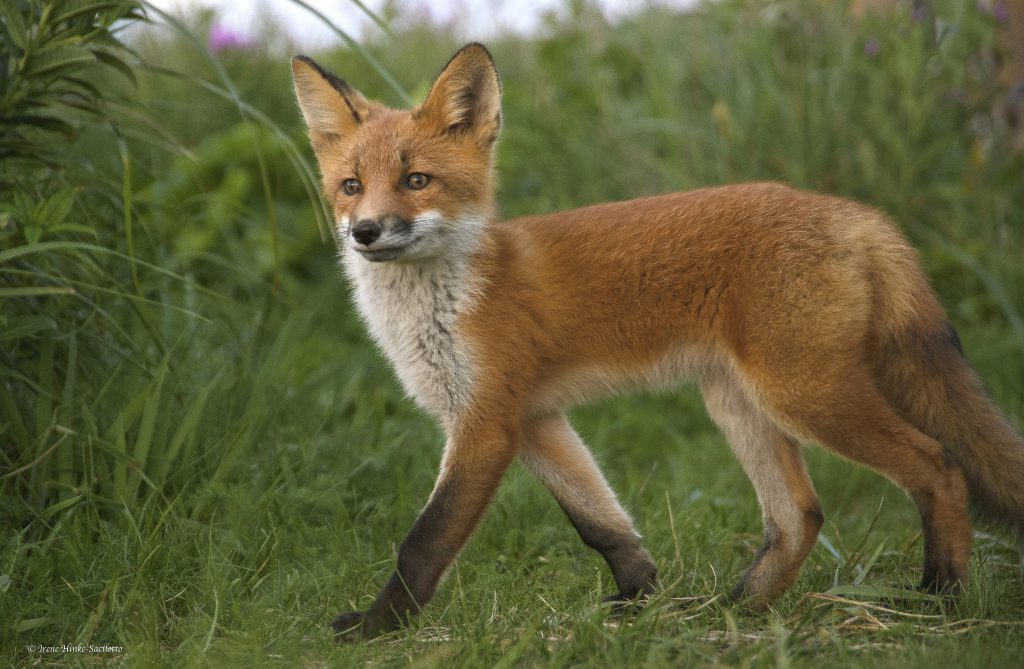
Red Fox image captured with an expression that suggests the saying “sly as a fox”. I took several shots of the fox at the time but this was the only one with this look.
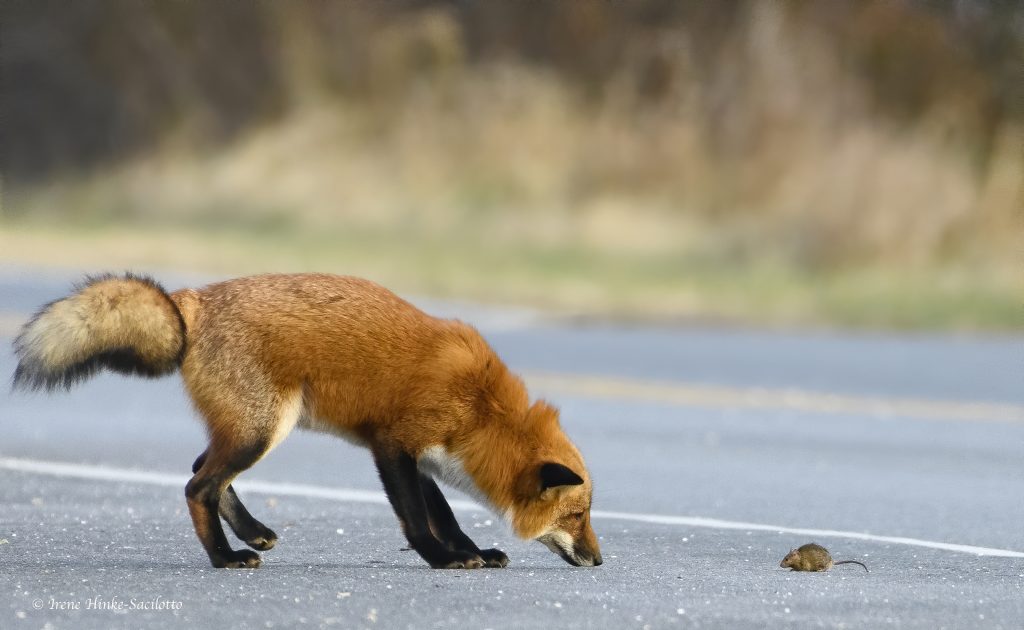
Red Fox standoff with mouse at Chincoteague, NWR. Every day during this trip I looked for fox in same area where I first saw it. Eventually I spotted it toying with a mouse and moved in to take this photo.
Background Control
Sometimes I squint my eyes when looking at a scene to exclude less important details and see what stands out (including lines, forms, etc.) or could present a problem. For example, I use this technique when photographing a subject as a silhouette to be sure its shape does not blend with other unlit portions of the scene and that the animal is recognizable by outline alone.

Silhouette of heron with fish in bill.
For close-up photography, I sometimes shift my camera’s focus off the subject and focus on the background for an instant. This technique allows me to more easily see if strong forms, bright highlights, or other distractions are in the background and may be a problem. Then I refocus on the subject with this information in mind.
The longer the focal length of the lens, the narrower angle of view. So, these telephoto lenses can help you exclude a something distracting in the background. Small shifts in the camera position can dramatically control what appears behind your subject. In some situations where the subject is in sunlight but the background is distracting, I position camera so that a shadowed area falls behind my subject. This approach creates a dramatic image, as is if the animal is lit by a spotlight.

Yellow-Crowned Night Heron after catching soft crab. The bird was in sunlight but the background was in shadow. I made the image a bit more dramatic by darkened the backgound even more during post-processing .
Shooting from a position level with your subject is often desirable, producing less distortion of the image and suggesting a more intimate relationship between you and your wildlife subject. The lower angle can also help isolate the subject if the background is distant and well out of the depth of field.

Black-Tailed Prairie Dog family

Black-Tailed Prairie Dogs nose to nose.
Capturing the Unusual
I love capturing the unique aspects of an animal’s morphology and behavior. I look for the unexpected, humor, or the emotion evoked by the scene. Every situation is unique, for the behavior, environment, and lighting is never the same. Don’t pass up on an opportunity expecting it to be there tomorrow. It won’t!
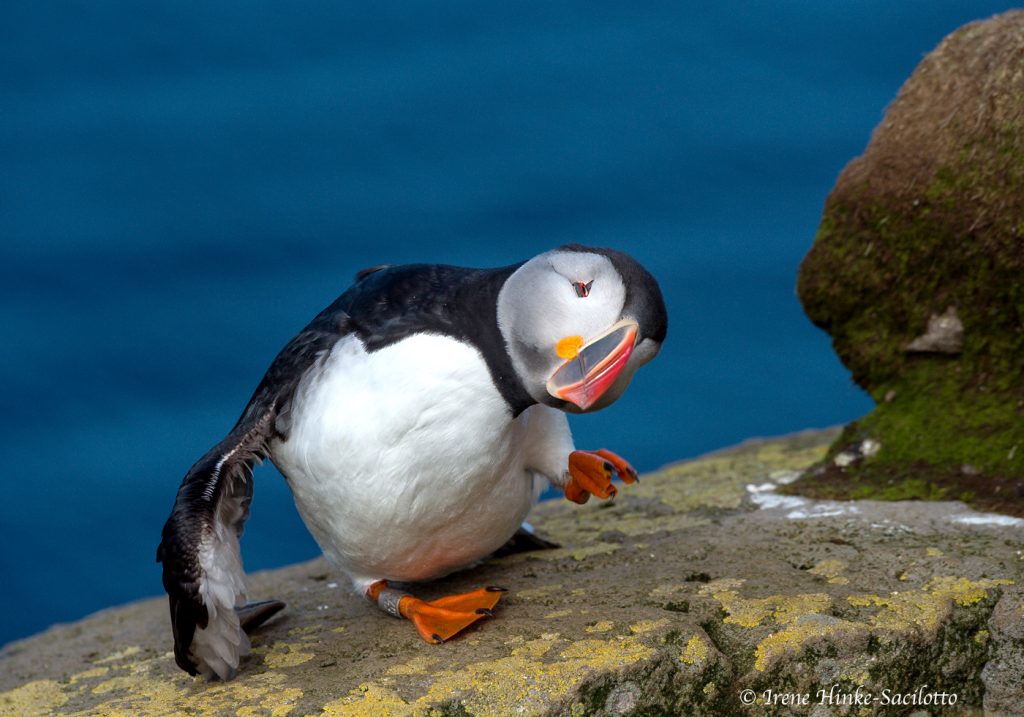
Unique photo of Atlantic Puffin using wing for balance while scratching.
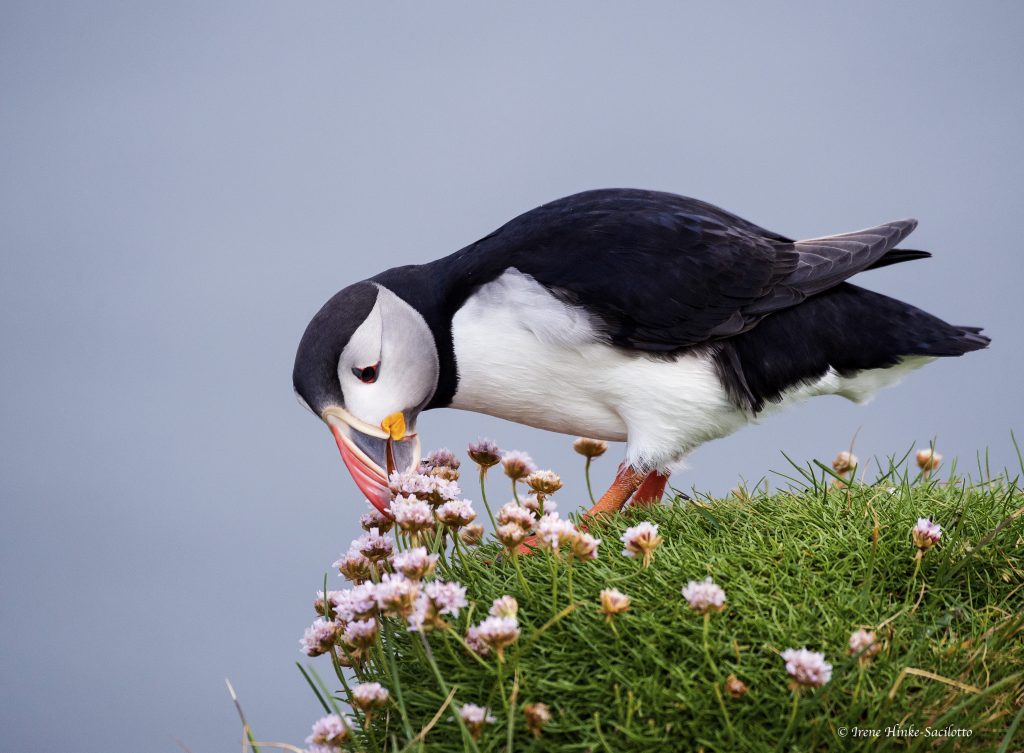
Atlantic Puffin eating flowers. This was so unexpected, that I took a number of photos at the time but only one best showed what the puffin was doing. The distant background and relatively shallow depth of field helped make the bird bird and flowers standout.
Imaginary Gallery
To judge the impact of a photograph, I sometimes imagine it hanging on the wall in a gallery. I examine the photo as if seeing it for the first time. Then I ask myself, have I conveyed the thoughts and feelings I experienced while taking the photo? Is the composition static – perhaps with the subject centered or with the horizon in the middle of the frame? Is the viewers eye drawn into the scene? Does it convey a story?

This is a humorous shot of a young Brown Bear struggling to hold onto a slippery salmon at McNeil State Game Sanctuary in Alaska. I love the story.
I always am learning something new from magazine articles, youtube, experiences in the field, and from other photographers. I keep my workshops small so I can provide individual attention to each person, no matter their skill level. No one should ever be embarrassed to ask questions. I typically learn something each time I conduct a program. If you have an open mind and see disappointments as opportunities, you will gain from your experiences. Everyone has his own unique vision. This becomes very obvious during my workshop image reviews. Even though the photographers are at the same location at the same time, the resulting mages are normally quite different.

by Osprey Photo Workshops & Tours | Mar 13, 2019 | Alaska, Bald Eagle, Bristol Bay, Brown Bears, Environmental Impact, Mc Neil River State Game Sanctuary, Nature, Wetlands, Wildlife
Pebble Mine and Its Negative Environmental Impact
The following expresses my feelings and concerns about construction and operation of the Pebble Mine in Southeast Alaska and it negative impact on the environment and Bristol Bay ecosystem, spawning sockeye salmon, and the bears of Southeast Alaska.

Bald Eagle in Homer.
The construction of one of the world’s largest open-pit mines will require the building of significant amounts of supporting infrastructure, including roads, a power plant, pipelines, and a port, and the resulting development would have destructive environmental impacts for hundreds of square miles. The disturbance of this pristine area including Mc Neil River State Game Sanctuary and Katmai National Park where coastal brown bears gather each year to feed on salmon is distressing. The application submitted to the Army Corps of Engineers includes a deep-water port at Amakdedori beach and road that stretches across prime bear habitat from near Kokhanok, AK to the shoreline. This proposed road comes within a mile of the McNeil River State Game Refuge boundary and the port facility is within sight of a world class bear viewing destination.
The activity along the road and associated construction and operation of a deep-water port nearby and mine is bound to have a highly detrimental effect on the bears and other wildlife that live in the area. For years the government has exercised great care to protect the bears and provide safe bear-viewing for the public. This includes minimizing negative interactions between the bears and humans by enforcing rules to avoid harmful encounters. Activities around the mine and port will certainly undo these efforts.
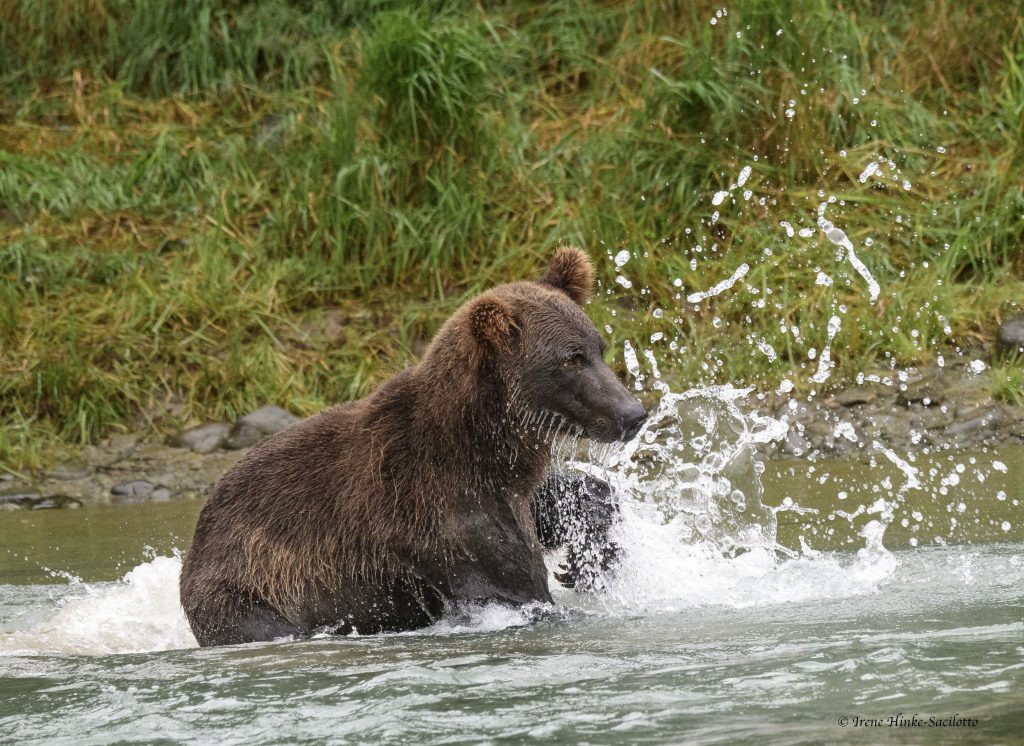
Brown bear chasing salmon.
People from all over the world are attracted to Alaska for the possibility of seeing bears and other wildlife roaming free. They spend millions of dollars in Alaska for the opportunity and contribute billions to the economy of Alaska – food, transportation, lodging, tour guides, park fees, etc.
Regarding Mc Neil River, there is no place like it anywhere in the world. I am now 70 and last year I had the privilege of visiting Mc Neil River, after a number of years trying to win the state lottery for the privilege. It was one of the most incredible experiences I have had in my life. I am a professional wildlife photographer and nature photo tour leader. I have been to Africa, Argentina, Iceland, Chile, Newfoundland, the Falkland Islands, Northwest Territory, Churchill Manitoba, Nome, Australia, and New Zealand, so I have been to many premiere natural areas around the world. But I never experienced a thrill like that of sitting quietly photographing and watching the bears feeding on salmon at the lower falls at Mc Neil, feeling unthreatened with some bears walked by only 12 feet away.

Brown Bear Standing in grasses near lower falls of Mc Neil River.
I was horrified when I found out that the Pebble Mine project may be approved. The largest sockeye salmon run in the world will be disrupted along with the fishery industry in Southeast Alaska. Equally important, bears and other wildlife (bald eagles, killer whales, other marine animals, etc.) will be adversely effected since they depend on the salmon for survival. Removal of groundwater in order to operate the mine will dry up streams, lakes, and wetlands necessary for salmon eggs, young salmon, and their food source to survive. No amount of recycling the water supply after waste water cleanup will return the water and waterways to their original state. The mine with its associated structures is located near a fault, in an area where earth quakes and severe storms with heavy rainfall are possible. Not only will the blasting involved in the mining process disturb wildlife but I question whether it could actually trigger earthquakes. The acid waste from extracting copper and gold from pulverized ore contains cyanide, toxic metals such as lead, selenium, cadmium, and arsenic, and other contaminants can potentially leach into nearby waterways and lakes. Efforts to permanently contain this poisonous waste are destined to fail.
It is not worth damaging Alaska’s natural resources including the fragile Bristol Bay ecosystem and wildlife populations just to benefit developers and foreign investors. Any perceived economic benefit will be offset by the cost of restoration if there is a mishap during the construction or operation of the mine, deep water port, and any associated activities. Remember the Exxon Valdes oil spill, a tragedy thought to be unimaginable. The damage to the environment was catastrophic and the cost of clean-up was in the billions of dollars. The benefit from the construction of the Pebble Mine is not worth the threat to human population nearby and the incredible ecosystem where salmon spawn and bears roam free. This pristine region of Southeast Alaska is unique in the world. In addition, Issuing a permit for the construction of the Pebble Mine will open up other areas in the Bristol Bay region and southeast Alaska to mining which will result in farther degradation of the environment and more threats to wildlife.
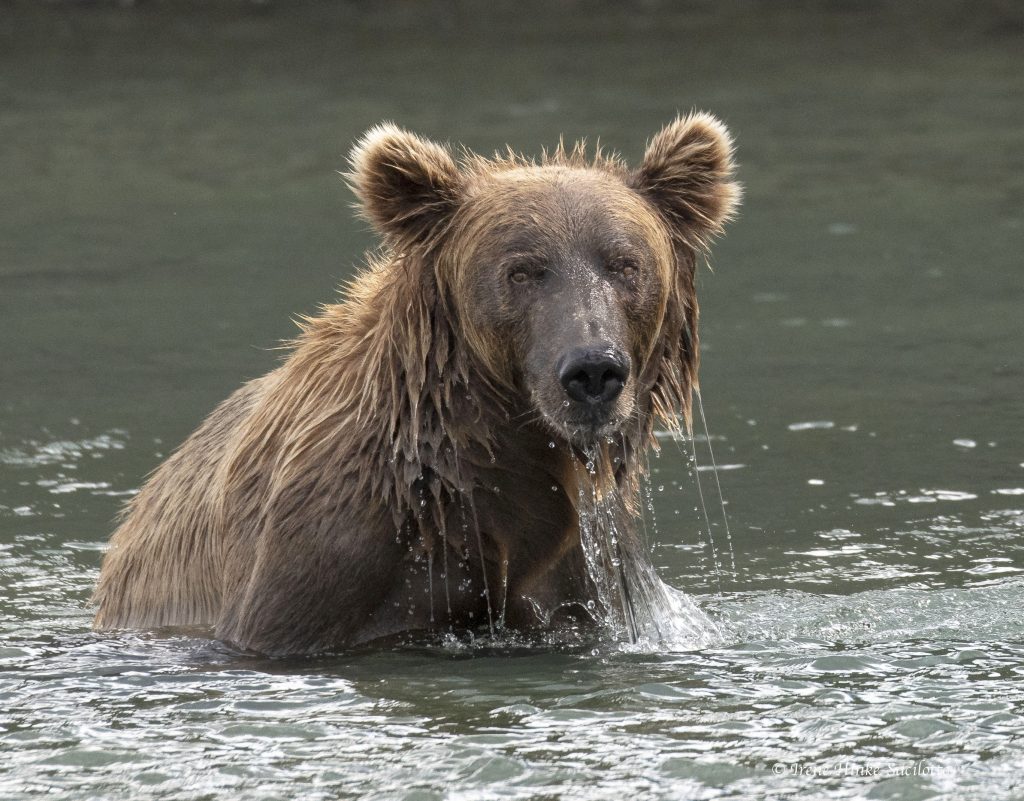
Coastal Brown Bear feeding in the waters at the lower falls of Mc Neil River.
What kind of world to you want to leave for your grandchildren?
What Makes America Great are places like Mc Neil River State Game Sanctuary where in July as many as 80 brown bears gather to feed on salmon, where millions of sockeye salmon spawn, and where wildlife thrives on the land and in the waters of Bristol Bay.
I believe that the Pebble Mine Draft Environmental Impact Statement should be resubmitted and replaced with one that is more comprehensive and backed by data that can validated. This project is huge with many ramifications and the potential of having far-reaching negative on the environmental and the delicate ecosystem of Bristol Bay. That which it will destroy, cannot be replaced.
See my previous blog on Mc Neil River State Game Sanctuary and Coastal Brown Bears.
Young Red Fox in South East Alaska.
***********
For more info and links on the Pebble Mine and where you can comment to the Corp of Engineers regarding the project.
Orvis.com/nopebblemine
Regarding the Army Corp of Engineers approval of the Draft Environmental Impact Statement on the Pebble Mine you can go to their website. https://www.pebbleprojecteis.com/ A quote from their web page reads as follows: “The public comment period will run from March 1, 2019 through May 30, 2019. You can submit comments through testimony at public meetings, email to drafteis@comments.pebbleprojecteis.com or mail them to:
Program Manager
US Army Corps of Engineers
645 G St.
Suite 100-921
Anchorage, AK 99501
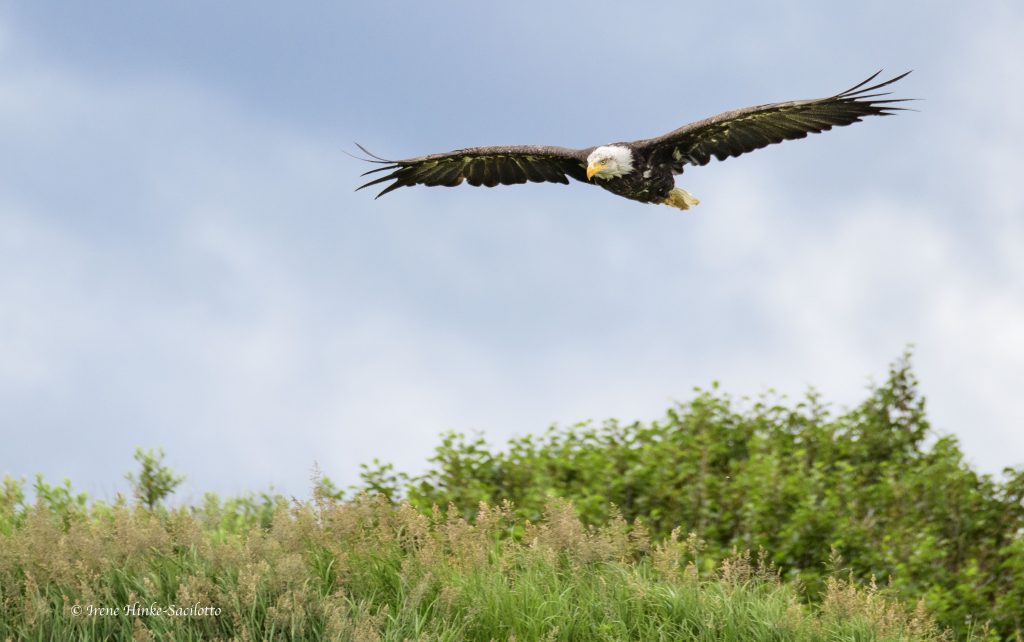
Bald Eagle flying over cliff at Mc Neil River State Game Sanctuary.

by Osprey Photo Workshops & Tours | Apr 8, 2017 | Flower Photography, Garden Photography, Longwood Gardens, Nature, Nature Photography, Photo classes, Photo instruction, Photo Technique, Photo Workshops
Photography at Longwood Gardens
in the conservatory
and for similar conditions elsewhere as in a greenhouse
Close-up Photo Tips
Next photo workshop featuring flower photography – 14-15 April at Norfolk Botanical Garden. For info, see my website www.ospreyphoto.com or http://norfolkbotanicalgarden.org To register call (757) 441-5830
Introduction to Photography at Longwood Gardens
A legacy left by Pierre du Pont, Longwood Gardens consists of over 1,077 acres of indoor and outdoor gardens with fountains, reflecting pools, flower beds, woodland trails, and meadows. Located near Kennett Square, Pennsylvania, in the Brandywine Creek Valley.
The 4-acre indoor Conservatory of Longwood Gardens houses plant displays that are varied throughout the year. It is divided into climate-controlled rooms representing various climates and plant species from around the world. My favorite is the orchid room, filled with species from all over the world, varying in color from red to black, with some shaped like lady slippers and others resembling insects. At any time during the year the display showcases 200–300 of the 6,200 orchids housed at Longwood Gardens.

Orchid Arch
Depth of Field (DOF) Issues
The more you magnify your image, the shallower the depth of field in the photo, i.e. the amount of scene that is sharp in front and behind the point of focus (1/3 in front and 2/3 behind). With high magnifications, you can increase the depth of field slightly by selecting a higher f-number (smaller lens openings) but with extreme magnification this may have only have a marginal effect. You may opt to use less magnification to gain depth and then crop the image during editing to exclude the unwanted surroundings.
A shallow depth of field is not necessarily a bad thing and can be helpful to isolate the subject and keep the background from becoming a problem by being well defined. Isolation of the subject in this fashion is particularly effective if the background is at a distance and you are shooting eye-level with the subject. But shallow DOF can be a problem if the subject you wish to photograph has depth and you wish to capture detail front to back.

Orchid – photo focused on internal parts
Flat Surfaces
When photographing patterns on a leaf or a group of multicolored leaves or flowers, you need to have the face of the lens parallel to the surface to have all portions of the scene within the DOF. To photograph from above a pattern created by a group of leaves or flowers, select a section of the scene where the vegetation is of nearly equal height and distance from the lens. A cell phone with built in camera can have an advantage here because it can be more easily positioned at the desired angle over the subject without the constraints of a tripod or the weight of a heavy camera/lens system.

Leaves shot with i-phone
Purple pattern
Manual Focus
Manually focusing your lens allows you to precisely select the part of the scene you wish to be sharp. With some lenses, manual focusing allows you to focus closer to the subject than when using autofocus. This slightly increases the magnification possible with that lens.
Stacking
George Lepp and others have used the technique of stacking to sharply capture each layer of a subject, controlling what is, and is not in focus. This requires taking multiple images of a stationary subject at different but overlapping points of focus and using software such as Helicon Focus. The technique can be used with macro and landscape subjects. For details, see George Lepp’s article in Outdoor Photographer Magazine. http://www.outdoorphotographer.com/tips-techniques/photo-editing-tips/unlimited-depth-of-field/

Orchid Pair
Distracting Backgrounds
It is easy to be caught up with the beauty of a flower or other subject that you ignore obvious distractions in the background. For a photograph to be successful, it is important that the viewer can immediately identify the subject. Anything that directs the eye away from it should be avoided. Such distractions can be particularly troublesome in the conservatory on sunny days. Carefully examine the image in your viewfinder looking for bright or colorful vegetation behind the subject, shiny objects, lights, hot spots from sunlight striking the background, shadows from overhead struts supporting the greenhouse glass, and object appearing to grow out of your subject. If close to your subject, make sure your own shadow is not falling on a portion of it.
Because of the shallow depth of field common with high magnification, you may have a difficult time recognizing distractions behind the subject. One trick to avoid this issue is to temporarily shift the focus of the lens from your subject to the background in search of potential problems – bright areas, shiny objects, strong forms, bright colors, etc. Note possible distractions and then refocus on the subject, keeping these observations in mind. If necessary, move or recompose your image to avoid the offending items.

Jonquil
Visualization
Take the time to visualize your final results. When approaching a subject, always identify what drew you to it initially. Was it its color, abstract patterns, shape, texture, etc. Consider the best lighting and depth of field to emphasize these features. Adjust the f-stop and position the camera accordingly.
Light
Low light can be an issue in the conservatory in areas heavily shaded or on overcast days. High ISO settings on your camera may be required so select your camera that has the best response under these conditions. With many cameras, ISOs higher than 400 are accompanied by noise that reduces image quality and appears as random specs of color and/or something similar to film grain. In your shooting menu, you may have special settings to improve performance at high ISOs or when using slow shutter speeds. Turn them on but don’t forget to turn them off when conditions change. Avoid under exposure since noise becomes more evident as you lighten the exposure. Noise is the most noticeable in dark areas of the image and if the image is underexposed. Editing programs such as Adobe’s Lightroom and software plug-ins provided by Nik and Topaz can help reduce the appearance of noise without compromising image sharpness.
Playback Display Options
In your playback menu on your camera select display options that help you recognize exposure problems. Turn on the histogram and highlight indicator that shows where the image is overexposed and detail lost.
Wires and Sticks
Plants on display are often supported by wires or sticks, so try to avoid capturing them in the photo. This may require changing your shooting angle or magnifying the subject to better isolate the most interesting aspects of the plant. Consider using an editing program such as Adobe’s Lightroom, Photoshop Elements or Photoshop CC to remove the offending object using clone or healing brush tools. In the Lightroom program, you can also use the adjustment brush to lighten or darken areas, open up shadows, and control contrast, sharpness, saturation, etc. The spot removal tool can be used to cover problem areas.
Have fun. The orchid image below was oversaturated intensionally during editing for a bazar artistic effect. I struggled to keep a window sill out of the photo so I avoided it by filling the frame with the subject.

Orchid – High Saturation
Spot-lighting
If the subject is in the sun or is back-lit and background is busy, search for an shadowed area that can be positioned in the frame behind the subject. If no natural shadow is present, have a friend cast a shadow over the offending area or create one of your own.
Polarizer Filter
Mounting a polarizer on your lens can remove reflections from the surface of leaves, water, windows, and make the sky appear bluer. To use one, rotate the outer ring until you remove the offending glare. However, they remove a component of light resulting in slower shutter speeds for the same f-stop, There are warming polarizers that some people prefer to reduce the blue in the image.

Orchids part of Orchid Arch
Lenses
There are applications for any lens from wide angle to telephoto in the garden; however, for flowers close-ups, macro lenses are the most versatile. They are designed for high magnification and are extremely sharp edge to edge with low image distortion. Compared to a standard lens, they able to focus on subjects at a closer distance and thereby magnify the image. Many can reach a magnification of 1:1without accessories. They come in different focal lengths with the 105 or 200 mm lenses being my favorite. The shorter lens has vibration reduction and is easier to handhold but I prefer to use a tripod for stability when possible. The longer focal length lens has a narrower angle of view making it easier to alter the background with slight shift in position. They also offer a greater working distance from the subject. This helps prevent your shadow falling across the subject. Also with live subjects, the greater working distance increases the chance that the subject will not be alarmed and not flee. With a dangerous subject, the extra room provides a safety zone. My 200 mm Nikon Micro-Nikkor lens comes with an adjustable collar around the lens so you can mount the lens on a tripod directly, providing better balance and stability. The collar (see image below) also allows you to easily rotate the camera orientation from horizontal to vertical or in between without having to adjust the tripod or detach the camera from the tripod. The down side to macro lenses is that they are more expensive than standard lenses.
Macro-Zoom lenses have the ability to focus closer to the subject than a standard lens but often they do not have the magnification power of a “true” macro lens and the image quality is often not as good. But they do offer a lot of versatility from one lens.

Colar for 200 mm macro lens
Extension Tubes & Close-up Filters
As an alternative for close-up photography, consider purchasing a less expensive set of hollow extension tubes (see image below) that fit between the lens and camera body and allow you to focus closer to your subject than with the lens alone and thereby increase magnification. With no glass involved, the images obtained are quite sharp. Another low-cost alternative is using close-up filters that mount on the front of your primary lens. The resulting images are not as sharp as with the other options but are suitable for aesthetically pleasing images. A tele-converter can also be useful when you cannot get very close to your subject. They increase the magnification of your primary lens without changing your position.

Extension Tubes
Movement Issues:
When using high magnification, movement of the subject or camera is exaggerated and can be detrimental to image quality particularly when using slow shutter speeds. Tripods and monopods help you steady the camera. They are allowed in the garden most of the year but their use is limited in the conservatory. You must obtain a permit to carry it at the info desk near the main entrance to the gardens (Some conditions apply for use, so see Longwood’s web site for guidance). Tripods are not permitted during times of high visitation, particularly during the Christmas season. They can only be used in the conservatory until noon and cannot be used in the Children’s garden. Be considerate of other visitors since the narrow paths can become quite crowed as the day progresses and for popular exhibits.

Hybrid Lilly
More on Tripods
Tripods are useful for more than serving as a stable platform for the camera. With the camera supported on a tripod, it is easier to carefully examine the image in the viewfinder and on the LCD screen for issues related to composition, image sharpness, or background distractions. In the playback mode, consider using your camera’s magnifier for more critical view of image sharpness and depth of field. I frequently use a Hoodman or similar loupe over the LCD when reviewing images in the field. It excludes external light so you can more accurately judge what was captured.
It is wise to invest in a good tripod suited to your needs. Those with legs made with strong carbon fiber are lighter and easier to transport. If you have the opportunity, take your heaviest camera and lens to a pro camera shop such as Service Photo in Baltimore and test various tripods with your set-up. Using an unsteady, cumbersome tripod can be worse than using none at all. I recommend using a ball head mounted directly on the tripod for most applications.
At times, using a tripod can stifle creativity. Often you mount the camera on the tripod, walk around the subject a little, plant the tripod in one spot, and never move it again. Try exploring camera angles without the camera mounted on a tripod. Once you have decided on the best approach, they add the tripod for support.

Orange Stamens
Unwelcomed air movement
Be sensitive to subject movement caused by environmental conditions. The conservatory’s fans, that help regulate climate conditions in each room, circulate air and create drafts that can cause leaves and flowers to move during exposure. Similarly the movement of people passing nearby or opening a door can also generate an unwanted breeze. Be aware of the potential problem and wait for a lull in the motion before taking your photo. To maintain a still camera when taking a photo, use an electronic cable release.

Mark & Adam
More Than Just Flowers
Flowers are photographically intriguing but don’t ignore the garden’s water features, the conservatory’s architecture, and aspects of the plants other than the blooms (the leaves, buds, seeds pods, vines, fruit, etc.). Since the conservatory is quite large, I suggest deciding on specific goals for your visit, perhaps specific rooms, flowers, or techniques. Have fun and experiment with unusual camera angles, abstracts designs, or special effects created by intentional camera movement. Visit local gardens, your own backyard, a nearby meadow, or even a florist shop to improve your skills and creativity.

Tile in Children’s Garden

Umbrellas Suspended from Ceiling

Art Deco Decor in Ballroom of Conservatory
by Osprey Photo Workshops & Tours | Jan 16, 2017 | Autumn photography, Fall photography, Nature, Nature Photography, Photo Tour, Photo Workshops, West Virginia
Southern West Virginia Photo Opportunities
On 14-16 October 2016, I held a weekend photo workshop in Southern West Virginia in the vicinity of the New River Gorge, using the centrally-located town of Beckley, WV as my base of operations. Typically this is a good time to photograph fall color in this mountainous region but this year had been drier and warmer than most. Leaves were just beginning to turn autumn colors and there was more brown than gold. But no mater what the conditions, you can always find great photo opportunities locally. New River Gorge National River, a part of the National Park System, protects 53 miles of the New River and covers 70,000 acres of the surrounding area.
The following is a summary of locations with photographic potential based on my observations during scouting trips to the area and this year’s and past photo workshops.
New River Gorge Rim Trail & Bridge
The New River Gorge Bridge is the longest steel span bridge in the western hemisphere and is the third highest in the U.S. The nearby Canyon Rim Visitor Center provides an overview of the area and nearby trails provide views of the bridge. Just north of the visitor center, off of route 19, is Lansing-Edmond Road, a narrow winding road that leads to trails accessing the canyon rim. From the Fern Creek Trailhead Parking lot, it is a relatively easy hike to the rim of the canyon where you can photograph the river, bridge, rafters, and the walls of the canyon. Diamond Point is one of the more popular overlooks, but there are numerous others that can be explored as well.
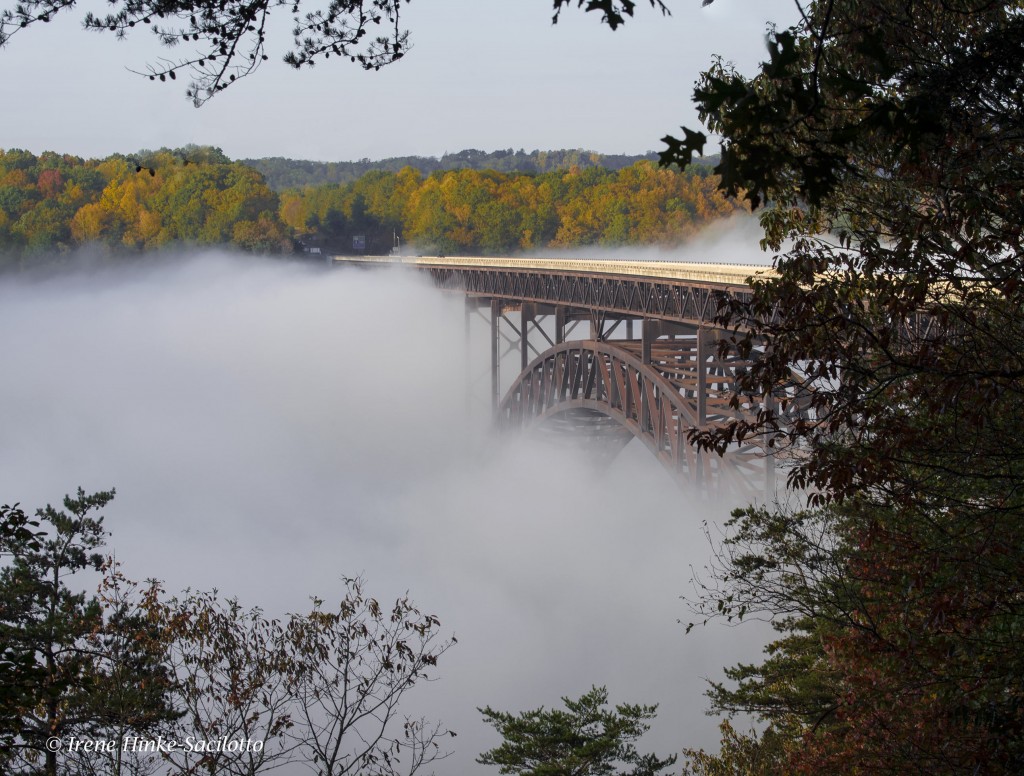
New River Gorge Bridge emerging from fog.

Cell phone shot of a mushroom along the trail to the canyon rim.
Babcock State Park and Glade Creek Grist Mill
The park is approximately an hour drive from Beckley, WV on back roads. I typically time my travel to arrive shortly after sunrise. This year mill’s water wheel was not turning due to damage caused by a severe flood in June. It is more likely to be operating in the spring when there is more water flowing in the adjacent creek. As with most of the locations visited this fall, the color of the surrounding trees was not intense, However the mill with the falls below still presents a number of interesting photo opportunities from both sides of the creek. Soft light is best at this location since on a sunny day as the sun moves higher in the sky, the contrast between the trees surrounding the mill and waterfalls intensifies. During this visit, I looked for subjects other than the mill to photograph, such as softly lit sections of the creek and colorful reflections in the water.

Glade Creek Grist Mill.

Glade Creek Grist Mill. Photo taken a number of years ago with better fall color.

Reflections in puddles from surrounding trees. Falls at Glade Creek Grist Mill, Babcock State Park.
Sandstone Falls
Sandstone falls is the largest waterfall on the New River. Located at a wide point in the river where it is divided by a series of islands, the river drops 10 to 25 feet. A boardwalk with overlooks span the waterways and offer a number of views of cascades and main falls. The first overlook is my favorite, where there is a series of small falls fanning out in a horseshoe shape. There are places to photograph both from the boardwalk and river bank. Access to the higher upper falls is not always possible dependent on the water level.
To reach this section of the National Park, go to the small historic town of Hinton where you cross the New River and travel parallel to its path until you reach the park. (Approximately a one-hour drive from Beckley.) A neutral density filter will enable you to slow shutter speeds for an artistic presentation of the water’s flow. These filters are neutral gray and reduce the amount of light entering the lens. Some are variable in strength and therefore are more versatile. Remove your UV filter before mounting these or a polarizer on your lens Besides extra layers of glass that can soften your image and contribute to flare, when using a wide-angle lens, vignetting of the image can occur (darkening in the corners of the frame). Each time I have visited the park, photographic opportunities differ. As I was leaving the area this time and heading back to Hinton, I noticed the backlit spray of water from the main falls and foreground trees and took the photo below.

Intrigued by the backlit spray from sandstone falls and the foreground trees, I could not resist taking this photo.
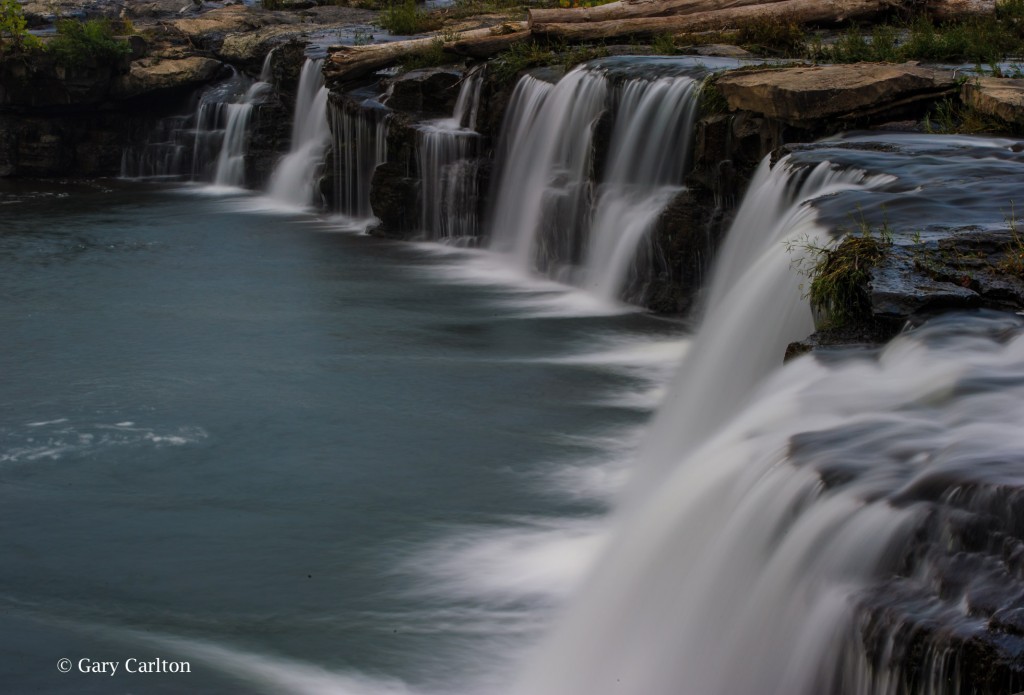
The above photo was taken by one of my 2016 workshop participants, Gary Carlton. He used a variable neutral density filter to for the first time to blur the movement of the water. Pleased with the results, he submitted this image during the critique portion of the program.

New River downstream from the main falls photographed with a slow shutter speed.

Foggy morning at Sandstone Falls.
Hawks Nest State Park
Hawks Nest State Park offers views of the New River from the side of the river opposite from the Canyon Rim visitor’s center. From Hawks Nest Lodge and overlooks from further down Route 60, there are interesting views of the river and surrounding mountains from a high vantage point. Also there is an aerial tramway to transport you from the lodge to the river below. When you reach the bottom jump off point, you can cross a small bridge and following an easy trail upstream to Turkey Creek Falls. Along the way you can capture photos of the trees gracefully overhanging the river, mushrooms, and wildflowers. Just before the Hawks Nest Dam, you reach a small bridge crossing the creek at the base of the falls. From the bridge and rocks below the falls, you have a good vantage point for photos. The best images of the falls have been taken in the spring when the flow of water is greater. During my visit this October, the flow was minimal.

Shot with the cell phone below Hawks Nest on the trail to Turkey Creek Falls. I used it to show workshop participants photo possibilities along the path to the falls.
Cathedral Falls
If you continue driving down Route 60 from Hawks Nest State Park, just before the town of Gauley Bridge, you will see Cathedral Falls on the right side of the road. Best photographed with late afternoon light. When the sun is high in the sky, there is too much contrast from the upper part of the falls to the base for a good exposure. I recommend using a telephoto lens to isolate portions of the falls, a 80 – 400 mm or 70 – 200 mm zoom lens. On the day of this year’s photo workshop, I spotted a rainbow reflecting in a portion of the falls. It would appear and disappear depending on where one was standing and only lasted for a brief period of time. Several workshop participants got great shots of the phenomena. During my scouting trip, the sky was slightly overcast and the rainbow was not present. But I still was able to capture the etherial beauty of the falls by isolating a section and using a slow shutter speed. Note: Typically I do not photograph with workshop participants during a weekend program, preferring to direct all my attention to helping them achieve the best results possible.

Cathedral Falls in soft light. The most beautiful portion of the falls captured with a telephoto lens.
Kanawha Falls
A short distance down Route 60 from Cathedral Falls is the small town of Gauley Bridge which provides access to the river for photos of reflections in the flowing water and of geese along its bank. Just southeast of Gualey Bridge is Glen Ferris where Gualey River and New River converge. Here you will find Kanawha Falls adjacent to a hydroelectric station. From a trail used by fishermen parallel to the main road, you can isolate a portion of the falls with a telephoto lens and exclude any evidence of the power plant. As an alternative, you can photograph the aging brick power station for a graphic image.

Kanawha Falls photographed with telephoto to isolate falls from its surroundings
Town of Thurmond
The historic town of Thurmond was once an active railroad town like many located along the New River. It can be reached off of Rt 19 at Glen Jean Exit north of Beckley. A narrow winding road leads to the town following a stream that cascades down the mountain. On the way down, there is a pull-off that provides relatively easy access to photograph one of the larger cascades.
At the base of the mountain, you reach the historic town of Thurmond by crossing an old narrow railroad bridge that spans the river. Ahead you will see a parking lot and railway station renovated by the National Park Service and serving as a Visitors Center. What makes this location special is that railroad tracks run through the center of town. Today only a few buildings remain from the past. However with a wide-angle lens, the train tracks create great lines leading into the frame. If you are there at the right time, you may be able to photograph a train as it approaches. Watch the signals above the tracks for an indication that one is on its way.

Railroad tracks at Thurmond.

Cascade on way to Thurmond.
Grandview, part of the New River Gorge National River, NP
Grandview lies within the National Park and provides views of the horse-snapped section of the river from 1400 feet above. In the early morning interesting shots can be obtained as the fog slowly lifts from the canyon floor revealing the river below. A trail follows the rim with a few small overlooks which are partially blocked by vegetation. Another overlook farther along the canyon wall is Turkey Spur. Steps lead to viewing platforms, but this year the upper level was closed due to fire damage. In May and June, I understand the area is quite beautiful with blooming rhododendron along the trails. This year there was little fall color but I did take an abstract photo of the forest by zooming my lens during a slow exposure. As I exited the park, I grabbed this photo of a white-tail deer.

Deer photographed just outside of Grandview.

Fall color at Grandview captured by zooming my 70-200 mm lens with my camera set on a slow shutter speed.
Fayetteville Station Road
The 100 year-old Fayetteville Station Road once regularly traveled before the modern New River Gorge Bridge was built in 1977. Access to the road is off of Rt 19 by turning right on Lansing-Edmond Road, near the Canyon Rim Visitors Center. Once on this narrow road, turn right at the sign “Fayette Station Road” and immediately take the left fork. This road is a very narrow with hairpin curves and sections that are only open to one-way traffic. It passes under the current bridge twice, offering unique views of the steel structure. Also it provides access to the banks of the New River, several small waterfalls, and Kaymoor trail which passes a historic coalmine site. The road is worth the drive but is closed to traffic during Bridge Day weekend when the New River Bridge is closed to vehicles an open to pedestrian traffic and BASE jumpers.

New River Gorge Bridge’s steel structure photographed underneath on Fayetteville Station Road.

By selecting sections of the bridge’s iron work, you can create interesting abstract photos.
Nuttallburg Town
Nuttallburg was one of a number of bustling coal mining towns along the New River. The abandon townsite for years was concealed under the cover of trees and vines. It was recently restored by the park service and can be reached from Lansing-Edmond Rd by turning right in the community of Winona onto Keeneys Creek Road. This very narrow road descends into the gorge to a parking area. From here, trails lead to the foundations of buildings and remains of coke ovens that converted the coal into fuel. The most interesting aspect of the site is the coal tipple and conveyor that transported the coal from the mine up the mountainside down to the processing area and railroad below. On a bright sunny day, the scene is difficult to photograph without using HDR technology. The contrasty photo below was taken this fall at mid-day while scouting locations to determine which to include in my upcoming workshop.

Coal conveyor at Nuttallburg Town. The amount of contrast in the scene was high resulting in distracting deep shadows and burnt-out highlights.. It would be best to photograph this scene when the light is softer.

Side of the old tipple in Nuttallburg Town I was attracted to the colors, shapes, textures, and lines displayed by the wall and took this photo of the abstract design. The side of the building was shaded, perfect for this photo.