by Osprey Photo Workshops & Tours | Jul 17, 2017 | Badlands, Badlands National Park, Nature Photography, Photo Tour, Photo Workshops, Wildlife Photography
South Dakota Badlands Photos and Tips

The following blog introduces you to South Dakota Badlands Photos and Tips from my photo workshop this June.
In early June, I conducted a photo workshop in the Badlands of South Dakota with co-leader Sandy Zelasko. It is a great location for dramatic landscapes with striped limestone formations, sharp pinnacles, canyons, and sprawling prairie grasslands frequented by pronghorn and mule deer. In the past, I conducted photo tours in the Badlands and Blackhills in the fall. But this time, Sandy and I elected to hold the workshop in early June when newborn animals were plentiful along with vibrant spring colors. On most days, temperatures were comfortable in the morning but rose as the day progressed. Therefore, we were on location to shoot sunrise and photographed throughout the early morning. Then we took a mid-day break at our hotel in Wall to rest, review images, photograph around town, and grab an early dinner before returning into the field until sunset. From Wall, it was only a 25-minute drive to the park’s northeast entrance and 15 minutes to Pinnacles Overlook. The small town of Wall has several good restaurants, a grocery store where we bought snacks and food for breakfast, and a gas station plus a few convenience stores.

Note: Many of images you see in this newsletter were taken while scouting locations I the Badlands for the workshop. Sandy and I did photograph with clients at times but only if we were demonstrating techniques or in the event they did not desire our assistance.

Bighorn sheep are social animals with the females and lambs living separately from the males until breeding season. Rams, we encountered several times at the northeast end of the park near Big Badlands Overlook and the parking area at Notch, Door, and Windows trails. Remarkably, the length of the rams curled horns are managed as not to block their vision. While we photographed, they occasionally engaged in mock fighting which will become quite aggressive during rutting season in November and December as they compete for the attention of the females and run at each other heads down and horns clashing. The sound of the impact reverberates throughout the canyons. Even the youngsters engaged in shoving matches practicing for their roles later in life. The sheep’s ability to climb steep slopes even when small is amazing and is possible because of the rough pads on the bottom of their flexible two-toed hooves. It is wise to use long lenses (300 mm or greater) when photographing wildlife as not to alter their behavior. Wild animals are not predictable and these sheep can actually run at speeds of 30 mph over level ground.

These bighorn sheep once populated the park and other areas in the western U.S. in large numbers. But due to hunting and habitat loss their numbers dropped to near extinction at the beginning of the century. The bighorn seen the Badlands are Rocky Mountain sheep that were reintroduced into areas of the western U.S. In the Badlands, researchers monitor the health and distribution of the bighorn population by capturing lambs just after birth and attaching collars with tracking devices that will eventually fall off.

Young prairie dogs were one of the most entertaining but challenging subjects in the park to photograph. Our favorite family group was along Quinn Road where there was little traffic or disturbance. We photographed the youngsters at eye-level, lying on our bellies and using bean bags or low tripods for camera/lens support. This approach provided us with an intimate view of the animals and an out of focus background. Even though the background was blurred, we had to carefully examine the image in the viewfinder to be sure there are no strong forms or bright objects that could distract the viewer’s attention. The small prairie dogs were more animated than the adults particularly in the morning and during the cooler parts of the day. Therefore, we concentrated our effort on photographing them under those conditions, trying to capture their interactions — nuzzling, tail pulling, and playing.

Bison
Sage Creek Rim Road was the best location for bison. Late one afternoon as the sun was setting, I photographed a bison lit by the setting sun with the warm light illuminating the badlands in the background. One of my favorite photos from the trip.

Landscape Photo Opportunities
For dramatic landscape photos, we shot when the sun was low in the sky, warming and intensifying colors, and emphasizing the relief of the land. In the spring the weather is less stable than at other times of the year resulting in large cumulus clouds appearing in the afternoon along with dark, threatening storm clouds. Both add interest to images by replacing boring washed out or solid blue skies.
Some of the better views of the Badlands were at Yellow Mounds, Conata Basin, and Panorama Point Overlooks and the area from the Ben Reifel Visitor Center to Norbeck Pass. I particularly liked the views along the loop road from Pinnacles Overlook to Conata Road. There were convenient pull-offs along the way where we could stop and photograph multi-colored yellow mounds with contrasting banded formations in the background.
Some of the locations we used for sunrise and sunset photography were at or near Pinnacles Overlook, the red eroded rocks along Sage Creek Ridge Road, Big Badlands Overlook and at Windows, Door, Notch Trails.

Sheep Mountain Table
Sheep Mountain Table is in the south unit of Badlands NP. At the base of the plateau there are unusual rock nodule and toadstool-like formations. The road leading to the top is narrow and dirt can be treacherous after hard rains. We had a limited amount of time to explore the area due to an approaching storm with ominous dark clouds. However, it was the storm that added dimension to our images of the surrounding badland formations. Among the grasses on top of the table, we found the giant fuzzy puff balls containing seeds for the flower goat’s beard. One participant with a mirrorless camera took photos of the plant using a macro lens with a modeling light built-in. When comparing his images taken with this set-up to mine, his were far superior as the light penetrated to the center of the sphere. Great job Jim!

Lessons Learned
When the light on a scene was flat due to heavy clouds or deep shade, I still took photos using high ISOs to freeze action and hoped for the best. In many cases, the high ISOs resulted in unacceptable noise levels in my images (looks similar to film grain). I used Nik and Topaz software plug-ins with Adobe Photoshop and Lightroom to reduce the noise but I was not always satisfied with the results.
What was worse, the subjects appeared unrealistically flat and blended with the background. On the last day of the trip, I resorted to shooting video with my Nikon D500 camera, something I had only tried once before. My results from that day were not always perfect due to the wind, a focus issue, and my inexperience. However, because the animals were moving and interacting during the video. they no longer blended into the background and the images were much more engaging. Needless to say, I plan to learn more about filming videos and plan to experiment with the technique more in the future.

Images in this blog are from scouting trip and photo workshop in the South Dakota Badlands. Planning similar program in 2018.
To see details from June workshop go to https://www.ospreyphoto.com/event/badlands-national-park-spring-escape/

by Osprey Photo Workshops & Tours | Apr 8, 2017 | Flower Photography, Garden Photography, Longwood Gardens, Nature, Nature Photography, Photo classes, Photo instruction, Photo Technique, Photo Workshops
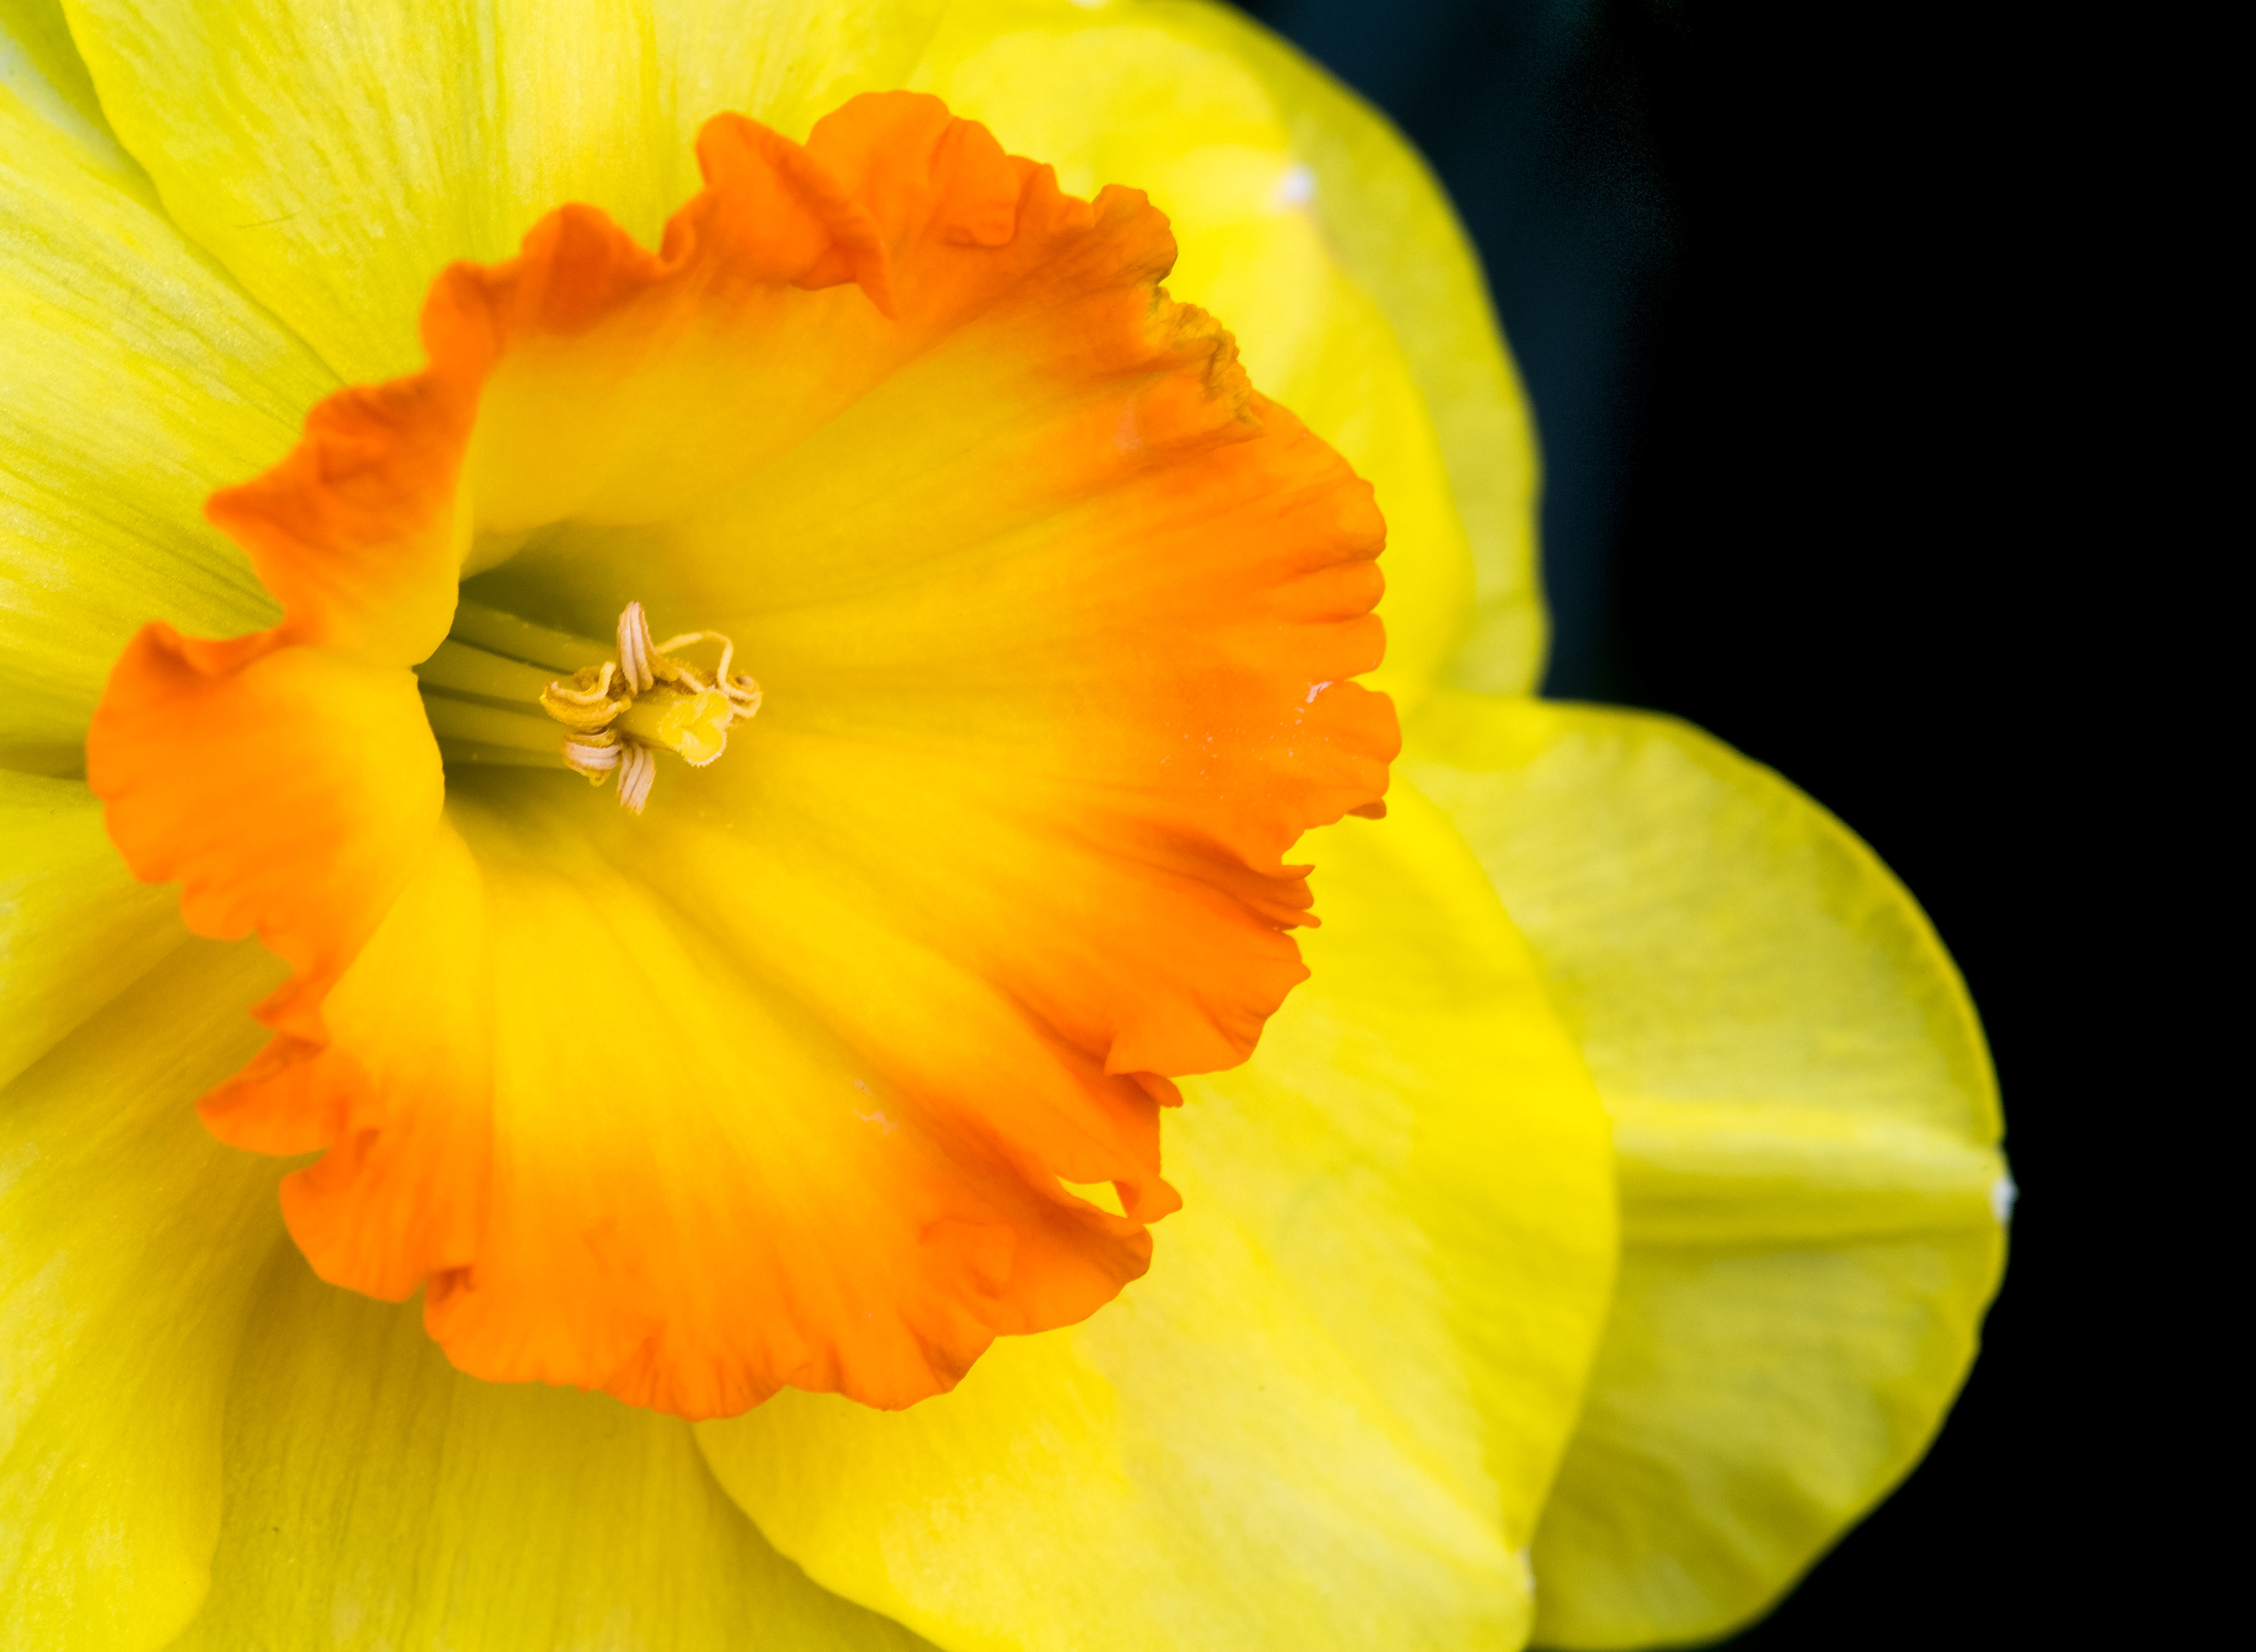
Photography at Longwood Gardens
in the conservatory
and for similar conditions elsewhere as in a greenhouse
Close-up Photo Tips
Next photo workshop featuring flower photography – 14-15 April at Norfolk Botanical Garden. For info, see my website www.ospreyphoto.com or http://norfolkbotanicalgarden.org To register call (757) 441-5830
Introduction to Photography at Longwood Gardens
A legacy left by Pierre du Pont, Longwood Gardens consists of over 1,077 acres of indoor and outdoor gardens with fountains, reflecting pools, flower beds, woodland trails, and meadows. Located near Kennett Square, Pennsylvania, in the Brandywine Creek Valley.
The 4-acre indoor Conservatory of Longwood Gardens houses plant displays that are varied throughout the year. It is divided into climate-controlled rooms representing various climates and plant species from around the world. My favorite is the orchid room, filled with species from all over the world, varying in color from red to black, with some shaped like lady slippers and others resembling insects. At any time during the year the display showcases 200–300 of the 6,200 orchids housed at Longwood Gardens.

Orchid Arch
Depth of Field (DOF) Issues
The more you magnify your image, the shallower the depth of field in the photo, i.e. the amount of scene that is sharp in front and behind the point of focus (1/3 in front and 2/3 behind). With high magnifications, you can increase the depth of field slightly by selecting a higher f-number (smaller lens openings) but with extreme magnification this may have only have a marginal effect. You may opt to use less magnification to gain depth and then crop the image during editing to exclude the unwanted surroundings.
A shallow depth of field is not necessarily a bad thing and can be helpful to isolate the subject and keep the background from becoming a problem by being well defined. Isolation of the subject in this fashion is particularly effective if the background is at a distance and you are shooting eye-level with the subject. But shallow DOF can be a problem if the subject you wish to photograph has depth and you wish to capture detail front to back.

Orchid – photo focused on internal parts
Flat Surfaces
When photographing patterns on a leaf or a group of multicolored leaves or flowers, you need to have the face of the lens parallel to the surface to have all portions of the scene within the DOF. To photograph from above a pattern created by a group of leaves or flowers, select a section of the scene where the vegetation is of nearly equal height and distance from the lens. A cell phone with built in camera can have an advantage here because it can be more easily positioned at the desired angle over the subject without the constraints of a tripod or the weight of a heavy camera/lens system.

Leaves shot with i-phone
Purple pattern
Manual Focus
Manually focusing your lens allows you to precisely select the part of the scene you wish to be sharp. With some lenses, manual focusing allows you to focus closer to the subject than when using autofocus. This slightly increases the magnification possible with that lens.
Stacking
George Lepp and others have used the technique of stacking to sharply capture each layer of a subject, controlling what is, and is not in focus. This requires taking multiple images of a stationary subject at different but overlapping points of focus and using software such as Helicon Focus. The technique can be used with macro and landscape subjects. For details, see George Lepp’s article in Outdoor Photographer Magazine. http://www.outdoorphotographer.com/tips-techniques/photo-editing-tips/unlimited-depth-of-field/

Orchid Pair
Distracting Backgrounds
It is easy to be caught up with the beauty of a flower or other subject that you ignore obvious distractions in the background. For a photograph to be successful, it is important that the viewer can immediately identify the subject. Anything that directs the eye away from it should be avoided. Such distractions can be particularly troublesome in the conservatory on sunny days. Carefully examine the image in your viewfinder looking for bright or colorful vegetation behind the subject, shiny objects, lights, hot spots from sunlight striking the background, shadows from overhead struts supporting the greenhouse glass, and object appearing to grow out of your subject. If close to your subject, make sure your own shadow is not falling on a portion of it.
Because of the shallow depth of field common with high magnification, you may have a difficult time recognizing distractions behind the subject. One trick to avoid this issue is to temporarily shift the focus of the lens from your subject to the background in search of potential problems – bright areas, shiny objects, strong forms, bright colors, etc. Note possible distractions and then refocus on the subject, keeping these observations in mind. If necessary, move or recompose your image to avoid the offending items.

Jonquil
Visualization
Take the time to visualize your final results. When approaching a subject, always identify what drew you to it initially. Was it its color, abstract patterns, shape, texture, etc. Consider the best lighting and depth of field to emphasize these features. Adjust the f-stop and position the camera accordingly.
Light
Low light can be an issue in the conservatory in areas heavily shaded or on overcast days. High ISO settings on your camera may be required so select your camera that has the best response under these conditions. With many cameras, ISOs higher than 400 are accompanied by noise that reduces image quality and appears as random specs of color and/or something similar to film grain. In your shooting menu, you may have special settings to improve performance at high ISOs or when using slow shutter speeds. Turn them on but don’t forget to turn them off when conditions change. Avoid under exposure since noise becomes more evident as you lighten the exposure. Noise is the most noticeable in dark areas of the image and if the image is underexposed. Editing programs such as Adobe’s Lightroom and software plug-ins provided by Nik and Topaz can help reduce the appearance of noise without compromising image sharpness.
Playback Display Options
In your playback menu on your camera select display options that help you recognize exposure problems. Turn on the histogram and highlight indicator that shows where the image is overexposed and detail lost.
Wires and Sticks
Plants on display are often supported by wires or sticks, so try to avoid capturing them in the photo. This may require changing your shooting angle or magnifying the subject to better isolate the most interesting aspects of the plant. Consider using an editing program such as Adobe’s Lightroom, Photoshop Elements or Photoshop CC to remove the offending object using clone or healing brush tools. In the Lightroom program, you can also use the adjustment brush to lighten or darken areas, open up shadows, and control contrast, sharpness, saturation, etc. The spot removal tool can be used to cover problem areas.
Have fun. The orchid image below was oversaturated intensionally during editing for a bazar artistic effect. I struggled to keep a window sill out of the photo so I avoided it by filling the frame with the subject.

Orchid – High Saturation
Spot-lighting
If the subject is in the sun or is back-lit and background is busy, search for an shadowed area that can be positioned in the frame behind the subject. If no natural shadow is present, have a friend cast a shadow over the offending area or create one of your own.
Polarizer Filter
Mounting a polarizer on your lens can remove reflections from the surface of leaves, water, windows, and make the sky appear bluer. To use one, rotate the outer ring until you remove the offending glare. However, they remove a component of light resulting in slower shutter speeds for the same f-stop, There are warming polarizers that some people prefer to reduce the blue in the image.

Orchids part of Orchid Arch
Lenses
There are applications for any lens from wide angle to telephoto in the garden; however, for flowers close-ups, macro lenses are the most versatile. They are designed for high magnification and are extremely sharp edge to edge with low image distortion. Compared to a standard lens, they able to focus on subjects at a closer distance and thereby magnify the image. Many can reach a magnification of 1:1without accessories. They come in different focal lengths with the 105 or 200 mm lenses being my favorite. The shorter lens has vibration reduction and is easier to handhold but I prefer to use a tripod for stability when possible. The longer focal length lens has a narrower angle of view making it easier to alter the background with slight shift in position. They also offer a greater working distance from the subject. This helps prevent your shadow falling across the subject. Also with live subjects, the greater working distance increases the chance that the subject will not be alarmed and not flee. With a dangerous subject, the extra room provides a safety zone. My 200 mm Nikon Micro-Nikkor lens comes with an adjustable collar around the lens so you can mount the lens on a tripod directly, providing better balance and stability. The collar (see image below) also allows you to easily rotate the camera orientation from horizontal to vertical or in between without having to adjust the tripod or detach the camera from the tripod. The down side to macro lenses is that they are more expensive than standard lenses.
Macro-Zoom lenses have the ability to focus closer to the subject than a standard lens but often they do not have the magnification power of a “true” macro lens and the image quality is often not as good. But they do offer a lot of versatility from one lens.

Colar for 200 mm macro lens
Extension Tubes & Close-up Filters
As an alternative for close-up photography, consider purchasing a less expensive set of hollow extension tubes (see image below) that fit between the lens and camera body and allow you to focus closer to your subject than with the lens alone and thereby increase magnification. With no glass involved, the images obtained are quite sharp. Another low-cost alternative is using close-up filters that mount on the front of your primary lens. The resulting images are not as sharp as with the other options but are suitable for aesthetically pleasing images. A tele-converter can also be useful when you cannot get very close to your subject. They increase the magnification of your primary lens without changing your position.

Extension Tubes
Movement Issues:
When using high magnification, movement of the subject or camera is exaggerated and can be detrimental to image quality particularly when using slow shutter speeds. Tripods and monopods help you steady the camera. They are allowed in the garden most of the year but their use is limited in the conservatory. You must obtain a permit to carry it at the info desk near the main entrance to the gardens (Some conditions apply for use, so see Longwood’s web site for guidance). Tripods are not permitted during times of high visitation, particularly during the Christmas season. They can only be used in the conservatory until noon and cannot be used in the Children’s garden. Be considerate of other visitors since the narrow paths can become quite crowed as the day progresses and for popular exhibits.

Hybrid Lilly
More on Tripods
Tripods are useful for more than serving as a stable platform for the camera. With the camera supported on a tripod, it is easier to carefully examine the image in the viewfinder and on the LCD screen for issues related to composition, image sharpness, or background distractions. In the playback mode, consider using your camera’s magnifier for more critical view of image sharpness and depth of field. I frequently use a Hoodman or similar loupe over the LCD when reviewing images in the field. It excludes external light so you can more accurately judge what was captured.
It is wise to invest in a good tripod suited to your needs. Those with legs made with strong carbon fiber are lighter and easier to transport. If you have the opportunity, take your heaviest camera and lens to a pro camera shop such as Service Photo in Baltimore and test various tripods with your set-up. Using an unsteady, cumbersome tripod can be worse than using none at all. I recommend using a ball head mounted directly on the tripod for most applications.
At times, using a tripod can stifle creativity. Often you mount the camera on the tripod, walk around the subject a little, plant the tripod in one spot, and never move it again. Try exploring camera angles without the camera mounted on a tripod. Once you have decided on the best approach, they add the tripod for support.

Orange Stamens
Unwelcomed air movement
Be sensitive to subject movement caused by environmental conditions. The conservatory’s fans, that help regulate climate conditions in each room, circulate air and create drafts that can cause leaves and flowers to move during exposure. Similarly the movement of people passing nearby or opening a door can also generate an unwanted breeze. Be aware of the potential problem and wait for a lull in the motion before taking your photo. To maintain a still camera when taking a photo, use an electronic cable release.

Mark & Adam
More Than Just Flowers
Flowers are photographically intriguing but don’t ignore the garden’s water features, the conservatory’s architecture, and aspects of the plants other than the blooms (the leaves, buds, seeds pods, vines, fruit, etc.). Since the conservatory is quite large, I suggest deciding on specific goals for your visit, perhaps specific rooms, flowers, or techniques. Have fun and experiment with unusual camera angles, abstracts designs, or special effects created by intentional camera movement. Visit local gardens, your own backyard, a nearby meadow, or even a florist shop to improve your skills and creativity.

Tile in Children’s Garden

Umbrellas Suspended from Ceiling

Art Deco Decor in Ballroom of Conservatory

by Osprey Photo Workshops & Tours | Apr 7, 2017 | Badlands, Badlands National Park, Landscape Photography, Nature Photography, Photo Tours, Photo Workshops, Scenic Photography, South Dakota, Wildlife Photography
South Dakota Badlands
Badlands National Park
Article on Outdoor Photographer website by Irene Hinke-Sacilotto
Site of June Photo Workshop with Sandy Zelasko & Irene Hinke-Sacilotto
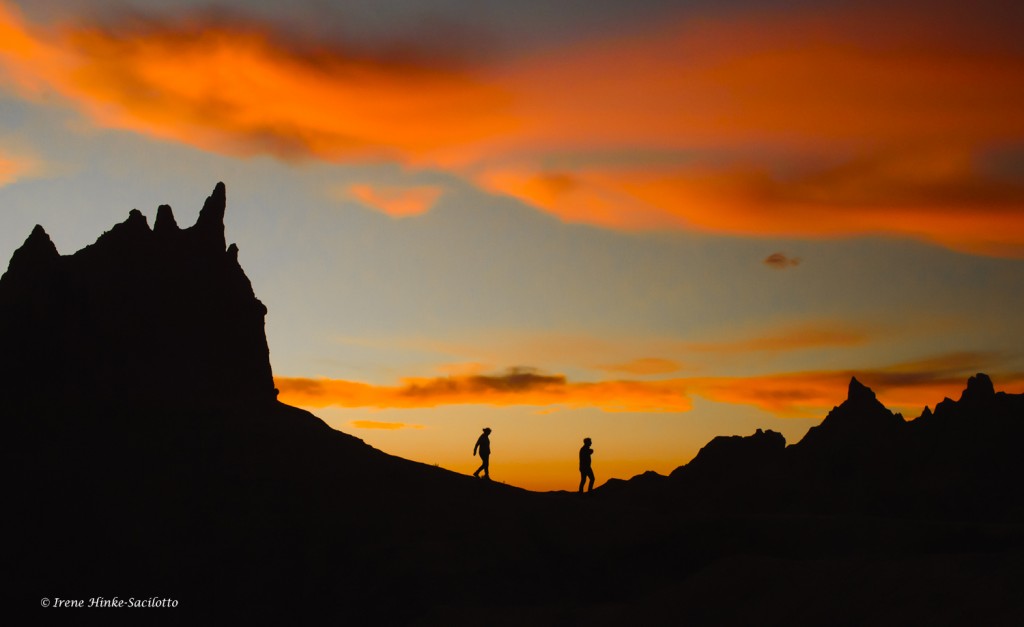
Hikers at Sunset
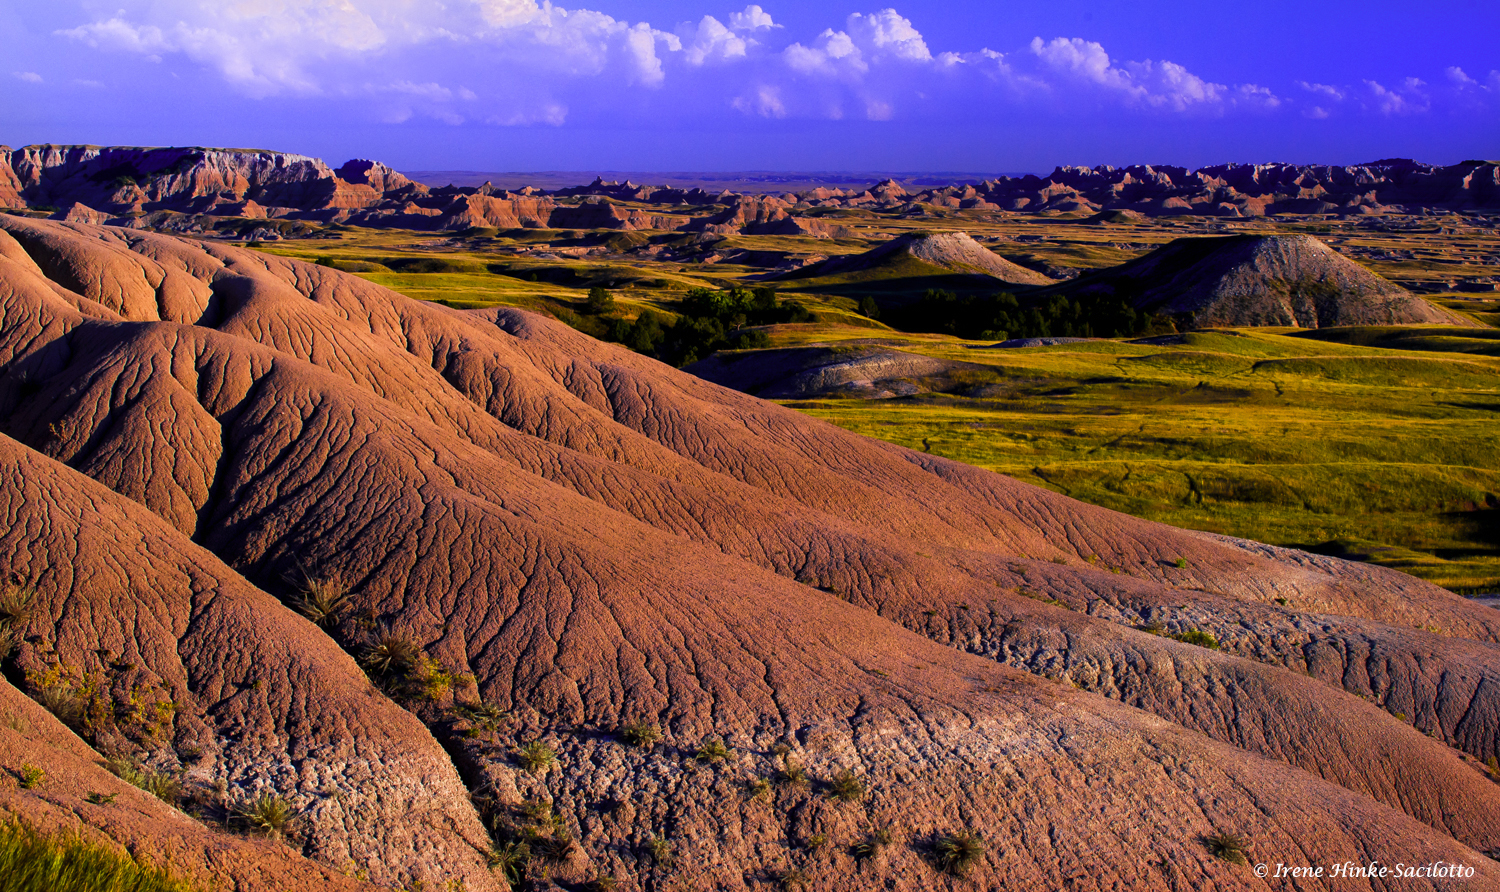
Badlands National Park is a terrific destination for landscape and wildlife photographers. It is the location of my June 2017 photo workshop, co-lead by Sandy Zelasko. The park is a convenient hour drive east from Rapid City on Interstate 90. North of the Pinnacles Entrance lies the town of Wall where you can find accommodations and other amenities. Near Cedar Pass, at the eastern end of the park, there are campgrounds, cabins, and a few other places to overnight.
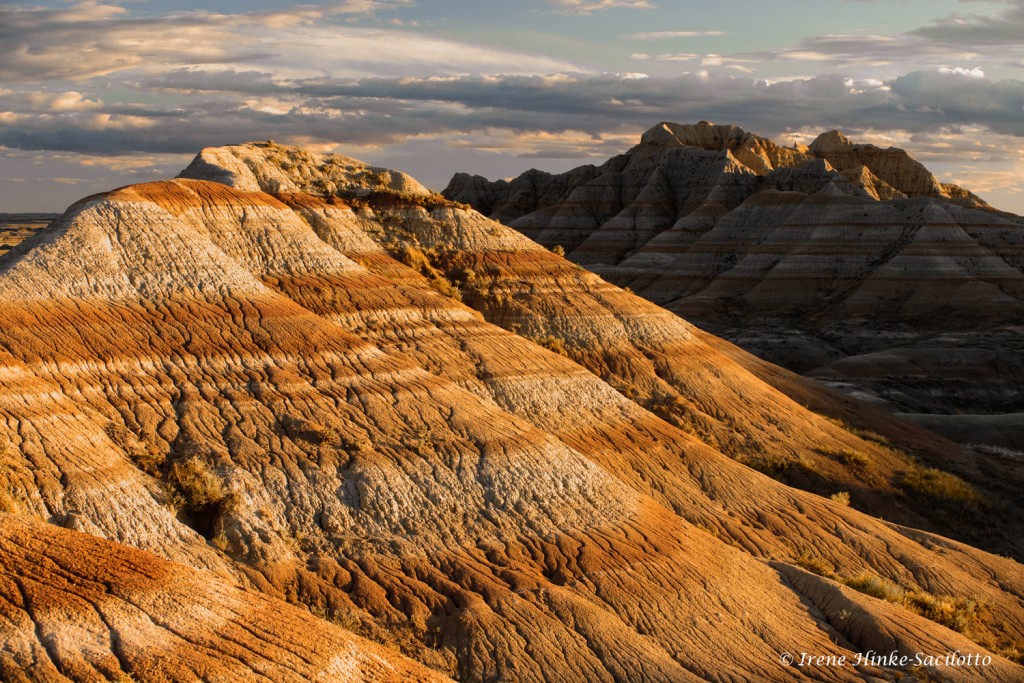
Banded sandstone formations
Badlands National Park Geology
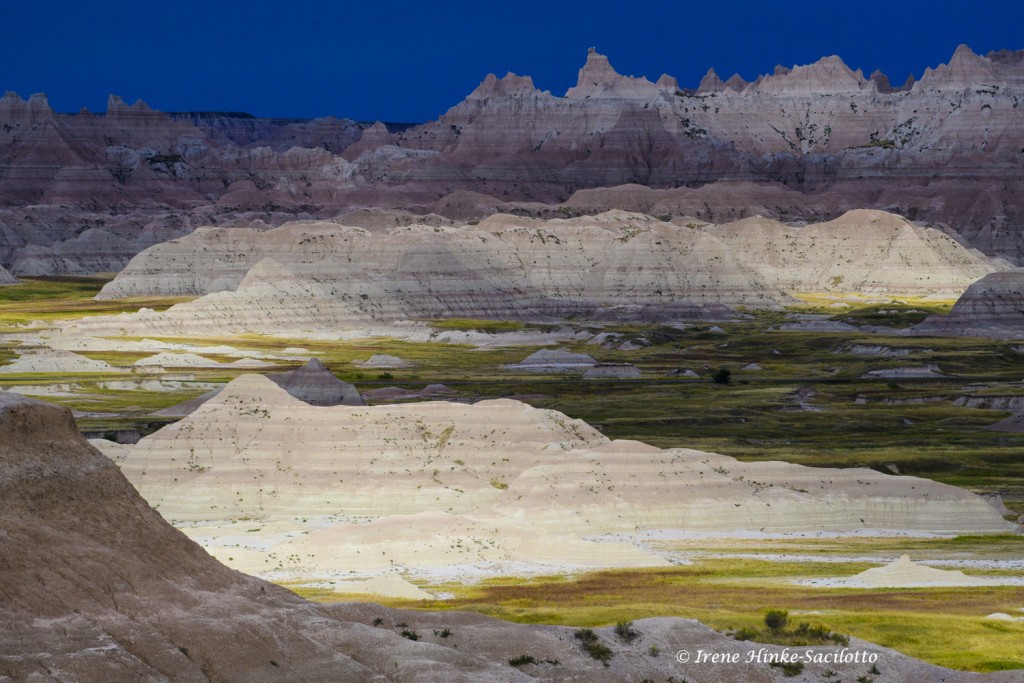
Once the site of an ancient sea, the South Dakota Badlands have been transformed over thousands of years by wind and rain into the land you see today. Layers of sediment and ash eroded away leaving behind a rugged landscape with red and tan banded buttes, jagged escarpments with narrow gorges, and brightly colored yellow mounds. In the north unit of the park, there is a thirty-mile scenic loop road that meanders past unique geological formations. Along the way, there are convenient vehicle pull-offs, overlooks, and trails to explore.

Bighorn Sheep Ram.
Wildlife
At first glance, the land seems sterile, dry and wind-swept. Yet close examination reveals a variety of creatures including 39 mammal species. Bighorn sheep, pronghorn antelope, mule and white-tailed deer, bison, prairie dogs, coyotes, badger, jack-rabbits, cottontails, thirteen-lined ground squirrels, chipmunks, and fox squirrels make this park their home. If lucky, you might even spot the rare black-footed ferret, a species reintroduced into the area. Birds include hawks, eagles, magpies, meadowlarks, northern flickers, sharp-tailed grouse, turkey, and pheasant, just to name a few. Wildlife can be easily spotted from the road and are not as timid as elsewhere, due protection by the park service. Search picnic areas and campgrounds for photo opportunities including local free-loaders, such as magpies, squirrels and other foraging animals looking for food scraps and handouts.
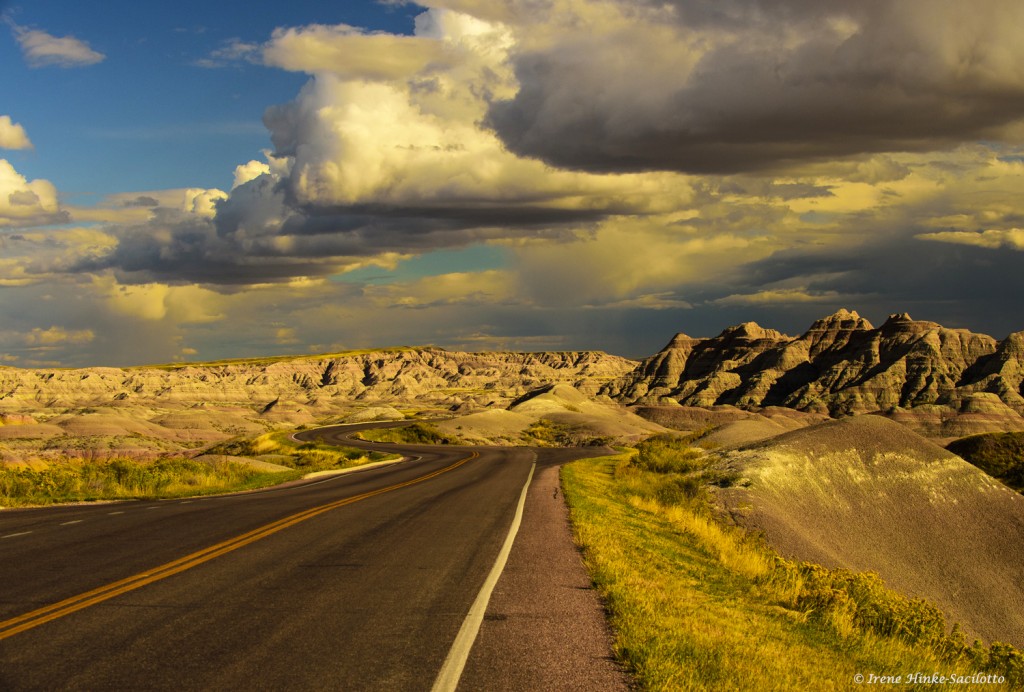
Badlands Loop Road
Photo Opportunities
From the town of Wall, it is only a short drive to Pinnacles Overlook, a favorite of visitors for sunrise and sunset photography. Watch as the light slowly creeps across the landscape, illuminating and darkening sandstone formations in the distance. As you head east from Pinnacles Overlook towards Dillion Pass, the loop road travels through some of the most dramatic landscapes revealing yellow mounds in the foreground and jagged peaks behind. At Dillon Pass, you can take the Conata Road south through Buffalo Gap National Grasslands, a tiny remnant of the prairie that once covered huge expanses of land in North America and Mexico. If you climb east on Badlands Loop Road, you will reach Rainbow and other overlooks for great opportunities to photograph the “wall” that separates the lower and upper prairies. At every turn along the road, the topography changes, offering even more photo ops. Storm clouds can add drama to your photos filling up an empty sky and casting shadows across the landscape resulting in alternating patterns of light and dark.
Moving Shadows

Black-tailed prairie
dog
Black-tailed prairie dog towns can be found throughout the park and their occupants are among my favorite subjects to photograph. During our recent scouting trip, we determined one of the best colonies for photography was along Quinn Rd, a dirt road running north off of the loop road where traffic was sparse and there was little disturbance. Here the prairie dogs were more tolerant and allowed us to photograph them at eye level from outside of our vehicle. It was nearly impossible to predict which animal was going to pop out of its burrow and “bark” an alarm call. For the best chance of capturing one barking, carefully observe the colony looking for individuals that seemed more vigilant and concentrate your attention on them. Since the alarm call suggests the presence of danger, be on the lookout for coyote or other predators nearby.
There are a number of trails that you can explore throughout the park for unique photo opportunities. They vary from easy to strenuous in difficulty. Always carry plenty of water. Take time to stop in at the Ben Reifel Visitors Center to learn more about the park, check weather forecasts and ask rangers for up-to-date information on recent wildlife sightings.

Bighorn sheep along Sage Creek Rim Road
Don’t skip Sage Creek Rim Road, a well-maintained dirt road heading southwest and accessed just after the Pinnacles Entrance to the park. Beautiful vistas abound as you glance left (south) near the roads entrance. Rust-colored mounds with deeply furrowed patterns dominate the foreground. In the setting sun, they almost glow red with the reflected warm light. Check out the areas with prairie grasses and browse for bison, antelope and bighorn sheep. At dawn, you may be able to silhouette one of these animals on a ridge against the rising sun. Roberts Prairie Dog Town is a popular stop to see prairie dogs. Often an abundance of visitors fright them back into their burrows making this location not ideal for photography. I suggest looking farther down the road for better opportunities. On the fringes of the colonies, look for coyote and badger which sometimes hunt as a pair.
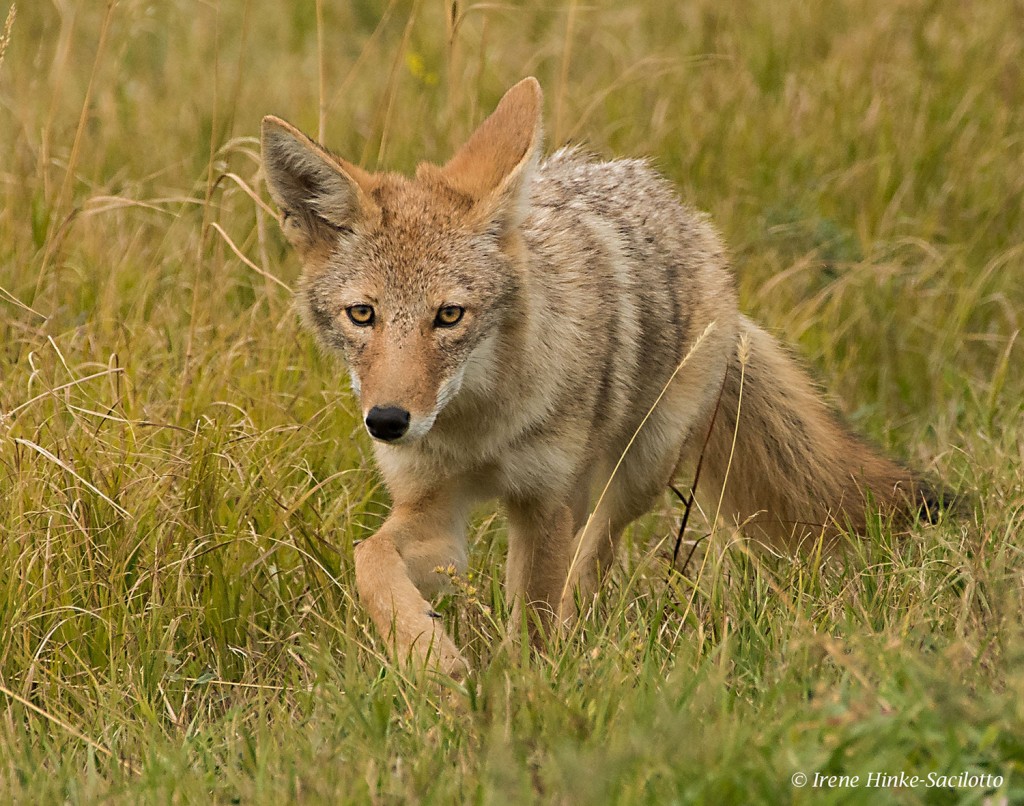
Stalking Coyote
Also check out woody draws where there is enough moisture to support shrubs, trees, and other plants. These sheltered areas are often havens for fox, deer, rabbits, squirrels and other wildlife. In autumn, these groves of trees add a splash of color to the dry landscape with leaves of yellow and gold. Be careful when stepping off trails. Burrows and prairie rattlesnakes might be concealed beneath the grass. Wear sturdy boots to negotiate uneven terrain and protection against cactus spines.

Fall color
Approaching & Photographing Wildlife
Make note of where you commonly see animals and check these locations on subsequent trips past the area. Photographing wildlife often relies on the animal accepting your presence as non-threatening. That means patience is important. Stalking tips: Move slowly, emulate their behavior, stop periodically, take an indirect route to close the distance, assume a low profile, and avoid direct eye contact. Minimize loud noises, perfumes, or anything not typically found in their environment. Camouflage clothing can help you merge with the surroundings and avoid curious human on-lookers from approaching you.

Pronghorn at rest
When photographing, make sure you do not disturb the animal’s behavior. If it reacts, stop and wait before resuming your approach. Curiosity may even bring them closer to you. Never block an animal’s means of escape or stand in their path. Just because they are in a national park, wildlife is unpredictable and can be dangerous particularly if traveling with young. Obey park regulations. Don’t feed wildlife.

Bison Scratching
Suggested equipment:
- DLSR camera with good response in low light at high ISOs
- Lenses from wide angle to telephoto. (My 200 – 500 mm Nikon zoom lens was handy when I needed to react quickly to wildlife subjects.)
- A matching tele-converter
- A macro lens if you enjoy close-up photography
- Large bean bag to support your camera when photographing from a vehicle
- Sturdy tripod mounted with a ball or gimbal head.
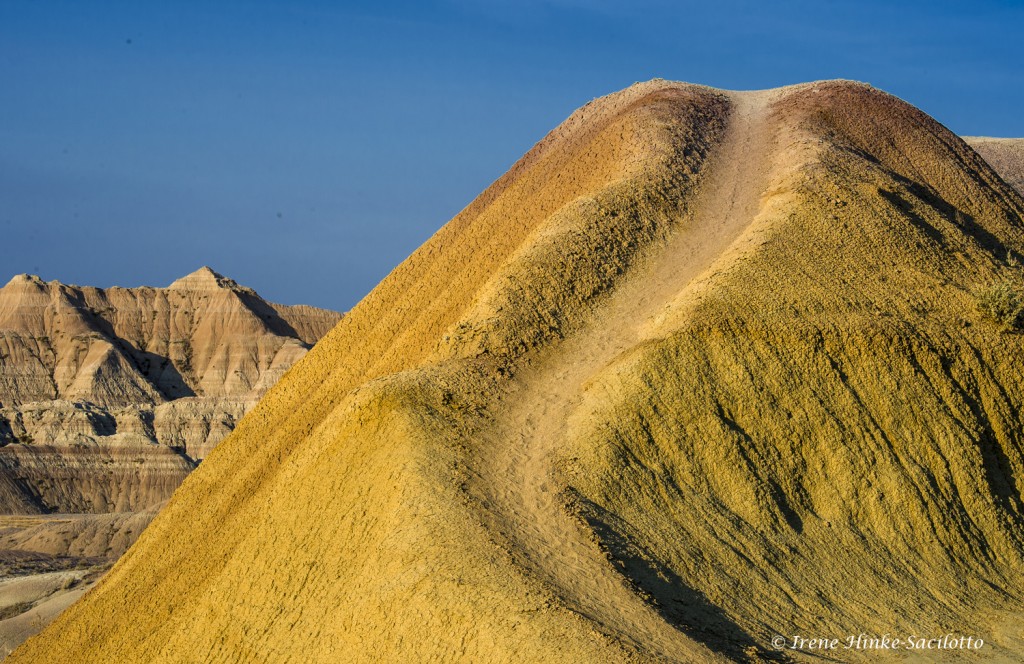
Yellow Mounds Near Dillon Pass
Check out the upcoming Photo Workshop 4-9 June, 2017 with Irene Hinke-Sacilotto & Sandy Zelasko. www.ospreyphoto.com

Meadow Lark Singing

Eroded Landscape

by Osprey Photo Workshops & Tours | Mar 4, 2017 | Digital Photography, Nature Photography, Photo classes, Photo instruction, Photo Tour, Photo Tours, Photo Workshops, South Dakota, Travel, Wildlife Photography
Badlands National Park Spring Escape
June 4 – 9, 2017
With trip leaders – Sandy Zelasko & Irene Hinke-Sacilotto
SOUTH DAKOTA – Photography Tour
sponsored by

in conjunction with

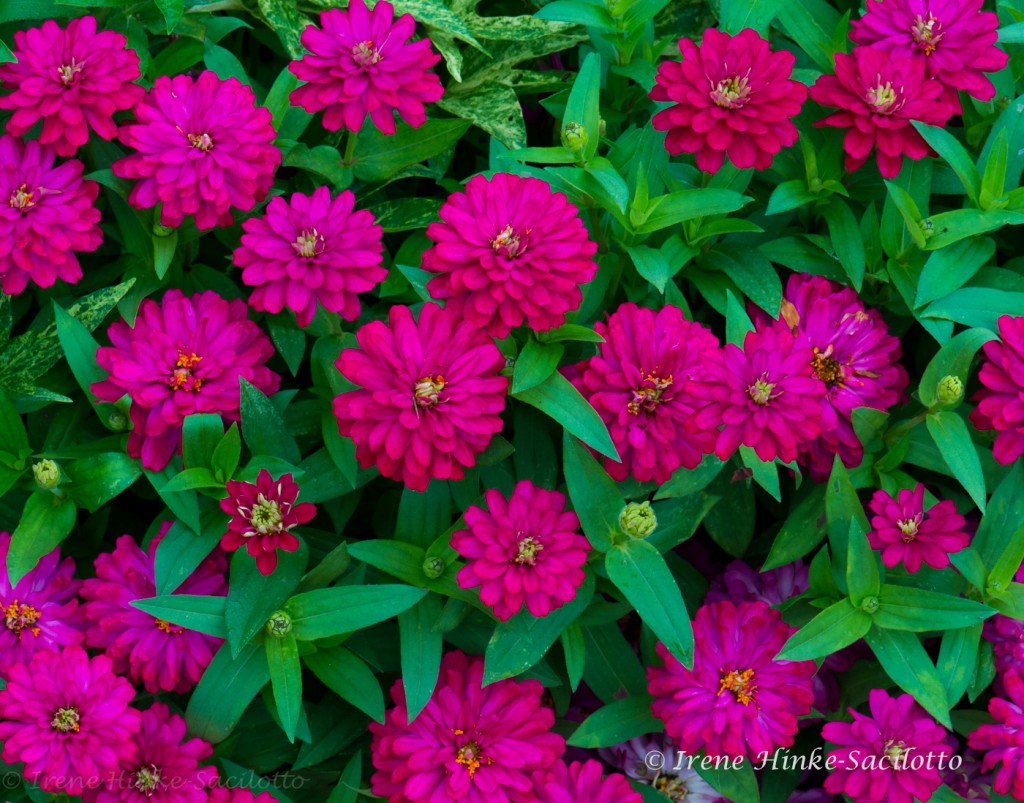
“Eat more flowers”
INTRODUCTION
During this South Dakota photo tour, we will explore Badlands National Park and locations in the vicinity. On most days, we will be in the field at dawn to take advantage of the early morning light. Likewise, we will end each day’s activities at sunset. When the sun is low in the sky, the light accentuates the relief and texture of the land. Colors are warm and the contrast soft, so details are not hidden by the dark shadows present at noon-time. At dusk and dawn, animals are more active and easily located. We will reserve mid-days for rest, reflection, image transfer, and travel between locations. There will be a variety of photo opportunities, including both scenery and wildlife.

Badlands Formations
BADLANDS NATIONAL PARK, SOUTH DAKOTA
Once the site of an ancient sea, the South Dakota Badlands have been transformed over thousands of years into the land you see today. Layers of sediment and ash were eroded away leaving behind multi-colored rocks and boulders balanced on pedestals of stone. Eroded canyons and isolated buttes stand as testament to the power of the wind and rain. At first glance, the land seems sterile, yet close examination reveals a variety of creatures. Agile bighorn scale steep canyon walls. Pronghorn and buffalo graze on the succulent prairie grasses while hawks circle overhead. A loop road travels through the northern portion of the park providing easy access to unusual geologic formations and favorite wildlife haunts.
An active prairie dog town lies along Sage Creek Rim Road. The colony’s occupants are enjoyable to watch and photograph as they groom, nibble on grasses, and romp playfully with their siblings. Now and then a shrill alarm call ripples across the colony warning of a potential intruder — perhaps a badger or coyote in search of a meal.
South of the Sage Creek area in the second unit of the park is Sheep Mountain Table. At the base of the plateau are formations with rocks balanced on limestone pedestals. A rough dirt road climbs to this high, flat plateau which is isolated from the surrounding terrain by deeply cut canyons. On top, the views are spectacular. Dirt roads extend like fingers to a variety of vantage points on the rim of the table. (access is dependent on road conditions at the time)

Wild Turkey

Bighorn Ram
by Osprey Photo Workshops & Tours | Jan 16, 2017 | Autumn photography, Fall photography, Nature, Nature Photography, Photo Tour, Photo Workshops, West Virginia
Southern West Virginia Photo Opportunities
On 14-16 October 2016, I held a weekend photo workshop in Southern West Virginia in the vicinity of the New River Gorge, using the centrally-located town of Beckley, WV as my base of operations. Typically this is a good time to photograph fall color in this mountainous region but this year had been drier and warmer than most. Leaves were just beginning to turn autumn colors and there was more brown than gold. But no mater what the conditions, you can always find great photo opportunities locally. New River Gorge National River, a part of the National Park System, protects 53 miles of the New River and covers 70,000 acres of the surrounding area.
The following is a summary of locations with photographic potential based on my observations during scouting trips to the area and this year’s and past photo workshops.
New River Gorge Rim Trail & Bridge
The New River Gorge Bridge is the longest steel span bridge in the western hemisphere and is the third highest in the U.S. The nearby Canyon Rim Visitor Center provides an overview of the area and nearby trails provide views of the bridge. Just north of the visitor center, off of route 19, is Lansing-Edmond Road, a narrow winding road that leads to trails accessing the canyon rim. From the Fern Creek Trailhead Parking lot, it is a relatively easy hike to the rim of the canyon where you can photograph the river, bridge, rafters, and the walls of the canyon. Diamond Point is one of the more popular overlooks, but there are numerous others that can be explored as well.
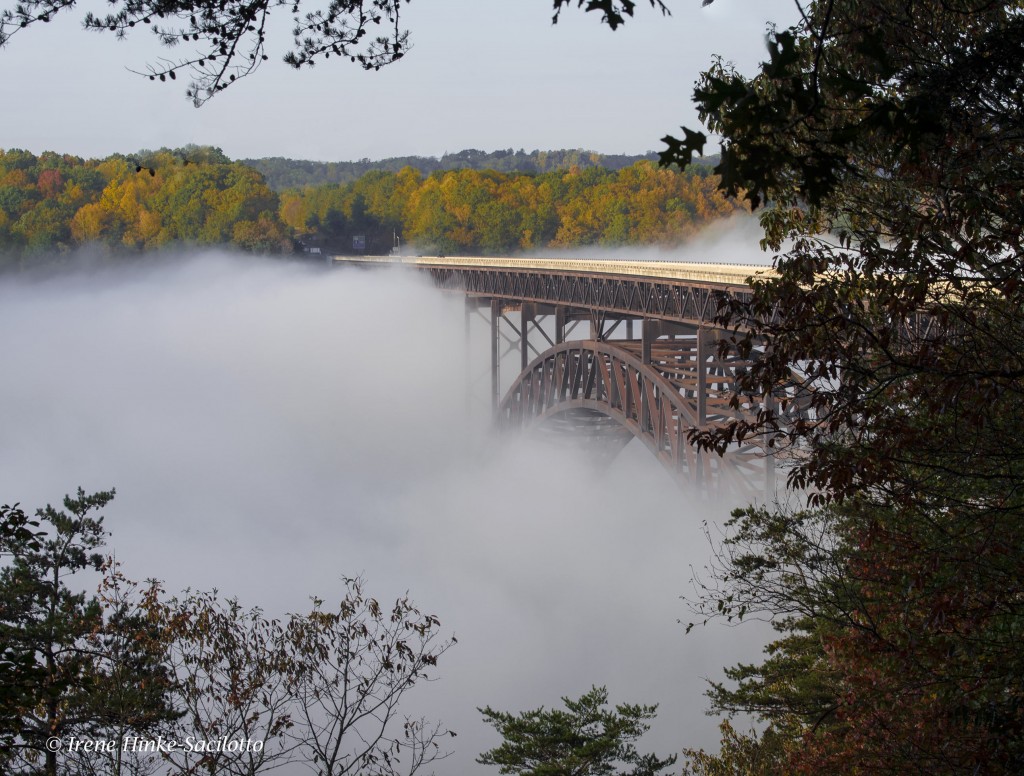
New River Gorge Bridge emerging from fog.

Cell phone shot of a mushroom along the trail to the canyon rim.
Babcock State Park and Glade Creek Grist Mill
The park is approximately an hour drive from Beckley, WV on back roads. I typically time my travel to arrive shortly after sunrise. This year mill’s water wheel was not turning due to damage caused by a severe flood in June. It is more likely to be operating in the spring when there is more water flowing in the adjacent creek. As with most of the locations visited this fall, the color of the surrounding trees was not intense, However the mill with the falls below still presents a number of interesting photo opportunities from both sides of the creek. Soft light is best at this location since on a sunny day as the sun moves higher in the sky, the contrast between the trees surrounding the mill and waterfalls intensifies. During this visit, I looked for subjects other than the mill to photograph, such as softly lit sections of the creek and colorful reflections in the water.

Glade Creek Grist Mill.

Glade Creek Grist Mill. Photo taken a number of years ago with better fall color.

Reflections in puddles from surrounding trees. Falls at Glade Creek Grist Mill, Babcock State Park.
Sandstone Falls
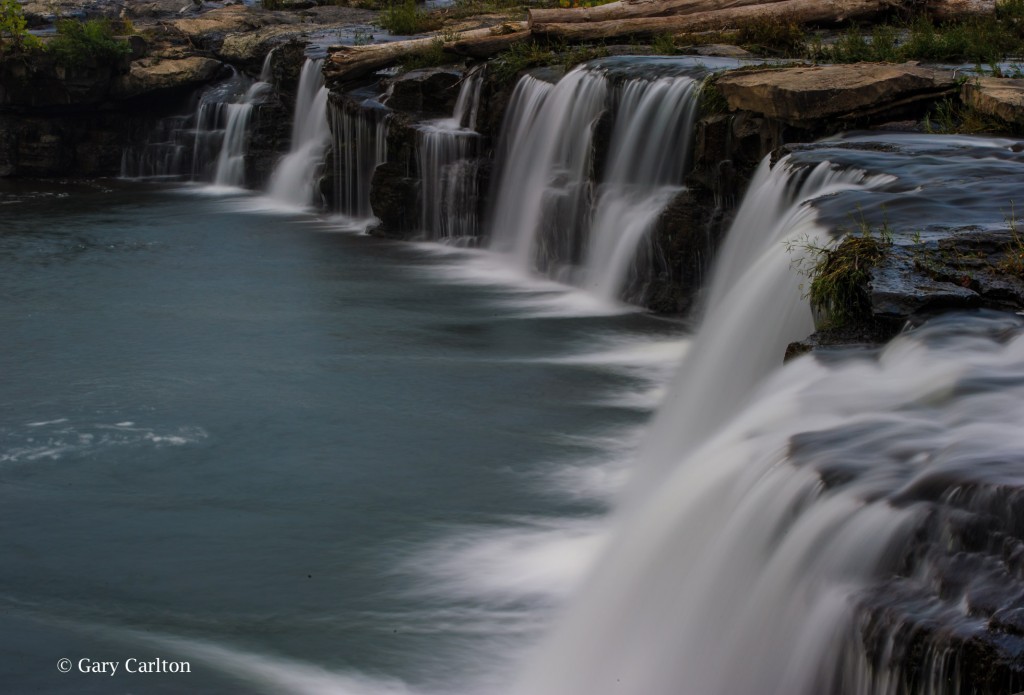
Sandstone falls is the largest waterfall on the New River. Located at a wide point in the river where it is divided by a series of islands, the river drops 10 to 25 feet. A boardwalk with overlooks span the waterways and offer a number of views of cascades and main falls. The first overlook is my favorite, where there is a series of small falls fanning out in a horseshoe shape. There are places to photograph both from the boardwalk and river bank. Access to the higher upper falls is not always possible dependent on the water level.
To reach this section of the National Park, go to the small historic town of Hinton where you cross the New River and travel parallel to its path until you reach the park. (Approximately a one-hour drive from Beckley.) A neutral density filter will enable you to slow shutter speeds for an artistic presentation of the water’s flow. These filters are neutral gray and reduce the amount of light entering the lens. Some are variable in strength and therefore are more versatile. Remove your UV filter before mounting these or a polarizer on your lens Besides extra layers of glass that can soften your image and contribute to flare, when using a wide-angle lens, vignetting of the image can occur (darkening in the corners of the frame). Each time I have visited the park, photographic opportunities differ. As I was leaving the area this time and heading back to Hinton, I noticed the backlit spray of water from the main falls and foreground trees and took the photo below.

Intrigued by the backlit spray from sandstone falls and the foreground trees, I could not resist taking this photo.
The above photo was taken by one of my 2016 workshop participants, Gary Carlton. He used a variable neutral density filter to for the first time to blur the movement of the water. Pleased with the results, he submitted this image during the critique portion of the program.

New River downstream from the main falls photographed with a slow shutter speed.

Foggy morning at Sandstone Falls.
Hawks Nest State Park
Hawks Nest State Park offers views of the New River from the side of the river opposite from the Canyon Rim visitor’s center. From Hawks Nest Lodge and overlooks from further down Route 60, there are interesting views of the river and surrounding mountains from a high vantage point. Also there is an aerial tramway to transport you from the lodge to the river below. When you reach the bottom jump off point, you can cross a small bridge and following an easy trail upstream to Turkey Creek Falls. Along the way you can capture photos of the trees gracefully overhanging the river, mushrooms, and wildflowers. Just before the Hawks Nest Dam, you reach a small bridge crossing the creek at the base of the falls. From the bridge and rocks below the falls, you have a good vantage point for photos. The best images of the falls have been taken in the spring when the flow of water is greater. During my visit this October, the flow was minimal.

Shot with the cell phone below Hawks Nest on the trail to Turkey Creek Falls. I used it to show workshop participants photo possibilities along the path to the falls.
Cathedral Falls
If you continue driving down Route 60 from Hawks Nest State Park, just before the town of Gauley Bridge, you will see Cathedral Falls on the right side of the road. Best photographed with late afternoon light. When the sun is high in the sky, there is too much contrast from the upper part of the falls to the base for a good exposure. I recommend using a telephoto lens to isolate portions of the falls, a 80 – 400 mm or 70 – 200 mm zoom lens. On the day of this year’s photo workshop, I spotted a rainbow reflecting in a portion of the falls. It would appear and disappear depending on where one was standing and only lasted for a brief period of time. Several workshop participants got great shots of the phenomena. During my scouting trip, the sky was slightly overcast and the rainbow was not present. But I still was able to capture the etherial beauty of the falls by isolating a section and using a slow shutter speed. Note: Typically I do not photograph with workshop participants during a weekend program, preferring to direct all my attention to helping them achieve the best results possible.

Cathedral Falls in soft light. The most beautiful portion of the falls captured with a telephoto lens.
Kanawha Falls
A short distance down Route 60 from Cathedral Falls is the small town of Gauley Bridge which provides access to the river for photos of reflections in the flowing water and of geese along its bank. Just southeast of Gualey Bridge is Glen Ferris where Gualey River and New River converge. Here you will find Kanawha Falls adjacent to a hydroelectric station. From a trail used by fishermen parallel to the main road, you can isolate a portion of the falls with a telephoto lens and exclude any evidence of the power plant. As an alternative, you can photograph the aging brick power station for a graphic image.

Kanawha Falls photographed with telephoto to isolate falls from its surroundings
Town of Thurmond
The historic town of Thurmond was once an active railroad town like many located along the New River. It can be reached off of Rt 19 at Glen Jean Exit north of Beckley. A narrow winding road leads to the town following a stream that cascades down the mountain. On the way down, there is a pull-off that provides relatively easy access to photograph one of the larger cascades.
At the base of the mountain, you reach the historic town of Thurmond by crossing an old narrow railroad bridge that spans the river. Ahead you will see a parking lot and railway station renovated by the National Park Service and serving as a Visitors Center. What makes this location special is that railroad tracks run through the center of town. Today only a few buildings remain from the past. However with a wide-angle lens, the train tracks create great lines leading into the frame. If you are there at the right time, you may be able to photograph a train as it approaches. Watch the signals above the tracks for an indication that one is on its way.

Railroad tracks at Thurmond.

Cascade on way to Thurmond.
Grandview, part of the New River Gorge National River, NP
Grandview lies within the National Park and provides views of the horse-snapped section of the river from 1400 feet above. In the early morning interesting shots can be obtained as the fog slowly lifts from the canyon floor revealing the river below. A trail follows the rim with a few small overlooks which are partially blocked by vegetation. Another overlook farther along the canyon wall is Turkey Spur. Steps lead to viewing platforms, but this year the upper level was closed due to fire damage. In May and June, I understand the area is quite beautiful with blooming rhododendron along the trails. This year there was little fall color but I did take an abstract photo of the forest by zooming my lens during a slow exposure. As I exited the park, I grabbed this photo of a white-tail deer.

Deer photographed just outside of Grandview.

Fall color at Grandview captured by zooming my 70-200 mm lens with my camera set on a slow shutter speed.
Fayetteville Station Road
The 100 year-old Fayetteville Station Road once regularly traveled before the modern New River Gorge Bridge was built in 1977. Access to the road is off of Rt 19 by turning right on Lansing-Edmond Road, near the Canyon Rim Visitors Center. Once on this narrow road, turn right at the sign “Fayette Station Road” and immediately take the left fork. This road is a very narrow with hairpin curves and sections that are only open to one-way traffic. It passes under the current bridge twice, offering unique views of the steel structure. Also it provides access to the banks of the New River, several small waterfalls, and Kaymoor trail which passes a historic coalmine site. The road is worth the drive but is closed to traffic during Bridge Day weekend when the New River Bridge is closed to vehicles an open to pedestrian traffic and BASE jumpers.

New River Gorge Bridge’s steel structure photographed underneath on Fayetteville Station Road.

By selecting sections of the bridge’s iron work, you can create interesting abstract photos.
Nuttallburg Town
Nuttallburg was one of a number of bustling coal mining towns along the New River. The abandon townsite for years was concealed under the cover of trees and vines. It was recently restored by the park service and can be reached from Lansing-Edmond Rd by turning right in the community of Winona onto Keeneys Creek Road. This very narrow road descends into the gorge to a parking area. From here, trails lead to the foundations of buildings and remains of coke ovens that converted the coal into fuel. The most interesting aspect of the site is the coal tipple and conveyor that transported the coal from the mine up the mountainside down to the processing area and railroad below. On a bright sunny day, the scene is difficult to photograph without using HDR technology. The contrasty photo below was taken this fall at mid-day while scouting locations to determine which to include in my upcoming workshop.

Coal conveyor at Nuttallburg Town. The amount of contrast in the scene was high resulting in distracting deep shadows and burnt-out highlights.. It would be best to photograph this scene when the light is softer.

Side of the old tipple in Nuttallburg Town I was attracted to the colors, shapes, textures, and lines displayed by the wall and took this photo of the abstract design. The side of the building was shaded, perfect for this photo.